I’ve rocked Samsung Galaxy phones since they made their appearance in the marketplace, and I’ve always protected them with those awesome Otterbox Defender cases. I tend to keep phones a long time and this one’s no exception. My S-8’s over 4 years old, my first with a “non-removeable” battery. I figured the battery would be its weakness but still charges easily and coolly and runs through my longest days with plenty of charge left over so never gave it much thought.
This particular model of Defender case has a weak point. The plastic catch that attaches the case to its holster tends to break. There are two of those attachment points so when one breaks, I tend to call it in for warranty. I use the unbroken side until they send me a new unit, usually just a few days.
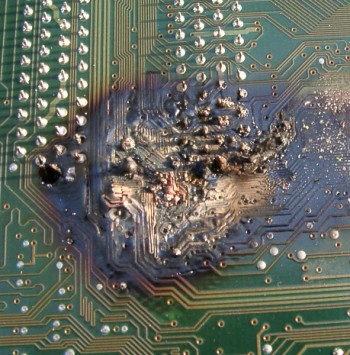
The stage set, the pictures show what I found as I un-cased to collect the Defender’s serial number.
The S8 battery had swollen enough that it forced the back of the phone right off! You can see it’s even broken the retainers that hold the Defender’s inner clamshell together.
In case you didn’t know, damaged Li-Ion batteries can be dangerous! They’re inherently unstable to the point that it takes active circuitry – built into the pack – that manages them. Thermal runaways happen. A cute way of saying that they can catch fire or even explode.
I wasted no time in replacing the handset.
What’s next? Part of me just wants it outa here. It’s got no cash value, too old. Throw it into recycling? But it’s a good computer! I may try replacing the battery myself. They’re available. It’s already 90% open – the hardest part, according to the Internet. If that goes well it’ll become a dedicated screen for the drone controller.
While I ponder it’s in a thick-walled ceramic box outside the house, nothing nearby but concrete.
On most bikes you simply lift from under the parallel frame members and get to work. But in this case three of four contact points are at one height and one is a fair bit lower.
Service Lift Adapter. Click for larger image.
Sure, you can cut up some 2×4 blocks to fit. But when I bought the bike I took the easy way out and bought the gen-you-wine H-D Service Lift Adapter. WTF, it was only $25 or so and offered some distinct advantages over crude wood blocks. See image.
So where am I going? Oh, yeah, the night before Biketoberfest I needed to change out a rear tire. When I finished I dropped the bike to the floor, kicked the tools aside, and went inside to eat. This tire change was unscheduled work and we were hungry. The burgers off the grill tasted oh, so good.
The next morning we were off and a fine weekend was had by all.
Some days later I was cleaning up the tools and discovered that two of the four Lift Adapter parts were missing. I scoured the shop – nope, they were gone. I was about to give up when Pam suggested checking the bike. “Uh huh, yeah, right,” I thought, “it’s been hundreds and hundreds of miles, if I’d left ’em in place they’d have fallen off, long gone fer sure.” But I looked anyway and waddya know, there they were!
So, it’s product endorsement time. Service Lift Adapter # 98965-99 is easy to place, exactly the right size for the job, and grips the frame members well enough that they’re hard to lose. Not that I’d recommend ridin’ with ’em in place. But if you do, perhaps after the stress of some unscheduled work, they probably won’t fall off at the wrong moment, maybe hurting you in the process. Two thumbs up.
[Tip o’ the ol’ lid to Marjorie over at Thunder Press for catchin’ my transposition of a couple o’ digits in the part number!]
For the longest time I simply wheeled the bikes into the garage and dropped the side-stands on plywood squares. Easy and cheap, but it wastes space and… well, we’ll just leave out the story of the rainy day and too much front brake as the tire rolled over the plywood. Gravity’s a harsh mistress.
Enter chocks. Chocks  aren’t only for your trailer, they can go a long way toward neatening up your garage and making bike parking a breeze.
I’ve got 4 of these (Harbor Freight #61670) bolted to the garage floor.
There’s not a lot that can go wrong. The first thing that I usually recommend for stuff from Harbor Freight is replacing the hardware (fasteners like bolts, nuts, etc.) with a better grade. But that doesn’t seem necessary in this case. The hardware isn’t great but it seems adequate for the forces involved. Just don’t over-torque the support arm bolts on assembly.
The support parts attach to the frame with through-shafts secured by spring retainers. The pivoting cradle (left side of image) locates front or back in the frame to accommodate wheel diameter differences.
Manufacturing tolerances for the support parts within the frame are another matter – they’re awful. Without modification they’ll can shift laterally which could cause a bike to drop, probably ruining a wheel. You must eliminate this lateral movement and align the pivoting cradle behind the front support to solve the problem. I used the lathe to fashion custom spacers from spare stock but a stack of washers would do just fine. Measure each of the four locations to suit your specific unit – the measurements will vary greatly. My four chocks ranged from about a quarter-inch to over an inch!
I turned some custom spacers to make up for poor manufacturing tolerances. A stack of washers would do the trick, too.
The chock is designed to accommodate fairly thick tires. It’s a perfect fit for a Dunlop D402F MT90B16 72H. But a narrower tire like a Dunlop MH90-21 54H isn’t thick enough to give solid support. For my bikes with narrower front tires I built up the tire contact areas with two pieces of quarter-inch plate, using machine screws (countersunk to avoid tire contact) to fasten them to the front support. I used Everbilt flat head Phillips #10-24 x 3/4″ screws. I drew a template for when I need to make more in the future.
Build-up to accommodate narrower tires/wheels.
After double-checking for proper placement, bolt the unit to the floor with concrete anchors – the Red Head 3/8″ x 1-7/8″ sleeve anchors (part # 50114) worked great for me.
The additional fasteners I used.
One last thing. If you plan to strap your bikes down for extended periods then I strongly suggest another anchor at each end of the arm with the eye-bolts. Those arms are thin-walled rectangular tubing that don’t take much strap tension to deform. In fact, I’d use flush anchors beneath the unit and run the eye-bolts right through the tubing into the anchors. That way the straps would anchor directly to concrete for greatest support.
Watch the coupons and sales. You can often get these chocks item for well under the regular price.
Safe, convenient motorcycle parking. Bonus – this arrangement provides easy access to battery tender cables and can even help with maintenance chores!
Addendum
In the time between this post being written and the post date I sold the two motorcycles furthest from the viewer in the illustration above. In their place is a trike – no chock needed. I uninstalled the year-old chocks and posted them to Craigslist where they sold within a couple of days for a price near to their original (discounted) cost.
This is a story about Hydra. Hydra’s a box, a computer, that up and died the death that old machines sometimes do.
Hydra, dead, stripped of all innards save the CPU and motherboard, awaiting transport to the parts shelf. Click for full-size image in a new tab.
I’m not 100% certain why Hydra’s dead, but pulling everything except the CPU still won’t elicit so much as a measly POST beep from the aged motherboard. I meter-tested the power supply. (I had another box on the bench for a PSU replacement, so I briefly stuffed the new PSU into Hydra just to make sure.) There’s nothing left to die except the mobo or CPU!
“So what,” I hear you thinkin’, “who TF cares about yer old box?”
Well, I do.
See, Hydra’s served the house in various capacities for a long, long time before retiring to the un-insulated sun room by the pool deck – most definitely an unfriendly environment for computers. The moisture, for one: Florida’s humid. The there are the temperature swings; in winter it can drop to near freezing and closed up in the summer it might reach 115F – or more. Environmental extremes have been the story of Hydra’s life. Finally, Hydra’s kinda remarkable in that it’s one of the oldest processors that Windows 10 will run on: the AMD Athlon 64 3200+.
So yeah, it’s worth taking a few minutes to write about little Hydra’s uncomfortable life.
Dex (left) & Reptar, circa 2002, about four years before Hydra.
For that we have to go back to Monday, October 16, 2006. That’s the day I walked into a local Comp-USA (remember that name?) with the idea of upgrading the house servers. At that time there were two. A more-than-10-year-old Pentium Pro box named Dex running Win2K Server, and a slightly newer Pentium II box named Reptar doing file server duty. Dex and Reptar were simply running out of gas.
I wanted a 64-bit CPU, a couple of GB of RAM with room for some future expansion. Remember, memory was considerably more expensive than it is today. I wanted the ability to use my existing IDE drives plus some SATA ports for later. I wanted a PCI bus. Overall, just something a bit more modern, something that would run VMware so I could segment the family’s workload.
Plus assorted support stuff like a cheap case, power supply, optical drive, and so on. Came to about six hundred bucks. Sure, I could have done better online but WTF, that’s what retail’s all about; getting it now. I assembled and IPLed the box that very afternoon and Hydra took up residence in the dusty, dark basement. Right next to the furnace. So Hydra’s twenty-four seven life began.
Hydra survived much abuse. The second phase of the basement refinishing project comes to mind. The drywall work deposited a coating of dust on Hydra’s innards that called for a weekly blowout to keep it from burning up. The un-insulated NJ basement was a harsh home.
Over the years came more memory, a couple of hardware RAID cards, more drives, and still more drives. That little case became dense and heavy. And ugly, as I cut more holes for fans. Yeah, it got loud, too, but in the basement it didn’t matter.
Win2K Server gave way to a bare-metal hypervisor for a while. Fast like shit through a goose, but tricky to administer. Bare-metal gave way to Linux. Hardware RAID gave way to software. The years passed.
In December 2012 we moved to Florida. We unceremoniously tossed Hydra into a U-Haul trailer with the rest of the stuff we didn’t trust the movers to handle and pulled to its new home.
Environmentally the new network closet was an absolute step up. But Hydra screamed like a jet on full afterburner with all those drives and fans. In the old basement it didn’t matter but the closet’s just off the office, quite distracting…
By the end of the first quarter of 2013 Hydra entered a much-needed semi-retirement. The replacement, named dbox, was a quad-core box from the parts shelf, with way more memory and fewer, but higher capacity drives. By then all the server roles were running as virtual machine guests. The migration was super-fast and super-easy.
In the garage, Hydra rested on the parts shelf before being called upon to support a Facebook project Pam had launched. I don’t really remember exactly when that began. Hydra was much quieter, stripped to a single drive running Windows 7. We shoved the headless case under the healing bench near the door and Pam ran her project from her Windows desktop, logged in using the Remote Desktop Connection tool. It wasn’t the highest performance configuration in the world but it got the job done.
Without the benefit of a proper UPS poor Hydra suffered a new peril: power glitches. We got used to looking for the power light under the workbench as we passed. If it was dark anyone could thumb the power button and go about their business.
That arrangement lasted about a year. Pam’s project wound down and Hydra went back into retirement.
Meanwhile, in the real world Windows 10 was getting legs. I’d come to like the Tune In Radio app. One can only take so much country and classic rock from the local stations and I’d had my fill. I wondered… could a Windows 10 box and Tune In Radio bring superior tunes to the pool deck? Was there any spare hardware around that could run Win10? Microsoft took great pains to exclude older hardware, even while offering free upgrades. Would Win10 run on Hydra’s CPU, now approaching twelve years since its introduction?
It turns out the answer was yes! Well, there were issues to overcome along the way, but yes.
A Win10 license costs more than the budget for this venture, which was exactly zero. Microsoft was still offering free upgrades from Win7 so the plan was to follow that path. Hydra had a Win7 Pro 64-bit OS from Pam’s project so we got that upgrade started. The several-gigabyte download took forever over the crappy ADSL connection. Then the upgrade failed.
That’s how I learned that Hydra’s Athlon 64 CPU doesn’t support the CMPXCHG16B instruction. This instruction, commonly called CompareExchange128, performs an atomic compare-and-exchange between 16-byte values. And 64-bit Win10 (and 64-bit Windows 8.1) requires this instruction.
CMPXCHG16B isn’t required by a 32-bit Win10. The path became clear. Install a 32-bit Windows 7. This meant giving up any installed memory over the 3.5 GB mark. Fine. Get Windows 7 activated. Install all the service packs and patches. Finally, upgrade it to Win10. Remember that crappy little error-prone ADSL connection? That, along with the lengthy downloads and general slowness of the ancient hardware… there went a couple of days. Thankfully it didn’t need much attention.
But it worked!
And that’s where Hydra lived out its days. Providing great radio out on the pool deck. Enduring temperatures from near-freezing to well over a hundred degrees.
The evening of May 15, 2017, I attempted to kick Hydra to life to collect the latest Win10 updates. I thumbed the power button, and heard it starting up as I walked away. Later I noticed it had gone down. Hydra never booted again.
A few interesting observations…
Hydra began and ended life on a Monday. (Watch out for Mondays.)
Hydra ran ten years and seven months. 10-7. If you remember the old 10-codes the cops and CBers used to use, 10-7 means “out of service”.
Hydra ran 24/7 for most of its life. If we assume about 9 years of total running life, that works out to about three-quarters of a cent per hour against its original installed cost. Absolutely worth every nickel.
Hydra died on its side, on the floor, in an overheated room, alone, behind the bar. A noble death.
And that’s where today’s story ends.
Maybe you’ve got an old AMD Athlon 64 3200+ floating around in your parts bin? Maybe you’d like to give it a new home? If it resurrects Hydra then it’s mine and I’ll give you a nice, fat mention in this story AND a link in the sidebar. If not, I’ll send the chip back to you with my thanks for a noble effort.
But wait! What about the tunes out on the deck? It just might be resolved. Well, at least some preliminary testing seems to show that it can be resolved with a little bit of creativity.
So that part of the story needs to wait. But I can promise you that if this scheme works it’ll be even weirder.
Pam and I had gone to the local pizza place for some takeout. In typical “I’ll buy, you fly” mode, Pam drove the F-150 with me in the passenger seat. She parked head-on by the front door and waited while I ran in for the goods.
It was just past closing time. Staffers killed the lights and ran out the door behind me.
Pam selected reverse and backed out, then pulled the lever for drive, hit the gas – AND THE TRUCK SURGED BACKWARD!
There wasn’t much room in the lot so she maneuvered to the curb, occupying about three marked spaces, and killed the engine.
It’s dark, beginning to rain, maybe three or so miles from home, hot food in the back seat, and we’re hungry. I called the kid for a lift home. We’d eat and think, then come back. Maybe the rain would pass.
The console lever felt sloppy, disconnected, I suspected a mechanical issue like a linkage or cable had worked its way loose. The console lever has a history. I removed the plastic shroud and felt around as best I could in the darkened cab; nothing felt out-of-place and my earlier hack/repair felt intact.
The kid soon arrived. We locked up and left to eat.
Sure enough, a bit of Internet searching turned up lots of similar failures! The most common issue came down to the cable-end detaching from the transmission lever. We returned to the truck armed with a good flashlight and I crawled under for a look. Before you ask, yes, the rainwater had pooled underneath…
Now it was clear that the cable-end was no longer attached. By manipulating the console and transmission levers it was possible to reattach, but when the console lever moved the cable end fell right off. The press-fit retention was no longer retaining!
I figured we could get the truck home, though. That’d free up parking for the restaurant and make for more comfortable work. The safety interlock only allow the truck to start in park and I could manipulate the levers to do that from beneath. With the truck started I could move the transmission lever into drive while Pam applied the brake. Then I’d crawl out she could drive home.
Pam was less than thrilled with the idea. But she did it. She probably pressed that brake pedal almost through the floorboard while I was under the truck fiddling with the transmission lever, engine running!
Cable end at top, transmission lever at bottom. The white plastic bit captures that knob.
The Root Cause The cable end is a roundish half-bowl of plastic molded onto the semi-flexible metal rod that extends from its sleeve. In the picture you can see a white plastic insert fitting in the black bowl. The transmission lever has a protruding machined knob that’s captured by that bit of white plastic.
Failure occurs when the white plastic insert no longer captures the knob.
The cable assembly is not adjustable. The length is exactly what it is. That’s important because…
When the console lever’s placed in park – that’s how the truck spends much of its time since being manufactured – there’s much linear force being applied against the transmission lever. By that I mean if you select park and slip the cable end free of the transmission lever (easy to do, now that the part’s failed), the cable end springs out extend a good 3/8″ past the transmission lever. You cannot put it back in place without manipulating the console lever positions, the end-to-knob alignment is that far off. So of course that 29-cent bit of plastic will fail eventually! It’s designed to fail!
The Repair The cable assembly – part number 4L3Z-7E395-CA for my 2004 unit – is available on Amazon for about $48. I don’t have a shop manual – that’s another story for another time – but it looks like it could be replaced in a couple of hours. Beer optional.
Obviously, a dealership could handle the repair. I heard that runs around $300-$350, including parts.
Ascension Engineering’s current location, under construction when Google Earth grabbed this shot.
But let me introduce you to Ascension Engineering. They produce a line of replacements for those little white pieces of plastic – apparently it’s a common failure mode across a wide variety vehicles, not merely Fords. The parts sell through their website, BushingFix.com. And business is apparently pretty damned good – Ascension Engineering’s principal relocated to some considerably nicer digs between May 2015 and March of 2016…
Shipping origin. Click for detail.
Y’know, $25 is a lot of money for a bitty bit of plastic. (Update: I learned, when sending a link to this article to the manufacturer for review, that the price is now reduced. My luck, right?) Okay, there’s design, tooling costs, manufacturing, but any number of Chinese outfits will do all that. Probably including the engineering design, too. It seems likely that they already manufacture those little bushings for the auto manufacturers. That Mr. Smith, he’s one smart cookie!
Screw it. I ordered a kit. There was sales tax, we’re both in Florida. And shipping was, I thought, a little high at just under $6 for USPS. The total cost was $32.29. I showed up at my door in a few days, shipped from Charlotte, North Carolina.
The cage-hack. See text for features. Click to enlarge for detail.
But First, An Interim Hack A couple of weeks before the order and permanent repair, a simple hack was necessary to keep the truck on the road. A truck’s a useful tool here in rural Florida. There’s trash and recycling to haul, stuff like that.
I hacked up a little cage from (what else?) coat-hang wire – easy to work with, yet stiff enough to enclose the cable end.
It’s got some nifty features. First, it’s a cage. It’s solidly attached to the transmission’s shift lever and doesn’t contact the cable or its end except where it absolutely must, to prevent the thing from slipping off the knob. That contact is minimized by a custom thrust plate constructed of softer plastic. (Don’t be fooled, the thrust plate is from a plastic storage bin. We use the bins as high-walled litter boxes for our feline residents, and this is the material cut out to form a door.) Notice the bend in the thrust plate, and the cutouts so the cage retains it.
The hack would likely outlast the truck. But a replacement part was on the way.
The Replacement Bushing It arrived in about a week. Here’s what $32.29 bought me:
The package, as received, followed by the individual parts and instructions. It’s actually well-thought out and about as foolproof as it gets. Click for a larger image.
Three bits of plastic: the bushing itself plus two more that served as press-blocks. Click to enlarge the image and see the instructions. Leaning way towards foolproof, I’ve gotta say. It took me longer to remove my hack than it did to install the replacement.
Debris in my cable-end cup. The rear of the truck is the right side of the image. The cable presses rearward when the transmission is in park. Click to enlarge.
Part of the install involves digging out any old bushing parts from the cable end cup. I used a carbide-tipped scribe and it cleaned up in a few seconds. Here’s a shot of what was left in my cup before that step. Pretty disgusting. But what’s clear as an unmuddy lake is how the linear force of sitting in Park had basically ruined one side while the other remained basically unworn. Ford’s non-adjustable setup is designed to fail. It’s only a matter of time.
Bushing installed. Click to enlarge.
I assembled the sandwich of plastic bits and used a pair of Channellock pliers to give it a squeeze. I chose the Channellocks because of the adjustable jaws but I think a pair of ordinary pliers like those found in the average person’s tool bag would have done the job just as well. You’d need pliers, though, it’s a bit much for fingers alone.
Repair complete. Click to enlarge.
The rejuvenated cable end mated to the transmission lever with a satisfying click. Then I exercised the console lever. It felt great.
Notice in the completed repair image that there’s a slight gap between the cable-end cup and the transmission shift lever. This tells me that the replacement bushing is the proper size for the job. If the knob sat too deep then the two parts would rub, wearing the cable-end cup.
So How’s It Holding Up? It’s been a few months since all this went down and so far, so good.
No issues, no complaints, the repair feels as tight as ever. How long will it last? Hard to say. Ford’s designed-to-fail assembly of the subsystem remains unchanged. What’s a worse environment? New Jersey winters or the Florida heat? Time will tell.
Back in 2013 I wrote about how my 2004 F-150 stranded me with an R203 relay failure. Since then I haven’t gotten any closer to a cause or solution. I’ve periodically replaced the relay as needed. But I’ve got a few more observations to add.
The DTC codes reported by the in-dash diagnostics (Engineering Mode) have meaningless meanings. D900 is just a general communication fault, not helpful, like “syntax error”. D950 is apparently an instrument cluster issue. Both make sense. No power to the PCM will tend to inhibit communications. No PCM data means the instrument cluster will be data-starved despite being powered up. Duh.
When running, the R203 relay runs HOT. You can hardly keep a finger on it.
It’s not necessary to replace the R203 relay as soon as it balks. In the beginning, simply removing and replacing it will often get it working again. After a while, stronger ‘persuasion’ is needed. I’ve gotten good at pulling the relay, giving it a couple of raps on the pillar, and jamming it home – even in the dark. Eventually the relay requires replacement.
The part of the relay that fails is the energizing circuit. A completely failed relay seems physically distorted by the heat over time. I haven’t been able to correlate this to long trips – we don’t use the truck that much – but it wouldn’t surprise me. A cross-country trip involving all-day use might be troublesome. Conclusion: there’s a high current draw on that circuit somewhere. I doubt it’s the relay itself, too many parts have been in there. Maybe the fuse panel itself?
Ambient heat worsens the problem. In winter (like Florida has a ‘winter’, right?) the failure doesn’t happen as often. Leaving the kickpanel off helps extend life. Â I’ve considered sandwiching the relay with Peltier devices, maybe something like this. Yeah, that’s fixing the symptom and not the cause, but WTF.
That’s about all I’ve got.
Maybe someone out there has the Ford shop manual pages for the fuse/relay panel? And/or the wiring diagram page(s) for the PCM power relay circuit? (2004 Ford F-150, SuperCrew, 5.4L V8, automatic transmission.)
Today I spent a goodly part of the day wrenchin’ the Dyna. An interval service was a bit overdue and I wanted t get it done before Biketoberfest. Bummer, I found a few issues…
There’s a bit of debris in the thick part of the tread on the rear tire. It’s about a millimeter thick by maybe 3 millimeters long. No leak, I doubt it goes all the way through, but I didn’t pull it out, either. When I get back I’ll order a new tire. I’m not happy because this tire, while not new, isn’t all that old either. But I don’t like to screw with tires, they’re too important. For the near term I’m going to gamble that it’ll survive the next week or so. I hope that’s not a mistake.
There’s been a nagging hot-start issue for a while now. No issue on cold starts at all, only hot. So I tore into the starter wiring which, for this bike, meant removing the battery and the caddy it lives in, along with associated hardware. I discovered the boot covering the battery positive on the starter had obviously been dislodged for a while. The terminal nut’s torque was a bit under spec, too, so I cleaned that all up and put it back together. Not sure if it cured the issue but it hasn’t been touched since 2008 so maybe…
While the battery caddy was out I had partial access to the back of the electrical caddy on the other side of the bike. I’ve wanted to get back there for a while. For nearly a year I’ve chased an intermittent demon that causes a fuse to blow. The fuse takes out the signals and brake lights. Not good.
Intermittent problems are hard, but careful observation has me believing it’s only triggered when actuating the left signal. It never occurs when I ride alone, only when Pam’s ridin’ bitch. The frequency has been on the rise.
So, poking around back there with a powerful flashlight I thought I saw the glint of copper through some worn insulation. Digging a little deeper confirmed it. The harness had rubbed the back of the starter housing, and apparently for some time.
It’s going to take some effort to effect a permanent repair. There’s very limited access there, and no less than three separate bundles enter the harness just upstream from that spot. It’s all got to come apart so I can open the harness. From there it might be as simple as wrapping the worn spots or as hard as replacing one or more individual wires.
I just don’t have the time now, I need the bike running for Biketoberfest. So I wrapped the offending spot with insulating tape as best I could.
The lesson here is not to put off service until a few days before an event. You never know what you’re going to find.
Tomorrow I’ll finish up, clean and put away the tools, Â and give the ‘ol Dyna a much-needed bath.
See you in Daytona!
[UPDATE – August 20th – Not a single fuse has blown in several hundreds of miles of two-up ridin’ so I think that’s one problem fully identified. The permanent fix will be a bit of a pain in the ass, but that’s okay. The hot-start issue remains. Daytona was  a blast.]
It’s been a long time – maybe too long – since I took inventory of the boxes we use regularly for various purposes around the house.
Except for the DOS box, and maybe the AutoCAD box, these are all in use with frequencies ranging from 24/7 to at least weekly. Omitted are the embedded things, iPods and so on. Making this list just now was a good exercise that surprised me. I mean, no wonder people look at me funny.
(no name) – MS DOS 6.22
Exists solely to run VisiCalc, the very first electronic spreadsheet that the world had ever seen. I fire it up now and again for folks to show ’em just what computing used to be. It has no name because, well, machines didn’t need names back then. You turned ’em on, used ’em, turned ’em off. Pulling the plug was every bit as good as thumbing the power switch.
change – Windows XP Professional Service Pack 3 – 32-bit This laptop runs software that I need to use in weird places, like out in the garage tuning motorcycles. It got its name because I bought it with pocket change. I told the story in another post.
coco – IOS, version 8 I suppose, too lazy to look
An iPad tablet. It’s good for reading magazines or looking something up quickly at the dinner table or controlling the TV. Bummer Safari sucks so bad.
darthvader - Windows 7 Professional Service Pack 2 – 32-bit
The media client that lives out by the pool, so we have cool tunes out there when we get tired of the radio.
dbox – GNU/Linux 3.13.0-36-generic x86_64
A VirtualBox host machine.
family – GNU/Linux 3.2.0-69-generic-pae i686
A secure, encrypted file server where the family’s data jewels are stored.
hydra -Â Windows 7 Professional Service Pack 1Â – 32-bit
Out in the garage, this runs a long-term project 24/7 – when it’s up. Presently it’s down, though, because a fan protecting its I/O hub is threatening failure and needs a little lube. I’ll get to it.
isolation – Windows 7 Professional Service Pack 1 – 32-bit
A sacrificial machine, stuff that needs testing and vetting in a Windows environment isolated from everything – EVERYTHING else – runs here first. Air-gap stuff. Easy to wipe and restore to a known good image.
jesus – Windows 7 Professional Service Pack 1Â – 64-bit
My son’s gaming rig and desktop. It’s slightly dated now, but as we built it and installed things, stuff completed faster than we thought possible. We’d look again, and yup, it was done, leading us to exclaim “Jesus!” The name stuck.  UPDATE - FEBRUARY 2013 jesus died, according to the BIOS status LEDS, of a processor initialization failure. jesus was replace by lucifer.
lucifer – Windows 7 Professional Service Pack 1Â – 64-bit
Essentially jesus with a new motherboard, CPU, and memory. My son’s gaming rig and desktop.
macnam – GNU/Linux 3.2.0-69-generic-pae i686
A MySQL database server. Firesign Theatre fans will recognize the name.
magic – GNU/Linux 3.13.0-36-generic i686
The family’s intranet server. Holds subscription material, a software library, and so on. A basic LAMP server where, sometimes, a bit of Web development gets its start before being deployed elsewhere.
merc -Â Windows 7 Professional Service Pack 1Â – 32-bit
An old, small HP netbook with a great keyboard. I’ll write with this out on the deck because the keyboard is so good and the battery life is measured in days.
minecraft  – GNU/Linux 2.6.38-16-generic-pae i686
Duh, it’s a minecraft server, what did you think it was?
overkill - Windows 7 Home Service Pack 1 – 64-bit
Used exclusively for secure communications with entities that require that sort of thing. Well-patched, no email, no browsing, no nothing except its one single purpose.
porky – Windows 8.1 Professional Update 1 – 64-bit
My primary desktop. It replaced whisky, the desktop I blew up with a ham-handed move with its internal power cables – while it was running. Oops.
rdnzl -Â Windows XP Professional Service Pack 3 – 32-bit
An old, old laptop, usually hardwired to the DSL modem because sometimes the modem needs a direct connection to recover when  it misbehaves. On the other hand, just the other week it came in handy to run some old proprietary software to collect audio files from a Sony dictation device. You just never know. Frank Zappa fans will recognize the name.
sheepdip - Windows 7 Professional Service Pack 1 – 32-bit Runs AutoCAD Architect, with which I heavily modified the design of a home. We presently live in the result of that effort. Named for a blended  Scotch whisky.
showtime – GNU/Linux 3.2.0-69-generic-pae i686
A media server. Music, video, and more.
success – GNU/Linux 3.2.0-69-generic-pae i686
A QuickBooks server supporting the business. Does double-duty as a file server for the business, too.
thor - Windows 8.1 Professional Update 1 – 64-bit
Pam’s desktop. Next in line for a refresh, the overclocked Intel quad-core’s getting a little long in the tooth.
twoface2Â -Â Windows 8.1 Professional Update 1 – 64-bit
A first generation Microsoft Surface Pro, this is the travel box. Good enough for me and/or Pam to do just about anything when we’re on the road.
udesk – GNU/Linux 3.2.0-63-generic-pae i686
Just a plain ol’ Linux desktop, when I’m home and a Windows desktop doesn’t quite cut it.
win7-32Â -Â Windows 7 Professional Service Pack 1Â – 32-bit
For running stuff that I don’t want cluttering up a work-a-day machine. These days, that’s photo gallery processing, mostly. Naming this one wasn’t one of my most creative moments.
winnie – Windows XP Professional Service Pack 3 – 32-bit
An unsupported holdout. Then again, there’s software that modern OSs won’t cope with, or have no modern analog, or I just don’t care to upgrade. That stuff runs here. One good example is when I need to pull something from an Outlook message store; I’ll be damned if I want Outlook near anything valuable.
And not just an ordinary death, either. I killed Whisky, and I killed it but good. Here’s the story…
Whisky’s – er, was – my desktop computer. One of the early Core-i7 systems back in 2009, it rocked rather nicely and handled anything and everything I threw at it. Okay, I hear ya: by today’s standards it was certainly getting a little long in the tooth, but I didn’t care. It still ran like the day I built it. Until March 27.
That morning I was running through the logs, see. We run lots of machines here and I like to keep tabs on ’em. And I found that one of the terrabyte drives, an old Seagate, half of a mirror of some rather important data, had failed. I knew the day would come eventually. Over a year ago the drive reallocated a couple of sectors, but the count was stable at 2 and never rose. I’d figured it’d start throwing more and I’d notice and replace it. And every time we’d be buying drives for this or that I’d shrugged it off. “Next time.” So there wasn’t a hot spare on the shelf.
So instead of getting on with my morning I set out to protect the data. I pulled a couple of other drives and a SATA card – spares for a Linux server – from the shelf and went to install ’em in Whisky’s cavernous case. The plan was to build a new mirror array and copy the data to it. But Windows was balky, seeing the card but not the drives attached to it. Hmm.
Not Whisky, just a representative image. But the damage is just as real.
The data cables were known-good but the modular power cable came from the parts box. So I grabbed another, plugged it into the power supply and the other end into yet another unmounted and unattached drive, figuring to see if it would spin up.
And that’s when the smoke came out.
I heard it and smelled it and nearly hit my head on the underside of the desk as all the internals went dark.
With eSATA you can do that, hotplug, the power connectors are such that you can apply and remove power without trouble. Not so with a regular raw SATA Molex. Clearly, I hadn’t paid enough attention.
At that point I wasn’t sure what had died.
But data data recovery was most important. I walked the good mirror half into the garage where there’s a project running on an old AMD box. Hey, any place where there’s some space, some power, and a network jack’s fair game, right? Windows 7 would be able to make sense of the mirror. Something more than an hour later the data was safe on our internal network, not a single byte of lossage.
I started troubleshooting hardware with the power supply. I found the 12V motherboard 8-pin connector voltage lacking. This is rural Florida and everything isn’t as available as in the northeast. I found a new one, retail, at a store about an hour and a half away. I used the trip wisely, stopping at other stores out in that area: Costco and Ikea.
Later that night I stripped Whisky to the motherboard and attached the new power supply.
I threw the switches. No response at all.
That smoke they put inside this stuff smells. Eau-de-silicon, we call it. It’s an expensive smell.
On the way to the local Johnny Rockets we hit some heavy rain. Some of the puddles on the right side of the road were rather deep and I found myself quite glad for the new tires we put on some months back. They cut right through but sent water flying everywhere. The truck didn’t miss a beat. We lucked out and parked right in front of the eatery, and went inside to consume heart attack inducing burgers washed down with some of the best milkshakes on Earth.
Satiated, we left the restaurant and climbed into the truck. I knew something was wrong the instant the key moved through the positions, the usual sounds and bongs were… well, they were different.
The mini message center displayed a cryptic message: Check Gauges in that odd font that LCDs use when making text from a limited set of segments. No starter crank at all. Instead, only an audible click coming from the fuse box under the passenger side kick-panel.
Hoping to avoid a call to Triple-A I dialed some friends to beg a ride (thanks Randy & Rose!), intending to leave the truck where it sat and troubleshoot in the morning. I felt pretty strongly that the problem was moisture-related – that was an awful lot of water! Maybe it would dry out overnight.
Around noon the following day I returned. The truck started as though nothing happened. I listened for a few minutes – nothing odd – turned it off and went home to get Pam to drive the thing home.
The round trip took about an hour. Pam jammed the key in and… yup, no crank! I got behind the wheel and gave the key a few disgusted twists. Wonder of wonder it fired and settled into a welcome idle. Pam drove it home without incident. But in the driveway it wouldn’t start again until the problem was found and solved.
When it comes to auto (and motorcycle) repairs there’s nothing in the world like the actual factory shop manuals. I have ’em for all our vehicles – except this truck. That’s because you can’t simply buy the shop manual for the F150. About the best you can do without springing for an expensive subscription to the online manual – like a dealer has – is to rent access to a section for a day. And that really sucks! So when things go wrong this truck either goes to the dealer or I use the Internet to learn from those before me.
The first likely candidate for failure seemed to be the Fuel Pump Driver Module (FPDM). This aluminum and plastic box, which regulates fuel pressure by modulating the voltage pulses sent to the fuel pump, is mounted directly to a steel crossmember under the bed, above the spare tire. The dissimilar metals tend to corrode the FPDM’s case, eventually allowing water to harm the circuitry inside. Water. I dropped the spare and unbolted the module, disconnected the single plug and brought it to the bench. The metal case was plenty corroded but intact. I didn’t open the plastic cover. Back onto the truck it went, with no change in symptoms. I never learned whether FPDM failure would cause a no-crank condition, or simply a no-start condition.
I entered the truck’s test mode and scrolled through the displays in mini message center. I found DTCs D900 and D950, but searching online for those codes brought no insight. It seemed like there was fuel pressure, consistent with an undamaged FPDM. There was lots of other stuff in the displays but much was undecipherable.
The Actron U-Scan model CP9599 is a dongle for your car’s diagnostic port which talks via Bluetooth to your smart phone.
I figured it was time to add a new tool to my collection: a reader to plug into the truck’s diagnostic port. I grabbed one of the bikes and took a ride down to the local parts store, the nearest was Advance Auto Parts. I intended to just get a simple reader but ended up going a little more spendy for a unit that promised to talk to my Android phone and deliver more comprehensive information. The device I bought is called U-Scan by Actron, model number CP9599.
I had problems with the CP9599. It didn’t seem to want to talk to my truck – but it had no trouble at all talking to my Jeep. This proved to be an important clue. Instead of just some random failure, now the trouble seemed like something was awry with the PCM. Maybe it had taken on some water? Maybe communications, maybe power, hmmm.
I pulled and inspected the condition of all the under-hood accessible plugs I could find, checking for changes after each. No change. In the passenger-side kickpanel box, I pulled and checked every fuse. No issues found. The fuse box also contains several relays of two different types. I began swapping positions of like-type relays to see whether the problem would move. After swapping the relays in positions R202 and R203 (the final pair to try – figures, right?) all the symptoms disappeared!
The truck cranked and started; the CP9599 connected and displayed DTC P1000 (which is normal after a PCM reset). I swapped the relays back to their original positions and the problem returned in all its glory. Relay R203 is documented as PCM power.
The original engineering part number for R203 was F57B-14B192-AA. It’s been superseded by Ford part number F5TZ-14N089-B, which costs about $15 from the dealer. I sprung for a pair of ’em, figuring a spare might be handy.
The truck is running normally now but there’s still a some work to do. I want to mount the FPDM on standoffs, which should halt the dissimilar metal corrosion. This ‘mounting on standoffs’ is part of the repair kit if you buy a replacement FPDM from Ford. Also, when in the fuse box, I found a significant amount of water in the passenger side rocker panel, which leads back from the area under the fuse box. I found the water accidentally. When pulling fuses from the back of the fuse box it seemed as though a dropped fuse could be troublesome to retrieve, so I reached down to see how hard that might be. There are no electrical connections in the rocker panel tunnel, only wire bundles, but I did find some evidence of moisture on a few fuse blades during my check. There’s water getting in there from somewhere! Online, some owners have mentioned trouble with gasket sealing on the brake/bed light housing, and I’ve had that off several times over the years. But I also have a sunroof. More investigation of the water’s source is needed.
Thor was dirty. No, Thor was filthy. Thor is Pam’s desktop computer, an Intel quad core box I built for her back in 2008. Next to her desk, it’s raised off the floor a few inches and we regularly clear off the surface dust and air filters but it had been a while – a couple of years, probably, since it’s been properly torn open and cleaned. Lately, signs of instability were growing more frequent. So the other day I opened the case.
Well, I guess it was to be expected. The innards were choked with dust. The squirrel-cage fan on the graphics card, one of those big honkin’ GeForce cards, hardly had room to spin! I looked inside the box, looked at the can of Dust Off in my hand, looked back inside, thought about how many cans I might have in the basement store… Nah, this would never do.
So I set up a work table outside the garage door and hauled out my shop compressor. 100 PSI? I thought about the possibility of blowing components right off the motherboard, the moisture that would accumulate in that air after a few cycles… I changed the blowgun tip to something a little more diffuse and got to work.
It took a while. But when I was finished Thor’s innards once again looked like new. I closed the box, cleaned up my tools, wrestled the box back upstairs. And it wouldn’t boot.
Nothing really seemed out-of-place, I was careful with the air streams, I hadn’t forgotten any cables. Still, no boot. Or, more precisely, the pulsating orbs of Windows 7 starting up would halt and the blips of drive activity would take on a regularity that indicates a hang. To add an interesting twist, it booted nicely to Safe Mode.
Because of the way Windows works, this was pointing toward an issue with video. The card was obviously initializing so I replaced the driver and exercised the various modes. All looked fine but the situation was unchanged.
Maybe the boot drive was going south from running in all that heat before the cleanup, and the shock of moving stuff around pushed it over the edge. Before I went to work I imaged the drive. I could virtualize the image, recover Pam’s settings and apply them to a new Windows 7 install. As part of Thor’s long-overdue maintenance I planned to change out the boot drive for one of those hybrid drives I like and the drive was in there anyway, empty and waiting. The install media booted fine and the installation began. Wouldn’t you know, though, when the installer got the point that it boots the newly installed kernel, before personalization, it hung again!
Puzzling. The hardware POSTs, Safe Mode boots, a normal boot hangs, as does a new Windows install. Log checks in Safe Mode, as well as other diagnostics run from bootable media all seem okay. Everything pointed to a video issue.
So I pulled the GeForce card out, grabbed a loupe and looked it over. Aha! There was corrosion on some of the contacts! Cleaned ’em up, that’s what I did, and coated ’em with Stabilant. What’s that? From the tech notes…
Stabilant 22 is an initially non-conductive amorphous-semiconductive block polymer that when used in thin films within contacts acts under the effect of the electrical field and switches to a conductive state. The electric field gradient at which this occurs is established is during its manufacture so that the material will remain non-conductive.
Thus, when applied to electromechanical contacts, Stabilant 22 provides the connection reliability of a soldered joint without bonding the contacting surfaces together!
It’s amazing stuff. It’s also seriously expensive. It’s by far the most expensive fluid in the house. Old whisky? Nah. Even printer ink is way cheaper. But it works. On the good side, a little goes a long way. I’ve still got more than half of the 15 mL I bought back in 2006.
The graphics card slipped into its connector with friction-free ease. And not only did Thor POST faster than I’d ever seen it POST, but it booted like nothing had ever been amiss.
When I built Whisky, my current work-a-day desktop, back in November 2009 I wanted to boot from one of those blazin’ solid-state drives. Bummer, though, either they were seriously expensive or performed poorly. Poorly, of course, was a relative term; for the most part even the poorest smoke conventional hard drives. Still, as the build expenses mounted the SSD finally fell off the spec list.
Sometime after the build, Seagate brought their hybrid drives to market. Hybrids combine a conventional spinning disk and conventional cache with a few gigabytes of SLC NAND memory configured as a small SSD. The system sees the drive as it would any other drive; an Adaptive Memory (Seagate proprietary) algorithm monitors data use and keeps frequently used stuff on the SSD. You’ll find people arguing over whether or not a hybrid drive provides any kind of performance boost. I wrote about my experiences with the Seagate Momentus XT (ST95005620AS) back in June 2010. Today when I build a multiple drive system I routinely spec a hybrid as a boot drive. It’s cheap and it helps.
So about a month ago I ran across a good deal on a fast SSD, a Corsair Force Series GT (CSSD-F240GBGT-BK)Â and I jumped on it. The specs are just tits: sequential reads and writes of 555 and 525 MB/s respectively. (Sure, that was with a SATA 3 interface and my motherboard only supports SATA 2; I wouldn’t see numbers like that, but still… It even looks great.
Integrating the thing into a working system was a bit of a challenge, mostly because I didn’t want to purchase additional software simply to clone the existing boot drive. I’ve got no trouble paying for software I use; it simply seemed like too much for something to be used but once. So part of the challenge was to find a cost-free alternative.
Strategy and Concerns
The general strategy would be to clone the current two-partition boot drive to the SSD, swap it in and enjoy the performance boost. The SSD partitions would need to be aligned, of course, and somewhere along the way the C partition would need to shrink to fit onto the smaller SSD.
The top concerns came down to security and reliability. Erasing a conventional hard drive is easy: repeatedly write random data to each block. You can’t do that with SSDs. Their blocks have a specific (and comparatively short) lifetime and so on-board wear-leveling routines become important. When data is overwritten, for example, the drive writes the data elsewhere and marks the old blocks for reuse. And unlike conventional drives, it’s not enough to simply write over a block marked for reuse; the entire block must first be erased. The bottom line is you can’t ever know with certainty whether or not a SSD is ever clear of confidential data. Disposing of them securely, then, means total destruction.
As for reliability, a conventional hard drive has to have some pretty serious problems before it becomes impossible to recover at least some data. There’s generally a bit of warning – they get noisy, start throwing errors, or something else that you notice – before they fail completely. Most often an SSD will simply fail. From working to not, just like that. And when that happens there’s not much to be done. This makes the issue of backups a little more thorny. If it contained confidential data at the time of failure you’ve got a hard choice to make: eat the cost and destroy the device, or RMA it back to the manufacturer (losing control of your data).
Considering backups, you can see that monolithic backups aren’t the best solution because they’re outdated as soon as they’re written. Instead, a continuous backup application, one that notices and writes changed files, with versioning, seems prudent.
In my case, this is to be a Windows 7 boot drive and and all confidential user data is already on other storage. The Force Series GT drive has a 2,000,000 hour MTBF, fairly high.
Software
SSDs are fast but they’re relatively small. It’s almost certain that existing boot partitions will be too big to fit and mine is no exception. Windows 7 Disk Manager will allow you to resize partitions if the conditions on those partitions are exactly right. There are commercial programs that will do the job where Windows won’t but my favorite is MiniTool Partition Wizard. I didn’t really want to do that in this instance. The fundamental problem I had with pre-shrinking is that it would involve mucking with a nicely working system. Come trouble, I wanted to simply pop my original drive back in the system, boot and get back to work.
For cloning and shrinking partitions there are several free or almost free applications. I found that most of them have drawbacks of one sort or another. I’ve used Acronis before – Acronis supplies OEM versions of their True Image software to some drive manufacturers, it’s an excellent product. But their free product won’t resize a partition image, bummer. I used EaseUSÂ some years back, too, but a bad run-in once with their “rescue media” – in that case a bootable USB stick. My disks got hosed pretty bad from simply booting the thing and I… wasn’t pleased. Maybe they’ve gotten better, people say good things about ’em, but I wasn’t confident… Paragon seemed very highly rated but in testing I had too many validation failures with their images. Apparently the current version is worse than the back revs. Whatever, I was still uneasy. I ended up settling on Macrium Reflect from Paramount Software UK Ltd. For no rational reason the name of this product bothered me, sending it to the bottom of the test list. Macrium. The word makes me think of death by fire. I was reluctant to even install it. About the only negative think I’ve got to say about Macrium is that it takes a fair bit of effort to build the ‘rescue disk’ – bootable media to allow you to rebuild a failed boot volume from your backup image(s). The rescue media builder downloads and installs, from a Microsoft site, the Windows Automated Installation Kit. WAIK weighs in at more than 2 GB. The end result is a small ISO from which you can make bootable media of your choice. Except for that final burn – you’re on your own for that – the process is mostly automated; it just takes a while. Probably has to do with licensing or something.
Finally, I bought a copy of Genie Timeline Pro to provide the day-to-day realtime backup insurance, mentioned earlier, that I wanted.
Preparation for Migration
I started by installing both Gene Timeline Pro and Macrium Reflect and familiarized myself with each. I built the rescue media for each, booted from the media, and restored stuff to a spare drive in order to test. It’s an important step that many omit, but a backup that doesn’t work, for whatever reason, is worse than no backup at all.
I did some additional maintenance and configuration which would affect the C: partition. I disabled indexing and shrunk the page file to 2GB. The box has 8GB RAM and never pages. I suppose I could omit the page file entirely, but a warning is better than a BSOD for failure to page. I got rid of all the temp junk and performed the usual tune-up steps that Windows continues to need from time to time.
Satisfied, I imaged the System Reserved partition and the C: partition of my boot volume, verifying the images afterward. For each partition, which I backed up with separate operations, I used the Advanced Settings in Macrium Reflect to make an Intelligent Sector copy. This means that unused sectors aren’t copied, effectively shrinking the images. Then I installed the SSD via an eSATA port. Yes, this meant it would run even slower than SATA 2 but it saved a trip inside the box.
It was at this step that I noticed the only negative thing about this drive. The SATA cable is a bit of a loose fit. It doesn’t accept a retaining clip, if your cable is so equipped. Ensure there’s no tension on a cable that might dislodge it.
Creating Aligned Partitions
Partition alignment is important on SSDs both for performance and long life. Because of the way they work, most will read and write 4K pages. A very simplistic explanation is that when a partition is not aligned on a 4K boundary, most writes will require two pages rather than one which decreases performance dramatically and wears the memory faster. (There’s more to it than that, really, but you can seek that out on your own. The Web’s a great teacher. Being the curious sort I learned more than I needed to.) Â Windows 7, when IPLed, will notice the SSD and build correctly aligned partitions for you. Some commercial disk cloning software will handle it automatically, too. But migrating users are on their own. Incidentally, it’s theoretically possible to adjust partition alignment on the fly, but if you think about the logistics of how this might be done – shifting an entire partition this way or that by some number of 512 byte blocks to a 4K boundary – you’ll realize it’s more trouble than it’s worth. Better to simply get it right in the first place.
Fortunately it’s easy!
Using an elevated command prompt (or, in my case, a PowerShell), use DISKPART. In my case, my existing System Reserved partition was 71 MB and change, and the remainder of the SSD would become my C: partition.
diskpart

list disk

select disk <n>
(where <n>is the disk number of the SSD)
create partition primary size=72 align=1024

active
(the System Reserved partition needs to be Active)
create partition primary align=1024 (no size specification means use the remaining available space)
exit
You can also use DISKPART to check the alignment. I’ll use mine as an example.
diskpart

list disk

select disk <n>
(where <n>is the disk number of the SSD)
list partition

exit
My partition list looks like this.
Partition ### Type             Size    Offset

------------- ---------------- ------- -------

Partition 1   Primary           70 MB 1024 KB

Partition 2   Primary          223 GB   73 MB
To check the alignment, divide the figure in the Offset column, expressed in kilobytes, by 4. If it divides evenly then it’s aligned. For Partition 1, the System Reserved partition, 1024 / 4 = 256, so it’s good. Partition 2’s Offset is expressed in megabytes so we have to convert to kilobytes first by multiplying it by 1024. So, 73 * 1024 = 74752 and 74752 / 4 = 18688, so it’s good, too.
Whew!
It’s worth noting that what DISKPART didn’t show in the list is the tiny unused space – about 2MB in my case – between Partition 1 and Partition 2 which facilitated alignment.
Someone pointed out to me that partition alignment can be checked without DISKPART. Fire up msinfo32. Expand Components, then expand Storage, then select Disks. Find the drive in question and divide the Partition Starting Offset fields by 4096. If it divides evenly you’re all set!
Migration
I used Macrium Reflect to restore the partition images I created earlier. Rather than allowing the software to create the partitions (which would negate our alignment effort) I pointed it to each target partition in turn. When the restore was finished I shut the system down.
I pulled the SSD from the eSATA port and pulled the existing boot drive from the system. I mounted the SSD in place of the old boot drive. (Windows gets upset when it finds multiple boot drives at startup, so it’s a good idea to have just one.) I took extra care with the data cable.
I powered up and entered the system BIOS, walked through the settings applicable to a drive change, saved and booted. Â Things looked good.
Living With the SSD
Wow! Coldstarts are fast. (See below.) So fast that getting through the BIOS has become the perceived bottleneck. Applications start like lightning, especially the first time, before Windows caches them. Shutdowns are snappy, too. (See below.) There’s no shortage of anecdotes and benchmarks on the ‘net and I’m sure you’ve seen them. It’s all delightfully true.
But all wasn’t perfect. After a week or two some new patterns seemed to be emerging.
Every so often, unexpectedly, the system would become unresponsive with the drive use LED full-on solid, for some tens of seconds. Most of the time the system would return to normal operation but depending on what application was doing what at the time, the period of unresponsiveness could sometimes cause a crash. Sometimes the crash would be severe enough to bring on a BSOD. The biggest problem I have with BSODs or other hard crashes is that it causes the mirrored terabyte data drives to resync, and that takes a while. Usually the System Log would show Event ID 11 entries like this associated with the event:
The driver detected a controller error on \Device\Ide\IdePort6.
And once, following a BSOD, the boot drive was invisible to the BIOS at restart! A hard power cycle made it visible again and Whisky booted normally, as though nothing abnormal had ever occurred.
Hard to say for sure, but it seemed as though these oddities were happening with increasing frequency.
Firmware Update
Prowling the ‘net I found others reporting similar problems. What’s more, Corsair was on the case and had a fresh firmware update! The update process, they claimed, was supposed to preserve data. I checked my live backup and made new partition images anyway. The drive firmware update itself went exactly as described, took but seconds and left the data intact. The next boot had Windows installing new (or maybe just reinstalling?) device drivers for the drive, which then called for another boot. All this booting used to be a pain in the ass but when the box boots in seconds you tend to not mind that much.
Benchmark performance after the update was improved, but only marginally – nothing I’d actually notice. The troublesome hangs I mentioned seem to occur on bootup now, when they occur at all. They seem less ‘dangerous’ because they don’t interrupt work in progress at that time. So far, anyway, I just wait out the length boot and log in, followed by a cold shutdown. The next coldstart invariably goes normally, that is, very, very fast.
What’s going on? Maybe some periodic housekeeping going on in the drive? Maybe some housekeeping that was underway when I interrupted with a shutdown? Or maybe it’s that data cable? Remember, I mentioned it’s sort of a loose fit without a retainer clip. Time will tell.
Videos
I goes without saying that SSDs are fast. Many people like to judge that by how fast Windows loads. I threw together a couple of videos to illustrate.
System Startup with SSD 00.00 - Sequence start
01.30 - Power on
04.06 - Hardware initialization
13.20 - Video signal to monitors
15.83 - BIOS
23.93 - Windows Startup
39.83 - Login prompt
44.93 - Password entry complete
54.50 - Ready to work
Power on to Windows startup duration is 22.63 seconds.
Windows startup to login prompt duration is 15.90 seconds.
Password entry to ready-to-work duration is 9.57 seconds.
People that know me know that I’m not a big Mac fan. By extension, not a big Apple fan either. That’s why people that know me are astonished when they learn that there’s an iPad in my house. The initial shock gives way to questions so I figured I’d just handle some of them here.
My friend Will, just the other day over on Google+, said “Trims atas advise nya.” Oh, wait a minute. That’s spam from some shitstain with an anonymous gmail account. Will actually said “Rick, what do you use it for? On TV people are watching videos, email or looking at pictures on it – nothing very interesting. Is it a glorified internet appliance?”
Well, it’s a funny thing. Tablets have been the Next Big Thing for a while and everyone has been bringing them to market. For most, er, scratch that, for everyone except Apple, success in the tablet space has been varied. For Apple success has been astounding. Eventually, I figured, we’d have to get one to play around with, to see what all the hype was about.
I think it started with a TV commercial. I casually said to Pam, “So maybe you want one of those?” and she said she wouldn’t mind. So a few days later I drank some Kool-Aid…
I’ve gotta admit, the iPad’s an absolute marvel of design and engineering. It feels really good in your hand, looks really great to your eye (both the display and the form-factor), and the UI is slick and responsive. Besides the device there’s not much in the box: a cable and charger cube (which promptly got lost for weeks) and a cute little Apple sticker. I powered it up, answered a few questions, and in a minute or two I was exploring the built-in apps. Apps. I was playin’ with apps. I felt so… trendy. We picked up the Smart Cover a day or two later. It, too, is a product of incredible thought and design. Just as you hold it near, wondering how it attaches, it attaches itself magnetically, in perfect alignment. Forty bucks.
Getting the iPad onto my network was a bit harder. We have two active WiFi networks in the house. Each serves different purpose and both are reasonably secure. (Hold your comments about being neighborly and running an open hotspot; I don’t care and I’ll only ignore you.) So I cleared the way for the iPad and tried and tried to get authenticated. Didn’t work. A search turned up plenty of others with similar problems. I forget exactly which magic incantation did the trick but after a while it was working. And here’s the thing: other than that initial hurdle the iPad connects and makes itself ready to communicate the moment you pick it up. The secret? It keeps a periodic chatter going with the router or access point, all the time. It’s always ready.
Instant-on network performance like that is usually a battery suck but Apple seems to have nailed the power management. Battery life is several weeks to a month.
“Huh? Did you say a month? Don’t you use it?”
Yup, that’s what I said: a month. And, mostly, nope, we don’t really use it all that much. None of us do. Three different people with three widely varying sets of interests and the iPad hasn’t become relevant to any of us. WTF.
What I sought most from such a device was simple (and, I might add, completely satisfied by my old netbook). I wanted to read, mostly stuff from my network where I keep a fair library of subscription material. I wanted to write, notes, posts like this, etc. And I wanted to be able to control different parts of my network, logging into a Linux console, adjusting this or that, maybe a bit of ftp to import or export a file or two, maybe shutting things down during an extended power failure.
Producing written material with the virtual keyboard is an exercise in futility. I’m not the best keyboardist in the first place but my meager productivity dropped like a stone. Y’know how they say to use strong passwords for stuff? Let me tell you, the way you need to switch modes for numbers, caps, punctuation, and everything else will have you setting your passwords to ‘asd123’ – and wishing you could skip the digits altogether – in no time flat. Forget writing.
On to reading. Well, this is actually pretty good. The display is nice, like I said. Consuming some written matter – WIRED comes to mind – the content designed for this device is, in some ways, superior to the print experience. You miss out on the tactile enjoyment of well-laid-out pulp – the color, the rich fonts – but the ease of navigation (no continued on page 134) and embedded multimedia could be a valid trade. Sometimes, at least. I mentioned that I have a rather large cache of subscription material – professional publications, books, newsletters, etc. – on a server here. The vast majority is in PDF format of one type or another. Reading any of those makes for a pretty good experience. The iPad will try to add them into the built-in iBooks app, which simply means that they’re downloaded and stored locally for use off-network.
Next up, handling network chores. Nope, can’t do that. Maybe buying a terminal app would fix that, maybe not. I’m not pressing because I have other alternatives. Also, you can’t get files onto or off of the iPad. In fact, the very concept of files on the iPad seems profoundly foreign. I’ll bet a dollar Apple would call that a feature.
Now, Pam’s expectations are markedly different from mine. She’ll play a few games, use Google+ and – gasp – Facebook, and use the Web browser. She’s bought a few apps. Sorry, can’t tell you which ones. Since the iPad is hers, it’s tied to her computer and it synced with her iTunes library painlessly and quickly. I can tell you that the Google+ client, while touted as made for the iPad, is simply an iPhone app that lives in the middle of the screen. Sizing it for the larger screen looks chunky and childish. When I tried, Hangouts didn’t work at all. Sort of too bad, that, as the hardware seems like it’d be perfectly suited to video conferencing. YouTube videos play nicely, but content-rich sites that don’t offer Flash alternatives fail.
I expected Damian to play with the iPad but he doesn’t. Not at all. Some weeks after it had been floating around in such obvious places like the dinner table, he said “Oh? We have an iPad now?” That was that. I don’t think he’s touched it since. That was a little unexpected since I think he’s in the target demographic. Oh well.
I’ve got a few closing random thoughts… The lack of multitasking hurts. The instant-on, instantly-connected Web browser – albeit a weak one like Safari – is a definite win. The lack of Flash can sometimes make a Web site unusable. Not that I’m arguing for that insecure wart on the side that is Flash, but some sites, well, that’s what they do. Sort of the way a site might be built for IE and render poorly on a standards-compliant browser. You can wish for a long time that it weren’t so. The security model kinda blows. I wouldn’t store any confidential stuff on the device. The virtual keyboard encourages the use of weak, easy-to-use passwords because good ones are such a pain to type, yet even routine updates prompt for the Apple account password.
The bottom line? I guess all told I spent something under $800 for the device, a cover and some apps. Worth it? For design, lots of points. For usefulness, very few points. Did I learn some stuff? Undoubtedly. Do I feel trendy? No, I feel like I threw away a wad of cash.
If I knew then what I know now, would I buy an iPad? No.
[edited 29 October to include this unique use for the device.]
A few days ago I was swapping email with my friend Paul about laptop batteries. He had some concerns about runtime and stuff. I thought that parts of our conversation seemed like a good candidate for this space and he agreed. Yeah, there are plenty of tip lists and whatnot out there, but what follows is based on my actual personal experiences.
[…] how much run time do you (or should I) expect? Seems to me like I’m getting 10-15 minutes, always running plugged in, and that can’t be helping the battery to take a deeper charge.
My laptops (now old, creaky P4s with conventional hard drives, since we’ve all moved back to fast, powerful desktops) get about an hour or so of work on the network, maybe an hour forty-five backing off the screen brightness with mostly local work. My SSD-equipped netbook OTOH goes for 5-10 hours, depending. Once, on a bus back from DC, I had the netbook running a LAMP server virtualized under VirtualBox, doing Web development to while away the hours. A single charge lasted the whole trip back to Jersey! Oh, yeah, and a seatmate’s iPhone died on the way so I let him plug into a USB port to charge up. (Bonus: I got a bit of ‘net access!) So, battery life can vary greatly.
You’re right about not liking to be constantly charging. But LiIon batteries are kind of predictable once you get to know them.
Don’t subject them to temperature extremes, high ambient heat is especially bad so don’t let ’em sit in the sun. Don’t let them fully discharge. In practice, your box will shut down before full discharge becomes a problem. But don’t forget to charge a spent one before long-term storage. A battery on the shelf will discharge slowly, a battery in a powered-off laptop will discharge faster. So, to maximize life remove it when it’s not being used for extended periods.
The LiIon chemistry doesn’t wear out (like lead-acid) so much as it develops an ever-increasing internal resistance over time. You’ll notice that a new battery charges fast and lasts a long time. After a while it takes longer to acquire a full charge that doesn’t last quite as long. At end-of-life you can charge it all day and it won’t show full, while delivering only a few minutes of use (if that). The charging circuitry can only push so hard, and as the battery’s internal resistance climbs it has to work harder and harder to deliver fewer electrons. You end up getting some number of useful cycles out of a battery and that’s that. It makes sense, then, to use the battery until depleted, charge it, set it on the shelf for next use. Nobody really uses ’em that way, though…
Keep ’em in the laptop, use it on AC? Not ideal, the charge circuitry will keep cycling them near the top of charge, you actually tend to wear out the battery quicker that way – but you won’t notice it until you’re away from AC and actually need that charge. Using your laptop on AC most of the time? Take the battery out. The charge circuitry will notice and stop charging the empty hole, and the whole box will run cooler. ‘Course, you don’t get the benefit of a built-in UPS, but life’s full of trade-offs.
Finally, a safety tip. LiIon chemistry is inherently quite unstable. Without the active circuitry within the battery itself it’s prone to problems like thermal runaway – a nice term for explosions or catching fire. If you drop one, best to stand there looking dopey watching it for a few minutes. Look for signs of stress – heat, bulging, etc. – before putting it away. Is a dropped phone going to explode every time? Not by a long shot. But you never know. Sony, HP, Dell, virtually all of the big players have had massive battery recalls. There’s been plenty of property damage and injuries, but only the most spectacular ones make the news.
I haven’t actually timed it, but it seems awfully, awfully short.
Conserve. Use the power-saving power profile. Dim the screen’s backlight. Use a simple blank screen saver. Set short sleep and hibernate trigger times. Routinely sleep or hibernate the box when taking phone calls, hitting the can, making coffee, etc. Run fewer simultaneous applications and trim background processes. Save processor-intensive work for when you’ve got AC. You can probably double your runtime, with practice. Most people can.
Finally, keep the system’s monitoring and charging subsystems ‘in tune’ by calibrating according to the manufacturer’s guidelines, taking your usage patterns into consideration. Usually, calibration amounts to using the battery until it’s depleted followed by giving it a full, uninterrupted charge. That way the system has a better idea of the battery’s condition at any given time and can more effectively manage the charging circuitry. It’s that internal resistance increasing over time thing again.
Last year, in the midst of migrating the VM farm from VMware to VirtualBox, I had a Seagate drive go tits up. Luckily it was part of a RAID so I just substituted another drive and that was that. It was still under warranty so I figured that one day I would clear out the confidential data and RMA the thing. No rush.
Every so often, as time permitted, I would haul the thing out and play with it a little. This morning was one of those times.
Since I’ve been rather unsuccessful with the thing so far I figured to try swapping logic boards on the drive. I’ve got a spare, of sorts; it’s on a drive that’s part of the RAID mirror in my primary desktop. Software RAID, that is, on a Windows 7 system.
It’d be a simple matter to pull the drive, failing the RAID. Then the plan was to install the known-good logic board onto the failed drive, cable it up to the ESATA port and (possibly) do the wipe. Recovery would be just as easy. Replace the logic board and re-install the RAID drive. Then recover/resync the mirror and that would be that.
Before I got started I figured a backup would be prudent. The RAID mirror is where I do all my work. The better part of a terabyte was soon copied to a spare drive.
The drive pull took but a moment. Gotta love those big, roomy cases! I booted to find that the array had NOT failed; instead it went missing altogether! Oops. No concern, though, right?Microsoft documentation says that breaking a mirror results in two drives containing the data, just no more mirror. My exercise should have merely simulated a drive failure. When I re-installed the drive it should be fine.
Okay, so I did the logic board swap and futzed with that a bit, still feeling a bit uneasy about the mirror. Didn’t get anywhere for my trouble. It looks like the failed drive is just that – a failed drive. (More about that later.)
I put the known-good logic board back on the mirror drive, shoved it into the case, cabled it up and booted. Uh oh. Still no mirror. One of the two formerly mirrored drives appeared uninitialized while the other was foreign. I imported the foreign disk, which then got its old drive letter back.The data appeared to be intact but (I guess) since the companion volume remained uninitialized it still reported itself as having “failed redundancy.” I couldn’t break the mirror, nor could I remove the mirror. It looked like it was in some kind of limbo. I tried to reactivate the volume and had a nice little “WTF” moment: “the plex is missing” mocked the resulting error message.
I’m running out of time, there’s stuff I need to be doing and it’s certainly not this.
I initialized the uninitialized drive, made it dynamic and formatted it. Then I copied the data from the drive whose plex – whatever the hell that is – was missing onto the newly formatted volume. Continuing, I wiped the plex-less drive. Would it now offer itself up as a candidate to accept a mirror? Yes, it would. So I did just that and it took a while – longer than all the file copying – to resync.
Now, I’ve had good luck with Windows’ software RAID mirrors before but this exercise worried me a little. Should I have broken the mirror instead of simply yanking the drive? What if it had failed electrically? Or if I knocked a cable loose doing some unrelated maintenance? Or someone stole the drive? What happens when a drive fails under certain circumstances? Have I just been lucky all along, where the failures I’ve experienced have just been the right kind of failures that were recoverable? Ponder, ponder.
I guess I need to set up a testbed VM and experiment. Meanwhile, I have my panic copy and the same mirror arrangement I had this morning, no lossage.
Oh, and the old drive that I was trying to wipe? Glad you asked. It’s still on the shelf. There’s confidential data on there, if one were to recover it. I haven’t been able to get to it in order to properly cleanse it. I don’t trust Seagate; not that Seagate’s evil or anything. It’s just that, well, the responsibility’s mine and I don’t take that lightly. Terabyte drives are only worth about $75 retail these days and I got a couple of good years out of the thing.
What would YOU do with a drive full of confidential but unreachable data? Can you suggest any tools that I might use to get at the drive to wipe it without needing to access it with Windows or Linux, the two predominant OSs we run here?

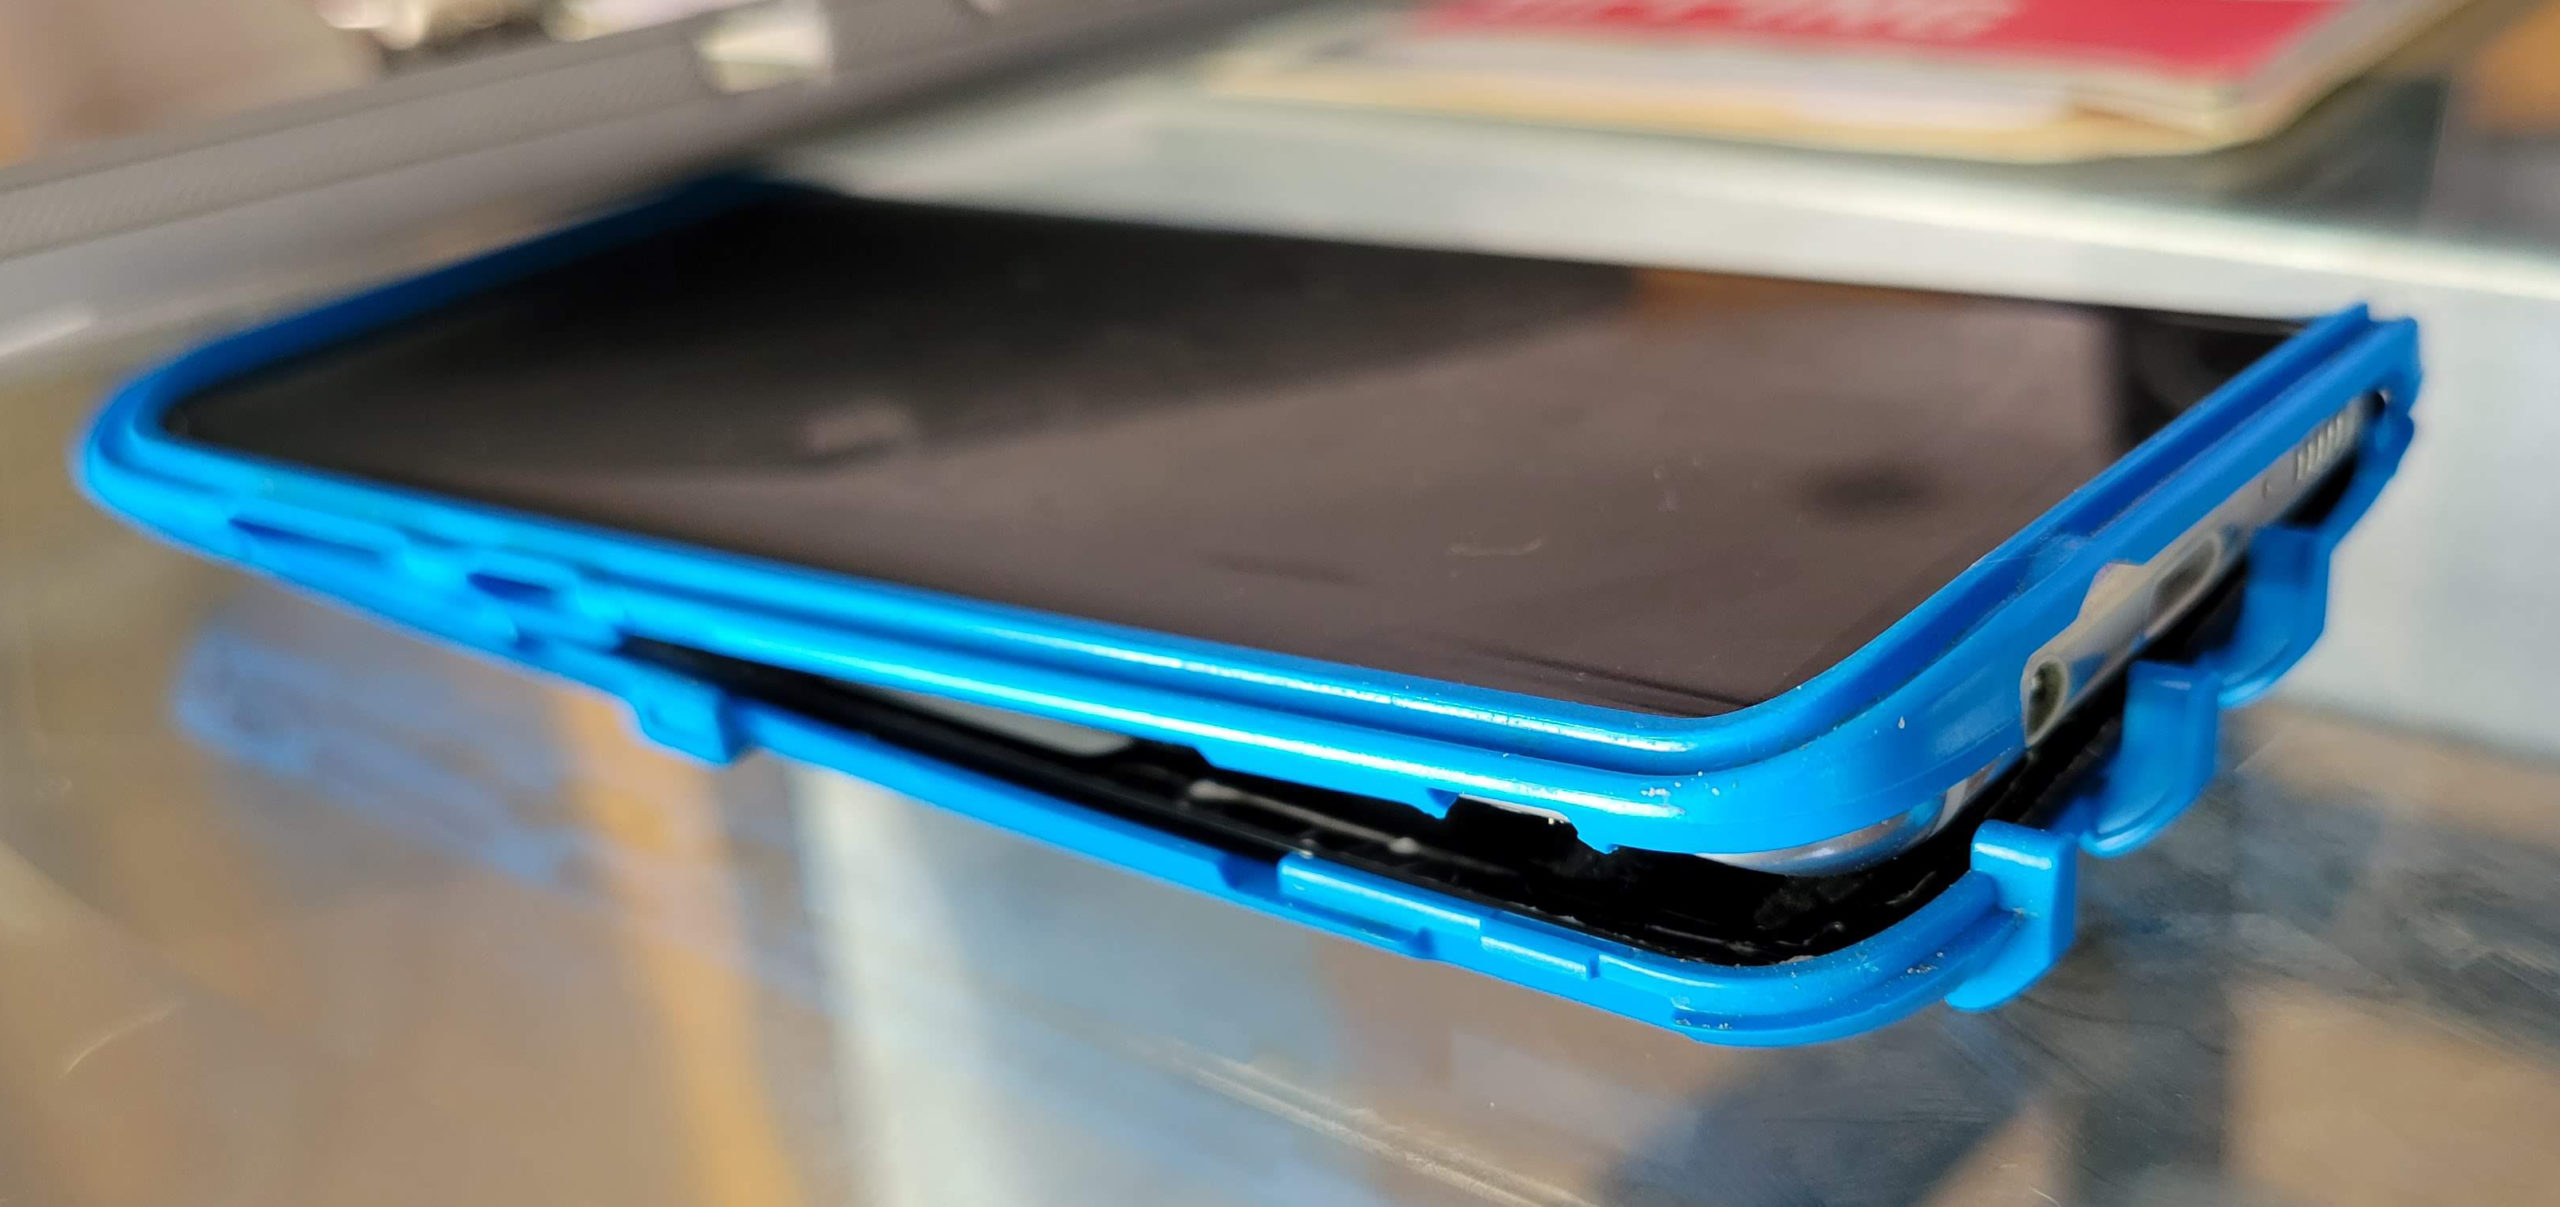
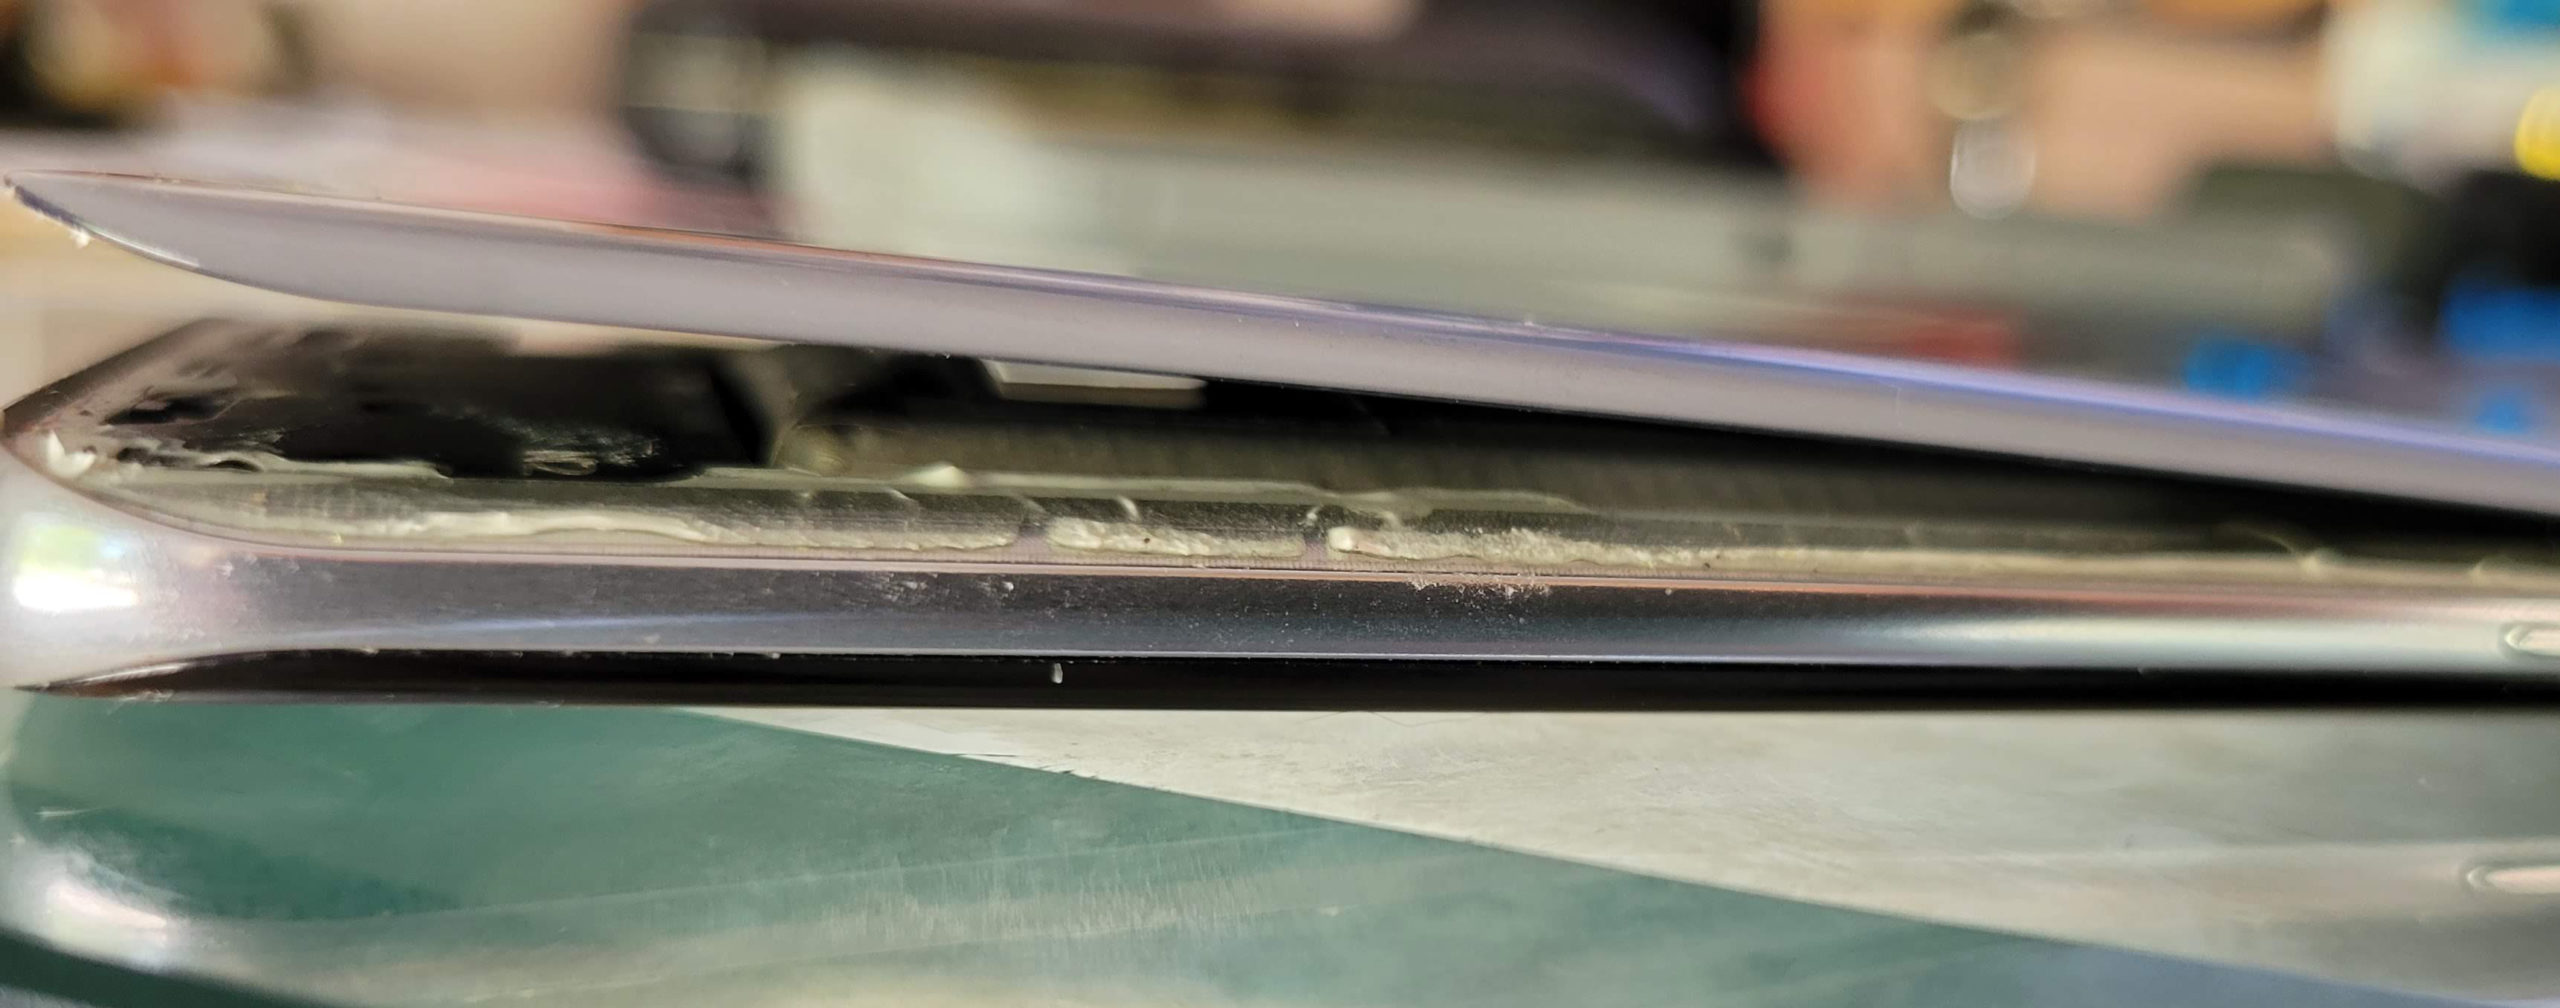
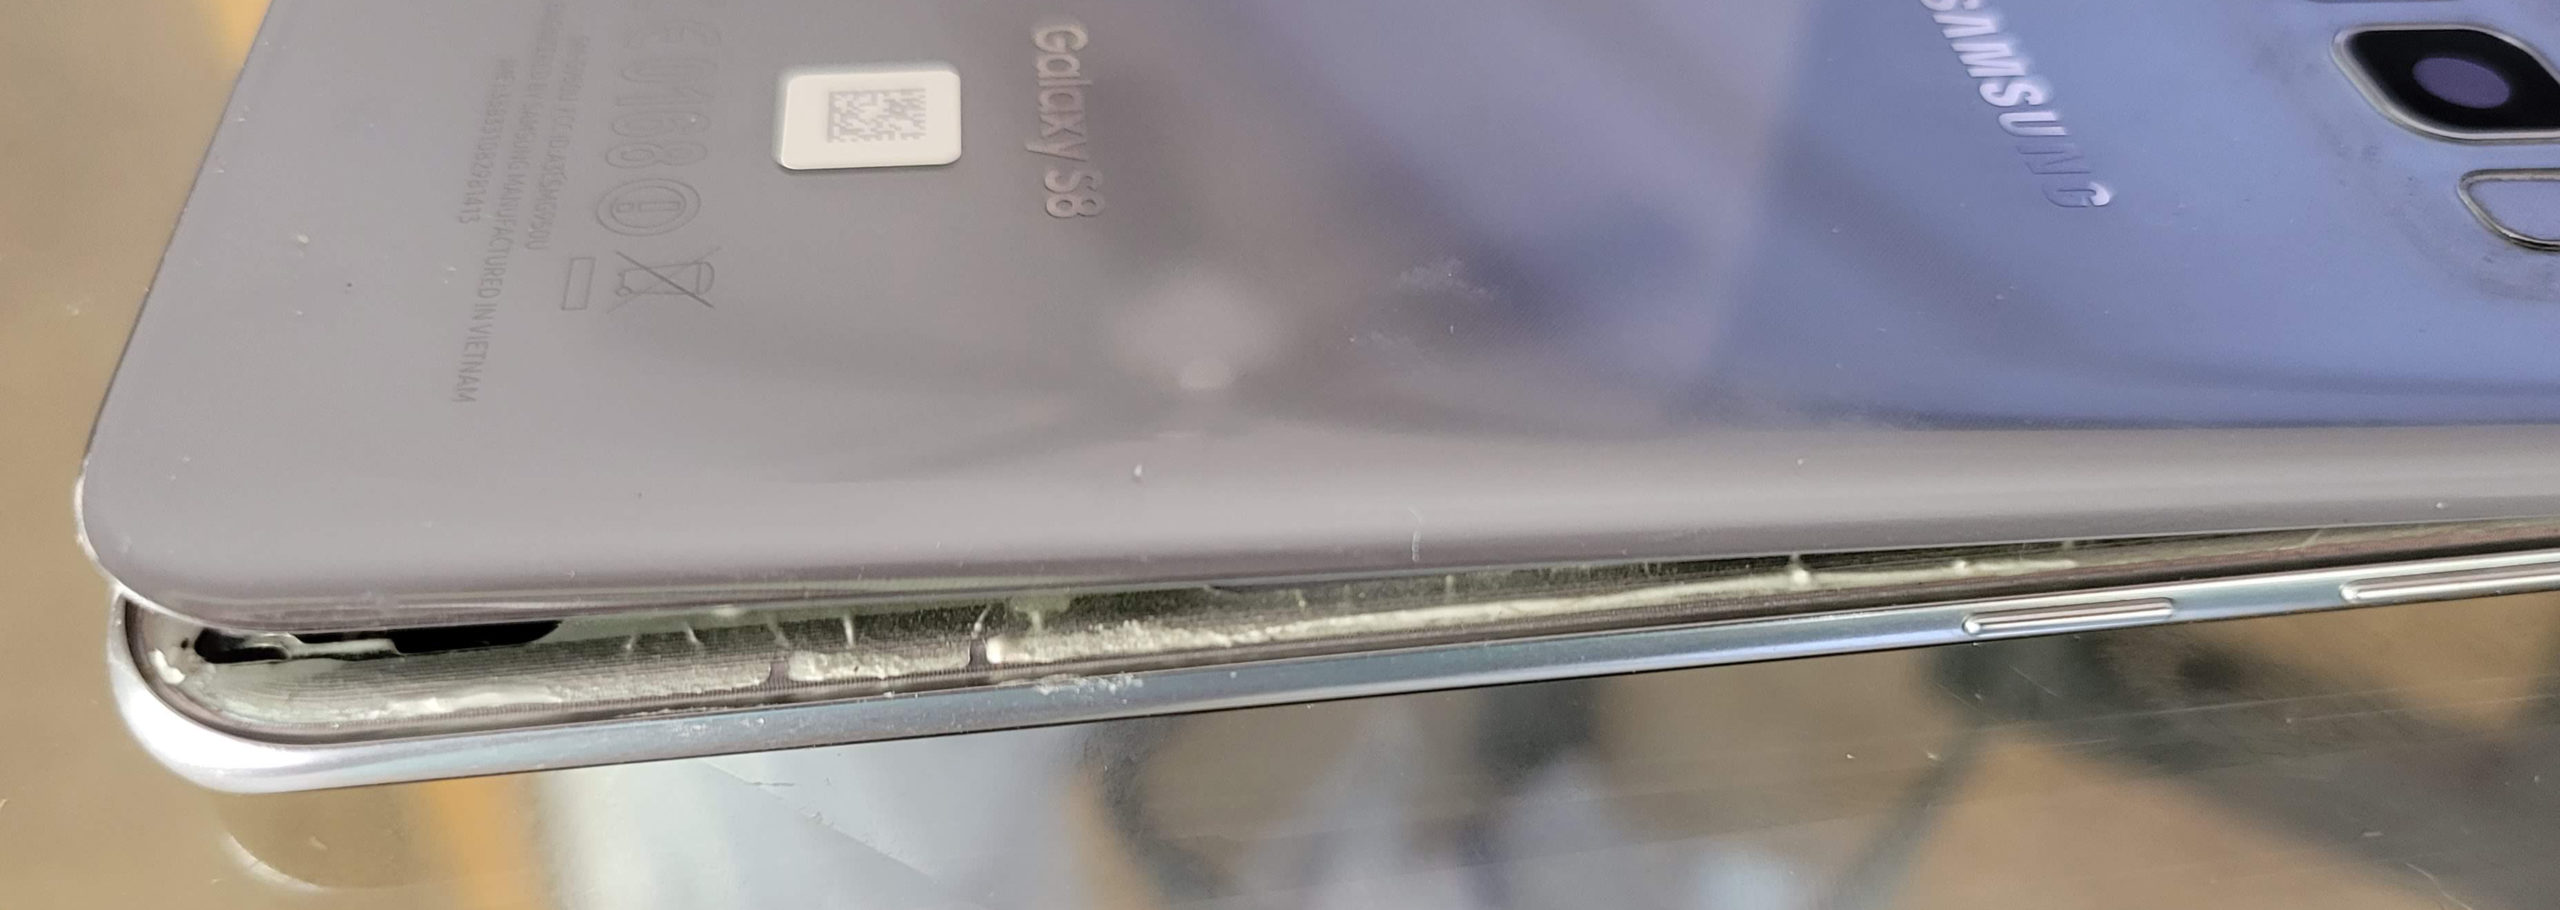
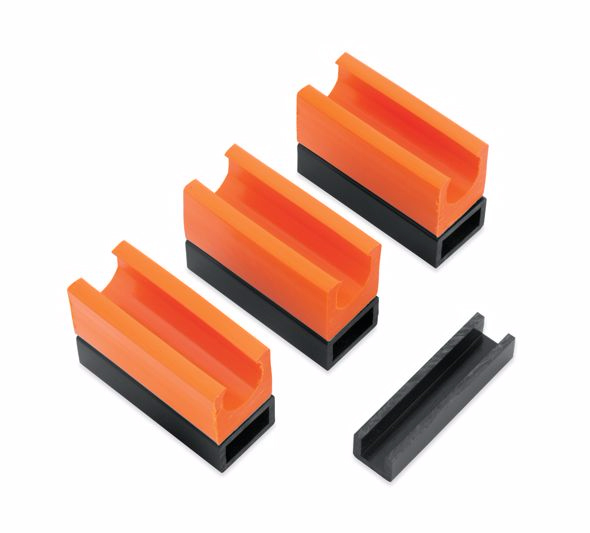
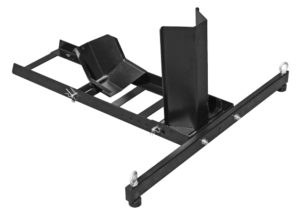 Enter chocks. Chocks  aren’t only for your trailer, they can go a long way toward neatening up your garage and making bike parking a breeze.
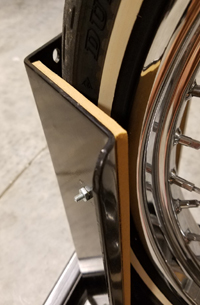


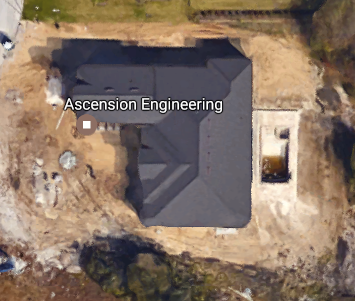

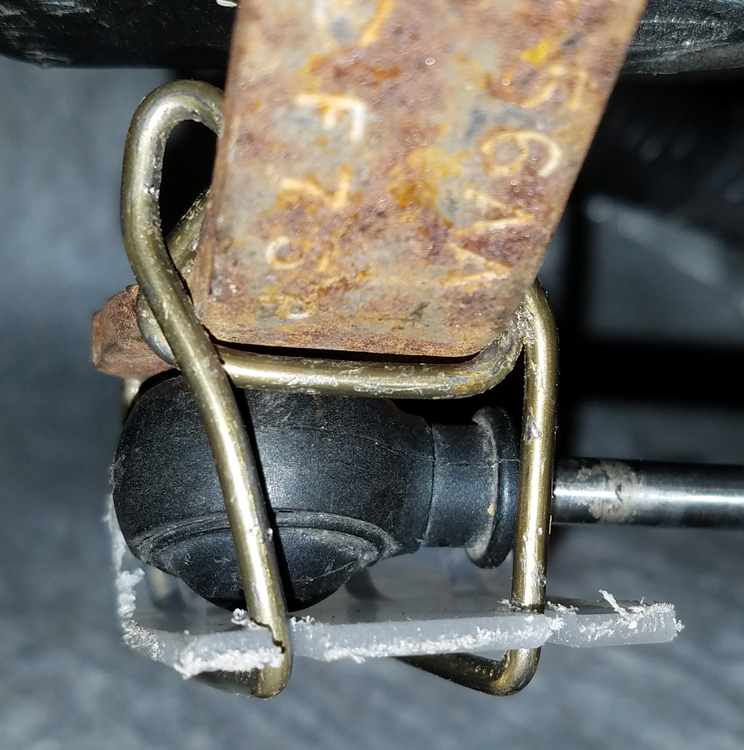
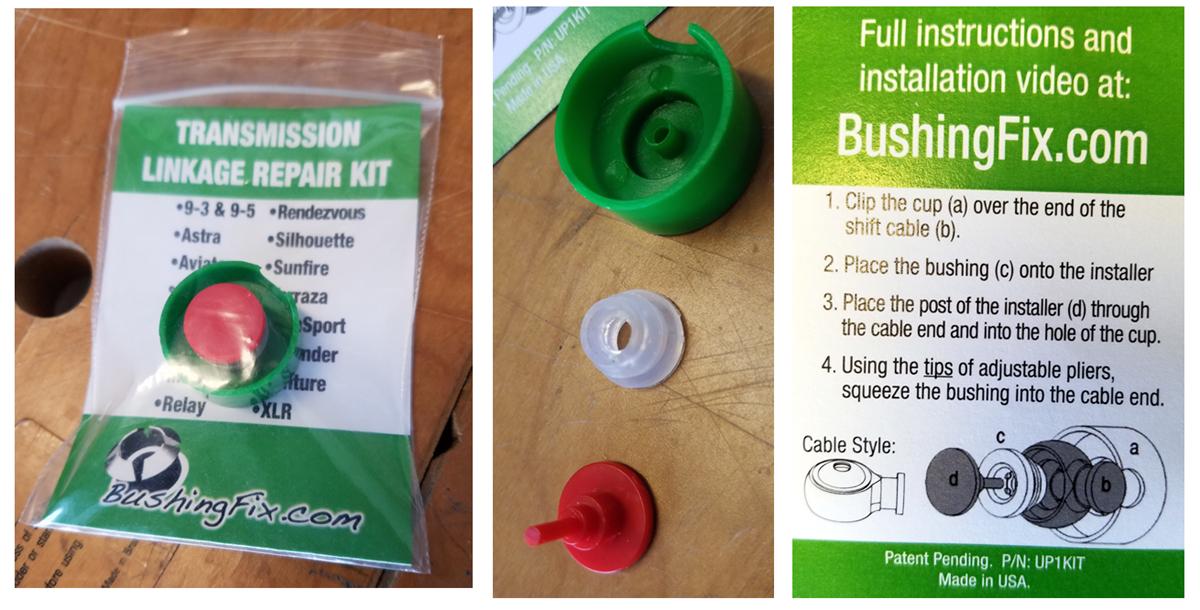
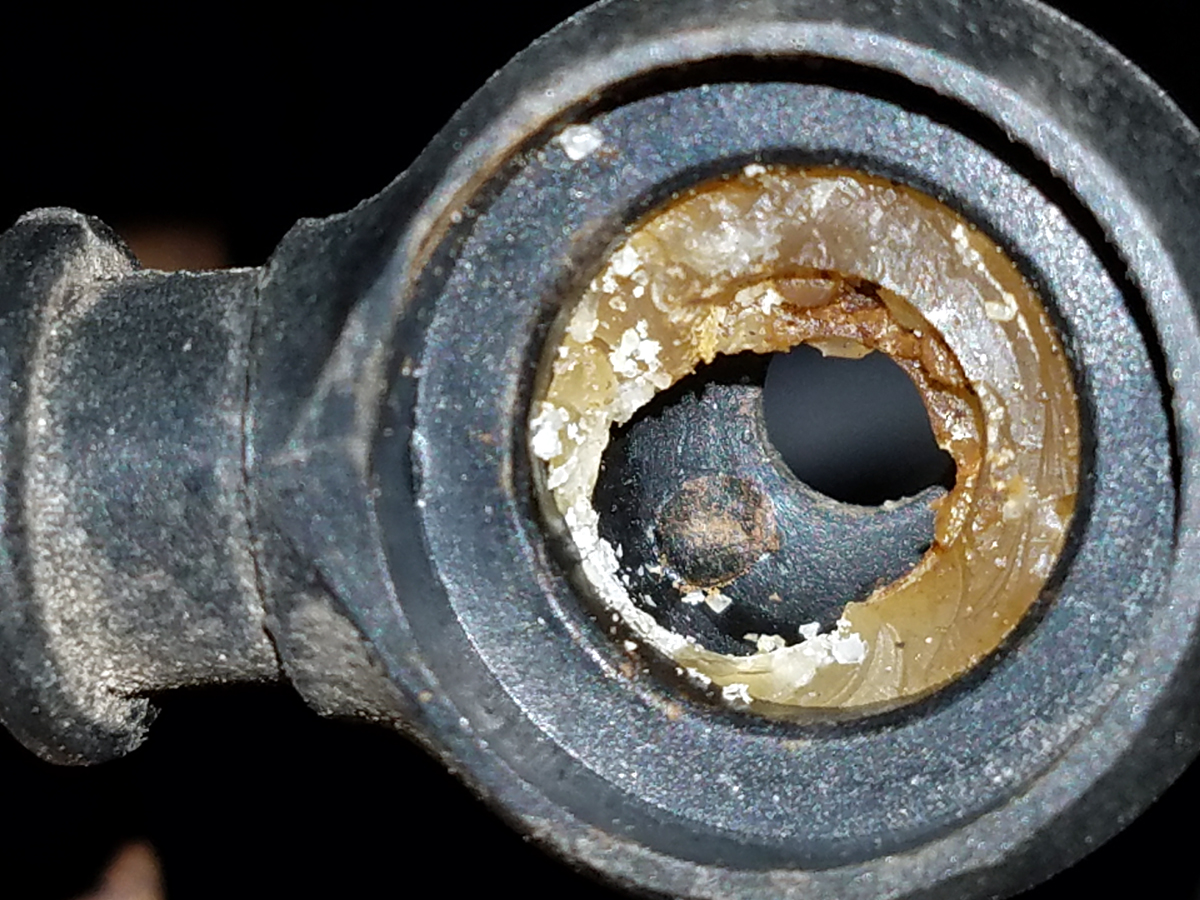
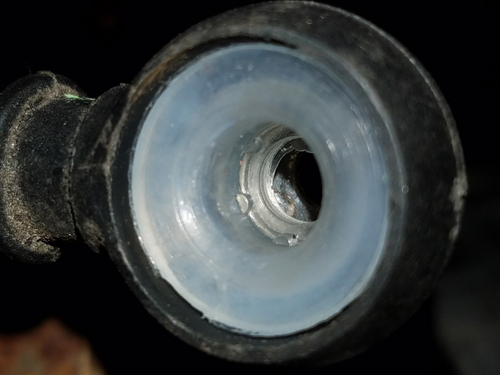
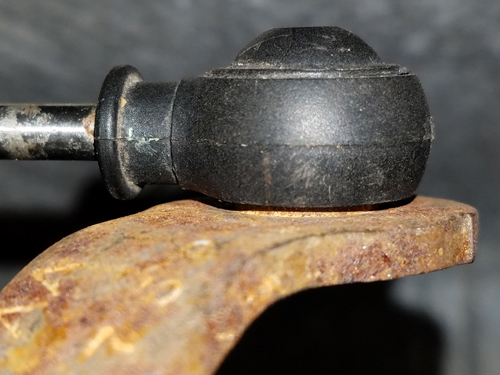
 Today I spent a goodly part of the day wrenchin’ the Dyna. An interval service was a bit overdue and I wanted t get it done before Biketoberfest. Bummer, I found a few issues…