Tag Archives: hardware

Bike Parts – Deal Gone Good

I love it when I have the opportunity to talk about companies that do things right. Here’s one: Will Powered Products.

Will Powered Products is a small company out of Dingman’s Ferry, PA that produces a limited line of high quality motorcycle parts. Hand grips, foot pegs, cable clamps – stuff like that. Simple stuff. But made from serious metal, cast and machined with quality and workmanship that you just know will last forever.

I first ran into Barry Will at a swap meet a couple of years back. I had gone through several sets of Harley-branded hand grips on my Dyna and I was sort of idly looking for something better. Funny thing, the Harley-branded grips start out looking and feeling great but they just don’t hold up over time. The Will Powered Products grips are machined from solid aluminum. They’re kind of expensive at nearly three times the cost of Harley-Davidson grips but they felt like they’d outlast the bike. I mulled it over as I wandered the show floor and ended up buying them on the way out. Today they look and feel just as good as the day I installed ’em.

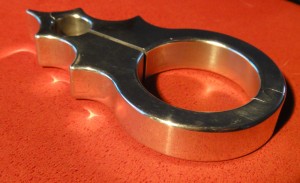
Clutch Cable Clamp
Solid aluminum clutch cable clamp from Will Powered Products. Click for larger image.
I saw Barry again at the Jersey Giant show/swap meet last April. This time it was his polished cable clamps that looked interesting. Ever see the stock Harley-Davidson cable stays? Cheap, plastic-coated slivers of spring steel, they’re functional but kinda ugly. Anyway, I needed two clamps but there was only one on hand. Barry promised to ship another right away so I paid for both and took one, handing off a business card with my shipping address. As I walked away from the table – sans receipt for the cash purchase – Pam gave me a questioning look. “I don’t think I need a receipt, he’ll do the right thing,” I said. “It’ll be worth the price to find out if my judgment’s still good.”

This is where things got interesting. After the weekend Barry emailed that he had sent the camp. And a few days later he emailed again saying that it had come back for insufficient

Keychain as jewelry
Keychain as jewelry, Damian's idea. He's thinking it needs something in the center, hasn't figured out what yet. I'm wondering what the center is made from, just in case I need to put it on the drill press.

postage – and that another would go right out. A few days later it arrived. Bummer, though, it turned out to be the wrong size for my needs. I emailed Barry, sent it back the next day and left for some travel. When I returned from St. Louis the correct-sized clamp was waiting. But that’s not all. Also in the package were two key chains styled after their dipsticks, AND three bucks – cash – presumably to cover my return shipping.

There are a few basic principles at work in this story. The principles are proven – they work in business and in life. Do what you say you will do. Will Powered Products did exactly that every step of the way, from shipping to keeping me informed. When something goes wrong, assume responsibility and do what’s necessary to fix it. Don’t make excuses. Mistakes happen. There were a few in this story but each were always handled as well as could be expected. Barry even mentioned that they took the extra step to ensure that their stock was correctly identified for size in order to reduce the possibility of future errors. Delight your customer. Throughout this extended transaction I always felt like I knew where things stood, so there was no anxiety or tension. Then Barry stepped up with unexpected extras in the end.

So, two thumbs up to Barry and Will Powered Products! Check out their Web site and if you’ve got a need for that kind of stuff for your bike then don’t hesitate to do business with them. They’re an American company making high-quality products that are absolutely worth the cost. You’ll know that the moment you hold one of their parts in your hand.

As for me, maybe some of those spiky footpegs are in my future…

Obligatory disclaimer: I don’t have any interest in Will Powered Products other than that of a satisfied customer.

A Good Reason to Keep Your Old Automobile

Old cars never had problems like this.

There’s too much not-necessary-for-driving stuff that you can do with cars these days, and few of ’em are any good. At best, many new features serve to distract you from the task at hand: driving the thing competently.

Even stealing cars isn’t what it used to be. With the demise of discrete wiring in favor of networks, in some cases all you need to do is access the network. Used to be you needed to break off a mirror to gain physical access. Jack in with your laptop and command the doors to open, the engine to start…

But now? Make a “phone call” from your laptop.

How long before we see car-botnets controlled from IRC? Or maybe viruses to cause an accelerator to stick? Or brakes to stop braking? Or, more subtly, stability controls to destabilize? Hmmm, cause your ex to seem like s/he’s driving drunk? For a price, of course, cash, please.

Here’s a NY Times article that ought to shake you up. (But I’ll bet it won’t.)

Researchers Show How a Car’s Electronics Can Be Taken Over Remotely


Supercharging the Stratocaster

I’ve got a Fender Stratocaster, one of the infamous “Splatter Stats“. Purely stock except for the strings, it’s always had a couple of quirks that I’ve wanted to address. It’s time.

I use Ernie Ball Super Slinky strings and the G string in particular has always sounded a bit on the dull side. It’s because of the way the string passes through the nut. One can brighten up the open string by dampening it a little between the nut and the tuning peg (but it’s inconvenient to play that way). I keep the tremolo bridge free-floating, which makes tuning somewhat more challenging. I don’t use the whammy bar but I sometimes ‘wobble’ the sound with my palm on the bridge. Once in tune it tends to stay in tune but lots of bendy work will tend to detune the bendy string. I chalk that one up to string friction.

Graph Tech makes what they call a Supercharger Kit that seemed like just the ticket. [addendum June 2013: Graph Tech has revised their product numbering and web site since this post was written. The link to the kit now points to the updated product. The biggest apparent difference is that my string trees are black with squared-off corners. They probably have a little more string contact.] [updated again November 2019: They’ve gone and changed their website again, so the link is updated. Here’s the part number I used: PN-8000-00] The kit includes a set of saddles, a replacement nut and nut blank, and string trees. The kit also includes an Allen key for setting string height, some emery paper for nut shaping, plus instructions. Oh, yeah, and a pick. You can read about their claimed benefits on their Web site.

The Graph Tech parts that contact strings are made of a material that promises to self-lubricate, leading to less string breakage according to their literature. I was hoping that by reducing friction, bends would return to original tune more consistently. Finally, others on the net had mentioned my preferred strings when discussing the Graph Tech nut. My shop isn’t equipped for cutting new nuts. I don’t want to invest in a set of seldom-used nut files so the closer I get to a stock nut the better.

The work is easy, but quite a bit of setup is necessary after swapping the parts around. If you’re not comfortable setting string heights and intonation then you’ll be better off having your tech do the work instead. If the setup is incorrect your instrument will sound bad. Very bad.

Mexican Splatter Stratocaster

Here’s my Strat on the floor ready for supercharging, using the kit of parts shown. You can click these images for a better look.

Stock saddles removed, new parts ready.

The stock saddles have been removed and the Graph Tech parts are ready for installation. The instructions tell you to remove the strings but I wanted to keep them a little longer; I only changed them a week ago. Since they were all loose, though, this was an excellent opportunity to clean the fretboard and other areas that aren’t often so fully exposed. (When I change strings I change them one at a time in order to keep the neck tension reasonably constant.) So these won’t be seated right and I expect setup will be harder that it would be with new strings. So it goes.

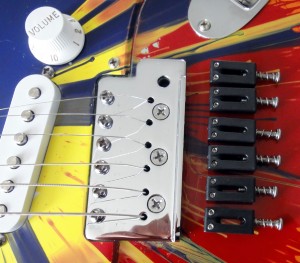
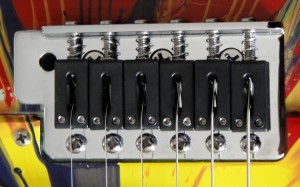
Graph Tech saddles installed.

Graph Tech saddles installed, though obviously not adjusted. Some say the black parts don’t look as good as the stock chrome but I disagree.

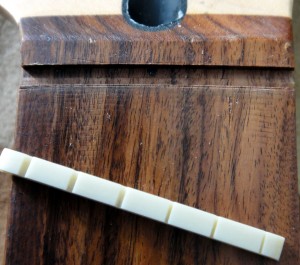
Stock nut removed.

The stock nut removed. I was ready for battle but mine literally fell out with a little bit of thumb pressure. Normally you’ll want to score the lacquer around the nut with a sharp Xacto blade so it doesn’t crack. This could explain why I’ve always felt the nut was just a tad low; the shop may have modified it before selling it. (Or, maybe what was sold as new was actually a return that had been set up?) According to the serial number, the guitar I bought August 14, 2004 was built in the Ensenada, Mexico plant in 2003-2004.

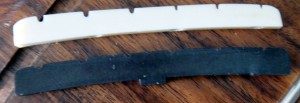
Stock and Graph Tech nuts.

Here are the stock and Graph Tech nuts. Note the tab on the Graph Tech – some Strats have a receiver for that tab and some don’t, I’m told. The string slots are not as deep. The new nut is a little longer than stock; I needed to remove the tab and shorten it a little, removing equal amounts of material from each side. It was easy do do using the emery included in the kit.

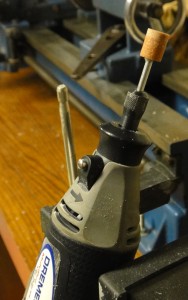
Tool setup for tab removal.

In the shop, a Dremel tool held by the rubber-jawed vise next to the lathe made the work of removing the tab easy. After the tab was removed, the thickness of the nut was reduced by hand to make for a snug fit in the nut slot. Then the bottom of the nut was reduced – by hand, a little bit at a time, tuning to pitch in between – to set the nut height. The supplied instructions give a good starting point but I set it a little on the high side. I’m conservative that way, figuring I can always lower the nut in the future. Raising the nut means ordering a new one and starting again.

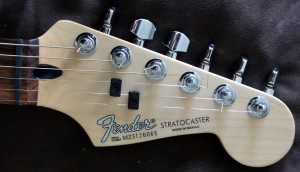
Finished headstock.

The nut’s in place and you can see the new string trees as well. Yes, now there are two string trees! What’s not evident in the photo (my bad) is that the trees are different heights. The bottom one’s shorter and guides the high E and B strings – exactly like the stock tree. Graph Tech supplies a second, taller tree in the kit. I thought about it for a long time before placing it as I did. The additional tree guides the G string but isn’t low enough to touch the B string at all. I didn’t want the tree to touch the D string because I felt it would make the nut-to-tree angle too severe. I’m not sure how the extra tree will hold up long term, guiding only one string, but we’ll see. I drilled the pilot hole for the new screw with a 0.058-inch bit chucked in a hand drill.

Modifications complete.

Here’s the finished product. You can see the black replacement parts and the extra string tree. The setup and intonation are roughed in, good enough to start playing. I know me – it’ll a period of time of adjusting to get it just the way I like it – and I may need to further lower the nut – but so far it looks like a huge success!

The instrument tunes easier and stays in tune better despite long bends. The G string now rings true! The overall sound is decidedly different. The unamplified sound is louder and brighter. Amplified, you immediately notice the increased sustain.

Forward Into The Past

Some music is timeless. My son – he’s 17 now – likes the Beatles. No matter that the band broke up when I was in middle school! Well, as it turns out we’ve got quite a few Beatles LPs (er, vinyl records, those plastic things with the grooves that played music for us old farts) in our collection down in the basement. It was time to do some conversion and put this stuff on his iPod.

I started to research those USB turntables that promise to quickly and easily turn LPs into MP3s and found them lacking. Well, at least those in the range I was willing to spend. Frankly, the hardware I was finding sported specs that kinda sucked, mostly because of the included cartridge.

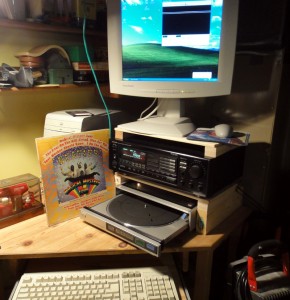
LP Digitizing Workstation
My basement LP digitizing workstation, Ethernet cable dangling from the floor joists above. That's the back of my furnace in the background and the handle of a 1 KW floodlight leaning against the desk. Also visible is a Discwasher kit to the left of the Beatles' Magical Mystery Tour LP. Bought new for 99 cents during the summer between grammar school and middle school, that was the very first record I ever bought.

I still have an old (but still kinda nice) turntable. Sony, Decent magnetic cartridge, linear-tracking, not too bad. I even have an Onkyo receiver that has a built-in phono pre-amp. That’s a bit of a rarity in receivers nowadays, as the need for one has pretty much gone away. I hauled out the gear and did some testing as I pondered the reality that was sinking into my head…

Analog music – turntables and vinyl records – have all but gone away. Some DJs still use them for mixing stuff but even that’s largely going away, leaving only the quote-audiophiles-unquote. And it’s a given that whenever a market targets a group labeled with some word that ends in phile you can add a zero or two to the price on any related gear. Wow.

I found my old audio gear to be in perfect working order, a testament to decent care while in storage. On to the computer. From parts, I thew together something to handle the digitizing chore: A 1 GHz Celeron box; all of 256 MB RAM; a 250 GB hard drive; Soundblaster PCI 512 card; Windows XP; an ancient program, CDWAV, I think it came with an ancient version of Cakewalk Pyro. Yeah, that ought to do it.

The setup makes uncompressed WAV files: PCM, 2 16-bit channels, sampled at 44,100 Hz. I pull the files up to my desktop and use Nero to correct out the clicks and pops, separate the tracks and burn a standard audio CD. Then use iTunes to import the CD to MP3. The intermediate CD saves the analog-to-digital and cleanup work, the most labor-intensive part of the process. The CDs, BTW, are in most cases good enough to allow iTunes (Gracenote, actually) to figure out the album/song titles.

My digital library is now experiencing steady growth.

Page From History

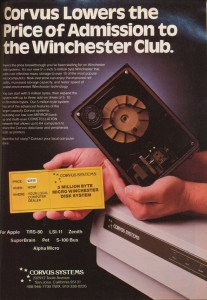
In this day where consumer-class terabyte drives approach the fifty buck price point, this Corvus ad from April 1981 seemed worthy of sharing.

Five million bytes at the newly-lowered price of $3750. That’s thirty seven hundred and fifty dollars, not a typo.

Corvus Ad circa 1981
Ad from Corvus Systems circa 1981: a 5 MB hard disk for the newly reduced price of $3750.00. (click to enlarge)

Just last week I was in an email discussion with a friend and he lamented the “good old days.” I’m not so sure that the old days were all that good. Did you have four large burning a hole in your pocket for storage back in 1981? I sure didn’t.

Parting the Sea(gate Data)

I wrote a while back about the Seagate Momentus XT hybrid drive, which purports to combine the advantages of a solid state drive with the low cost of a conventional drive. It works very well!

I decided to take the next step to see if I could wring a little bit more performance out of the thing. Since last fall’s build as a single-drive system, the desktop had become storage-rich. Besides the recently added Momentus XT there’s the original 750 GB Western Digital and a Seagate 1 TB, the latter used, well, for not much of anything. Relocating the data from the Momentus XT should allow Seagate’s algorithm to place OS and application files on the XT’s flash for lightning-fast reads.

There was only several hundred GB of data to move but it took a few days of here-and-there time to get the job done safely and completely. The system is used for real work. There were backup routines to change (and test!), path dependencies to chase down, stuff like that. But eventually it was done – with the bonus of some much-needed cleanup and organization.

So, what was the result? Windows 7 Professional boot times – BIOS to desktop – are on the order of 25 seconds. Ambitious application loads, full Photoshop for example, are down to just a few seconds. The system is powered down within 15 seconds of clicking Shutdown. I’m thinking these may even improve over time.

Seagate Momentus XT Hybrid Drive

A few weeks back I read of Seagate‘s Momentus XT hybrid hard drive. What’s a hybrid? It combines a conventional hard drive with a small SSD in one standard-size, standard interface package. The idea is that the conventional hard drive provides useful capacity while the SSD provides a significant performance boost. To the Operating System, the drive simply appears as any other drive. There’s no special OS support or drivers needed either; for instance, no need for TRIM support. Seagate has developed a special algorithm – they call it “Adaptive Memory Technology” – which purports to analyze use patterns and optimize the use of the SSD portion of the drive. What you use most often is stored in flash for best performance. The end result is supposed to be a drive that delivers much of the performance of an SSD at a cost that won’t break the bank.

The Seagate Web site might not be the best place to find objective comparisons, but check out the video (scroll down to the headline Compare solid state hybrid drives to SSD and HDD.) to see some impressive performance.

When I built my last desktop I (briefly) considered a pure SSD for the boot drive but decided against it. The cost was crazy high and the capacity was crazy low. When I read of the Momentus XT it didn’t take much to convince me to give one a try.

I decided on the ST95005620AS as a replacement boot drive. This is the 500 GB unit and, other than the built-in 4 GB SLC NAND SSD, it has some fairly conventional specifications – not at all unlike the Western Digital WD7501AALS it replaced. These drives are new, so it was a couple of weeks to wait for stock. I’m fortunate in that Newegg has a local distribution facility; once a drive was available it arrived the next day.

My desktop case (a Cooler Master HAF 932 #RC-932-KKN1-GP) doesn’t provide mounts for 2.5-inch drives so I picked up some adapter rails, too. These rails will hold two 2.5-inch drives but there are a couple of quirks. They use some odd-sized screws (supplied) and the holes were too small for my no-tool drive mounts. I mounted the hybrid in one of the front-accessible bays with the supplied screws. I may eventually drill and tap the rails for standard screws and relocate it to the drive cage for a cleaner cable layout.

I have a few applications for cloning boot drives. I don’t like any of them so I decided to try Seagate’s DiscWizard tool (made by Acronis), free for the download. Installation was quick and painless. But the clone process failed every time! Shame on me for believing you could do a low-level task like that from inside Windows. Fortunately DiscWizard provides a tool to build bootable utility media. I used it to configure a USB drive, booted from it and in short order I had my clone. In my case the target drive was smaller than the multiply partitioned source drive, but the DiscWizard handled it perfectly.

Now, cloning a boot drive is faster and worlds more convenient than doing an IPL from scratch, but it’s not without problems. Sometimes, if you run application software that requires activation, it may notice that the hardware’s changed and void your activation. I had several of those but all were resolved in short order. It’s just something to be aware of. Check your application load and have your necessary licensing information at the ready if you need to contact your vendors.

Okay, so how’s the Momentus XT work? Very well! What’s more, it seems to be getting even better over time. It’s weird.

Boot time is about half what it was with the old drive. It’s dead quiet, too, where the Western Digital is one noisy unit when it seeks, at least in my cavernous case. For the applications I use all the time, first-use loads are near instantaneous. Under Windows 7, the drive part of the Experience Index remained unchanged from my earlier drive but that didn’t surprise me because the specifications are virtually identical. The real difference is first-use of applications and data. There the performance boost is definitely not something you need to try to notice; it’s that obvious.

The jury’s still out on long-term reliability. I only buy Seagate and Western Digital drives, and I’ve had more Seagate failures over the years. To be fair, warranty service from both vendors is always as quick and easy as you can expect.

This isn’t a pure SSD, but Seagate appears to deliver on its promise with the Momentus XT: much of the bang of an SSD with significantly less cost, reasonable capacity and transparent Operating System support. Performance increases are right where you notice it most, on the stuff you use most often. The Momentus XT is positioned as a laptop drive but with these specs it works equally well for desktop applications.

Go and get yourself one of these, you won’t be disappointed.

RAID

When I stuffed those terabyte Seagate drives into the VM server I just knew that configuring for RAID would be a good idea. After all – that’s a healthy amount of storage and the likelihood that something would go tits-up eventually was too great. At first I simply used the RAID controller on the motherboard but I grew uncomfortable with the software drivers required. They were proprietary, of course. So I opted for a dedicated controller from Silicon Image.

Recently those decisions paid me back.

I never noticed anything amiss. The problem was revealed by a log entry noticed as part of regular maintenance. The RAID configuration console subsequently reported that one drive had become ill and gone offline. This array was configured as a simple mirror, so now the volume was flying without a net.

These are common drives and the local Best Buy has ’em in stock for under $90. Off I went, in horrible rain and cold, and soon I had the spare.

Swapping it in took almost as long as the short trip. The latest machine builds have been in mid- or full-tower cases but this server, nope, tight quarters in the mini-ATX case. But soon it was done. I restarted all the VMs and set the array to rebuilding.

It took a while – a couple of days. Yes, that’s excessive, I couldn’t agree more. But all things considered… It’s not a particularly powerful box; it’s busy, no less than a half-dozen VMs dedicated to their individual tasks, plus the host OS; the spare drive was added right out of the box – unpartitioned, unformatted. A sector-by-sector block-by-block reconstruction, so it’s no small wonder it took a while. I certainly could have helped it along.

Meanwhile, I’ve been running some tests on the failed drive. Yup, it’s failed alright. It’s also under warranty.

So just as soon as I scrub the data it’s going back to Seagate for replacement.

A happy ending, must be the Spirit of Christmas. There’s a lesson here, too. As we approach 2010, if you don’t already, resolve to apply some discipline to your data protection practices. Make maintenance and recovery plans. Use appropriate technology. Review your logs.

Happy New Year!

Added 1-Jan-2010…

Wouldn’t you know it? Following the secure deletion of all data from the failed disk I decided to run the Seagate diagnostics. It passed all tests.

I’ve repartitioned the thing and it’s formatting now. I’ll use it as scratch workspace for video and other big projects and with luck it’ll fail again soon. Something bothers me about using it for anything important.

Trouble Report Results in Process Improvement

About a month and a half ago my main personal computer, an (ancient) HP zd8000 laptop, began dropping keystrokes. I traced the problem back to the battery. No longer taking a charge, the interrupts generated as the charging circuitry tried, failed and tried again were interfering with the keyboard interrupt. My typing is bad enough; I pulled the offending battery, scanned the ‘net and ordered a new battery from overstock.com based on – what else? – price.

That was September 3rd, and the replacement battery arrived some days later. Unfortunately it was the wrong one! The order showed the correct number as did the packing list, but the thing that sat on my desk clearly showed a different number. The plastic bag it came in was already open (uh oh, could mean trouble) so I took the opportunity to stick it into the laptop, thinking perhaps it was a substitute. Nope, the computer refused it.

I used the online chat on Overstock’s Web site and explained the situation. The rep thought it best to escalate to a tech person so she told me to expect their call, which came some hours later. I hadn’t expected his call so quick. The tech generated the RMA and return shipping label and said he’d overnight another replacement.

Meanwhile I did a little checking. HP has an excellent online parts lookup tool, and I used it to check the two part numbers in question. They were markedly different. I looked them both up on the Overstock site and found the descriptions to be remarkably similar. Maybe this was the problem?

As it turned out, the next few weeks proved frustrating – for both me and Overstock – as we shipped the same incorrect battery back an forth across the country three times. In the end they said that they didn’t have the correct item. They’d process my refund and I was free to keep the incorrect battery. I sent it back anyway; there’s no sense in recycling a perfectly good battery I couldn’t use.

But that’s not the end of the story. Last Friday evening I took a call from Thomas at Overstock. He explained that my case had made it up to the executive level and that they had spent some time analyzing what went wrong. There were a few things, including a mis-SKUed warehouse bin (aha!) and lapses in communication. The analysis had resulted in some process improvements and Thomas called to tell me about them. We talked for a while about things like quality and customer service. Full disclosure: Thomas offered – and I accepted – compensation for my frustration and understanding: a correct battery and some store credit. He left his email and direct phone number.

(The correct battery arrived this afternoon, shipped overnight from Overstock’s supplier. The number fits several applications; the plastic cover trim isn’t right for my particular laptop, but I have spares from previous replacements so it’s no big deal. Overstock, if you’re reading this, don’t panic – I’m good, and I appreciate all you’ve done. You might want to follow-up with the warehouse, though.)

In my experience, the larger a company becomes the less likely is becomes that a minor customer problem actually results in action. Sure, refunds and credits are common enough, but not the continuous improvement part. To do that, and more importantly, to take the additional step of reaching out to the customer after the transaction is complete is exceptional. More should follow Overstock’s example. I’ll use them again.

Boosting SSD Performance

I’ve done some traveling this summer and the netbook I wrote about some time back has proved to be a worthy companion. The portability and battery life have more than offset the lower performance and cramped screen real estate. And the HP Mini 1000 has proven to be as reliable as a brick!

When I configured the box I chose the SSD over traditional hard drive. HDs tend not to last very long when transported via Milwaukee Vibrators. Sure, SSDs are considerably more expensive and offer less capacity, but I was looking for reliability and it’s certainly delivered that. Read speeds are fantastic, making for fast boot times even on the slow Atom processor. But small writes – the kind that Windows is famous for doing constantly – really suck.

I wanted to mention FlashFire, an SSD accelerator. According to their site, it’s “especially useful for the system using low-end SSDs.” It works. I haven’t bothered to upgrade the slow stock SSD mainly because FlashFire makes it tolerable.

Before you ask, yes, additional buffering can leave you with an increased risk of data loss if a crash occurs before the flush is complete. But the dirty little secret is that the higher-performance SSDs already use on-board DRAM buffers to boost performance, so is it really all that much different? I guess it depends on your needs. For me, the tradeoff – performance for a little more risk – is worth it.

If you’re grumbling and second-guessing your SSD decision, go give FlashFire a try.

The Netbook Experience

I’ll be doing some traveling this year. Usually I lug my laptop, a several-year-old desktop replacement that serves as my workaday box. With the battery and power brick it’s only, oh, around 15 pounds. That’s fine for moving around the house or even to drive to a client site, but it’s a bit much for more than that. Netbooks are growing in popularity, becoming more functional while getting better with battery life. The solid-state storage modules are durable, too – I could even carry it on the motorcycle!

I checked out a few of ’em before settling on the Hewlett-Packard Mini 1000. The clincher was the keyboard which at some 92% normal size is actually quite usable. So here’s the configuration: Atom processor N270 (1.6 GHz); 1 GB DDR2 RAM; 32 GB SSD; Intel Graphics Media Accelerator 950; 10.1 inch SD LED BrightView Infinity display (1024×576) with built-in microphone and webcam; Wireless G / Bluetooth; 6-cell lithium-polymer battery; mini-sleeve for carrying/storage.

I ordered directly from HP and delivery was fast, as usual. The shipping box was well-packed. It took but a couple of minutes to unpack, install the battery, plug in the charger and begin setup. The first thing I noticed was that SSDs are damned slow. Could it have been a mistake to choose a low-capacity SSD over a traditional hard drive? (I’ll come back to that later.) But getting Widows XP setup, activated and updated took hours. Thankfully it required no attention while it went about its business. I left it to its own, came back later and it was done.

Over the next few days my disappointment with performance continued. It looked nice, it was light enough, the keyboard was great, battery life was excellent at around 6 hours, but what good is all that if you can’t get useful work out of the thing?

As it turns out there are many things you can do to speed things up. Memory always helps Windows. The first order of business was to swap a 2 GB stick into the single slot, which took literally 30 seconds. I attacked the Registry, making the myriad tweaks I customarily make. The filesystem adjustments, like disabling 8.3 filenames, proved particularly useful, as did things like moving the kernel into RAM.

I found a process, StacSV.exe, that was consuming CPU and doing lots of I/O. I learned that the purpose of this was to monitor the audio jack to detect if you plug in or remove headphones. This is controlled by the Audio Service so I stopped it, setting it to Manual start. There are three associated registry keys, which do not exist, that were constantly being hit (and not found), so stopping the service quieted that noise down nicely. Here are those three keys:

HKLM\System\CurrentControlSet\Services\STacSV\DependOnService
HKLM\System\CurrentControlSet\Services\STacSV\DependOnGroup
HKLM\System\CurrentControlSet\Services\STacSV\DependOnTag

I updated the BIOS from F.10 to F.11 F.

There wasn’t much shovel-ware preinstalled on the box, but it still needed cleanup. (When will they learn?) Anyway, removing Roxio Back On Track was very straightforward. Thanks, but I’ve already got backup strategies in place.

The next was not as easy. MigoMobile Desktop 4 was apparently missing its MSI file and wouldn’t uninstall. However, they ship an installable copy of the software buried in the Program Files directory tree and it was easy to extract the missing MSI file on another machine, copy it back and perform the uninstall without resorting to mucking about with the installer database. I did still need to manually empty out the Program Files folder, delete the Start menu stuff and so on.

Oh, and then there was Microsoft’s dumbed-down productivity stuff. Is that still called Works? Didn’t matter, I removed it, too, without paying much attention.

And now, with an idle process count around 30 (about half what it shipped with!) performance is quite acceptable indeed.

One thing still troubles me, though, to this day. There’s this process called HPQToaster.exe and there’s just no quality information about it anywhere. According to my probes it is active. Because references to it are all over the Registry it looks like a bear to remove. I’ve tried killing the process and preventing it from starting and neither action seems to have any noticeable effect. But WTF is HPQToaster.exe? Does anyone have a definitive answer?

Shifting gears a little, there are a few things to keep in mind regarding SSDs. This might seem obvious, but there’s no need to defragment an SSD. In fact, it even hurts! The flash memory in an SSD has a finite lifetime, and the controller manages wear by spreading use across the array. So even though files may appear (or not) to be contiguous to the OS, there’s really no connection to exactly where in the memory array a file’s parts are stored at any given time. (I’m not sure how this contiguous or not stuff will come into play when resizing a swap file or building a new hiberfil.sys.) There are some security implications, too, as you can’t really erase a file securely by overwriting – the ‘overwrites’ will be done by the controller to different memory locations to manage wear. If you’re concerned about file security – deleted or otherwise – I suppose you must look to encrypting the filesystem in its entirety. Performance-wise, reads are very fast, large writes are pokey by modern hard-drive standards, and the kind of I/O done by application installs and things like Windows Update are abysmally slow. I recommend taking all of that kind of work off automatic and do them manually, when you can manage the time. Seriously, it’s that slow. An Office install and subsequent updates took, for example, a few hours to complete. Thankfully, you can usually start these things and walk away, come back when it’s done. One notable exception is Google’s Chrome browser, whose automatic updates you really can’t conveniently control.

I ran across an excellent article that will teach you an awful lot about the nature of SSDs, their performance and problems, and so on. Get your geek in gear, you’ll need it. About 16,000 words.

For a little more about the performance aspects of netbooks in general, when compared to more capable notebooks, give this post [edit: link died] a quick read.

Do I recommend the HP Mini 1000 netbook? It’s no substitute for your workaday box but used as intended it sure is better than lugging heavier stuff. I find myself using it around the house (connected to one of our internal networks, of course) quite a bit more than I thought I would. And I take it with me places that I never would have considered taking my laptop and actually get some useful work done when I wouldn’t have otherwise. Yes, I’ve even packed it on the bike several times with no ill effects. (Milwaukee Vibrators – er, Harleys – shake conventional hard drives to death in short order. Don’t ask me how I know.) Battery life, even with the increased RAM, is still around 5 hours – very nice. Like cameras, better the device you have with you that gets the job done than the full-featured device you left at home.
So, yes, I do recommend it.

The Newest Build

There were two main reasons to build this computer. Damian’s laptop, a hand-me-down almost 8 years old, had been showing signs of impending failure for some time. No surprise, he runs it 24×7 and the heat has physically damaged the finish on his desktop. And Pam, who plays Sims2 on her relatively recent desktop-replacement laptop, had been grumbling for a little more oomph. A plan was laid and by Christmas each would have their upgrades.

The Core i7 CPUs were just hitting the shelves and I briefly considered going that route. The on-board memory controller, new for Intel, meant new motherboard designs and chipsets. With reliability (not to mention my wallet – the i7s are kinda pricey today) in mind I chose the Core 2 Quad Q9550 instead. Well-supported, I’ve heard of folks pushing the 2.83 GHz part to 4 GHz and beyond. Cooling is always an issue but I didn’t want the hassle of liquid systems so an Arctic Cooling Freezer 7 Pro was added to the list.

The Gigabyte GA-EP45T-DS3R motherboard has been getting excellent reviews for its tweakability and DDR3 memory support so it was added to the list. Everyone knows that memory is king. I started with two sticks (4 GB) of Corsair 1333 Mhz DDR3. It’s an easy no-loss jump from there to 8 GB. And if swapped for 4 GB parts, this board will hold 16 GB so there would be some headroom left for the future.

The next choice was the GPU. Wow, things had come a long way since I last paid attention! After an evening of digesting reviews a choice was made: the GeForce GTX 260 Core 216 from EVGA. The 896 MB NVIDIA-based unit turns in solid performance for the price and also has some potential for tweaking later.

Key to user satisfaction is a good monitor choice and one in particular has always stood out: the HP w2408h. 24 inches of HDMI, 5 ms, high-contrast saturated colors with a native 1920×1200 resolution. Sometimes you’ve got to just swallow hard and go for it, and this was one of those times. Pam would be delighted with this monitor, and that’s what I was aiming for.

The rest of the component choices were rather pedestrian. A DVD-RW drive for loading stuff, a Western Digital SATA drive for holding stuff, a Microsoft wireless laser mouse for pointing at stuff, and a WLAN card to avoid a new cable run. A nice-looking, well-built Antec P182 case would hold all this nicely with plenty of room for expansion. Oh, yeah, and an OEM 64-bit Vista Home Premium. Y’know, buying a copy of Windows always leaves my stomach a bit unsettled and this was no exception – not to mention that this would be the first Vista box in the house. Well, at least it shipped with SP1…

A bit of back-of-the-envelope power analysis called a power supply of 650-700 watts, so a BFG Tech ES-800 was added to the list. (This PSU would end up failed in less than a month, hmmm, more on that in a future entry.)

The final order was placed with Newegg and soon the components were coming in. Between these and other Christmas shipments our UPS driver was becoming a daily visitor!

Physically, the build went quite uneventfully, easily even, thanks to component standardization and that well-designed Antec case. Oh, there were the usual share of driver issues, a BIOS change or two, a few ‘trial’ Windows installs, stuff like that, but nothing that couldn’t be handled. Vista reported a base score of 5.9 for every subsystem, the highest available as this is written.

Pam named her new rig Thor. Then the machine-shuffling got started in earnest.

Overall I’m pleased with the result, but there have been a number of… interesting… things that I’ll talk about in subsequent entries. Like that failed power supply, for one. Stay tuned.

Laptops and Hard Drives

My wife’s laptop was getting full. NTFS, as you probably already know, begins to suffer performance-wise when it crosses the half-full line. And the default MFT size is kind of small to begin with. Presently that all-important area was about 98% consumed and the drive itself had only 20% or so free space. Her last install of a Sims2 expansion pack brought another round of complaints.

Easy enough to remedy. Head out to Best Buy for a replacement drive. But how to get the new drive installed and set up as pain-free as possible? Usually it’s a fresh IPL, but I was looking for the easy way out.

I have this neat device from CoolMax. The CD-350-COMBO is a multi-headed cable that plugs into a raw IDE or SATA drive and presents to your system as a USB device. When your laptop is your workbench this device is worth its weight in gold. Soon the new drive was partitioned, formatted, and tested. (For good measure, I allocated a much larger MFT as well.)

With that problem solved I turned to the task of cloning the existing drive. I recently read of something called XXCLONE, which promised a file-by-file copy (including all the locked stuff) from a running Windows system, with the ability to make the destination bootable. This would be a good time to try that out.

The install to the wife’s laptop was easy enough: unzip and copy a file. I used the CoolMax adapter to cable up the new drive, the destination for the copy. I set XXCLONE to task and went away. The copy would take a while. When I returned it was finished. I made the new drive bootable with a couple of clicks, uncabled and shut everything down. It took a few more minutes to physically swap the old drive for the new one.

The first boot took a little longer than usual. Windows was a little confused, I guess, because the drive change triggered the New Hardware Wizard. But soon things settled down. Between these two tools, a usually-tedious job was turned simple!

There’s one other thing I should mention. The XXCLONE documentation claim that because it makes a file-by-file copy, it defragments the destination drive automatically. I run Diskeeper on all of our machines, and it reported the drive as heavily fragmented. I needed to run the boot-time defragmentation job before the new drive delivered its expected performance.

Additional stuff, 17 December 2008: There were a couple of nagging issues following the drive cloning. I’m not sure if it’s XXCLONE or if it’s integral to the cloning process itself, but some applications installed with the MS Installer were no longer accessible through Add/Remove Programs. Instead there would appear a dialogue:

“The patch package could not be opened. Verify that the patch package exists and that you can access it, or contact application vendor to verify that this is a valid Windows Installer patch package.”

The solution, while a bit of a pain, is to obtain and install the Windows Install Clean Up utility from Microsoft. Run the utility and select the errant application from the list, then clean it up – which amounts to removing it from the installer’s database. Finally, re-install the application.

In my case it was Office 2003, which called for finding the license number and install media as well as a few rounds of patches and service packs. There were a few other applications as well, but that was the most substantial.

Grungy Keyboard?

Try the dishwasher. See this post on 43 Folders for more.

I’ve been a believer that water poses little harm to electronics, provided that the water’s clean and you dry thoroughly to avoid corrosion, but I never would have guessed at this. I mean, cure powder-coat in the oven? Sure. Confidentially destroy CDs with the microwave? Absolutely. (But air it out carefully afterward, and don’t even think about breathing the fumes!) But a keyboard in the dishwasher? Yow.