On most bikes you simply lift from under the parallel frame members and get to work. But in this case three of four contact points are at one height and one is a fair bit lower.
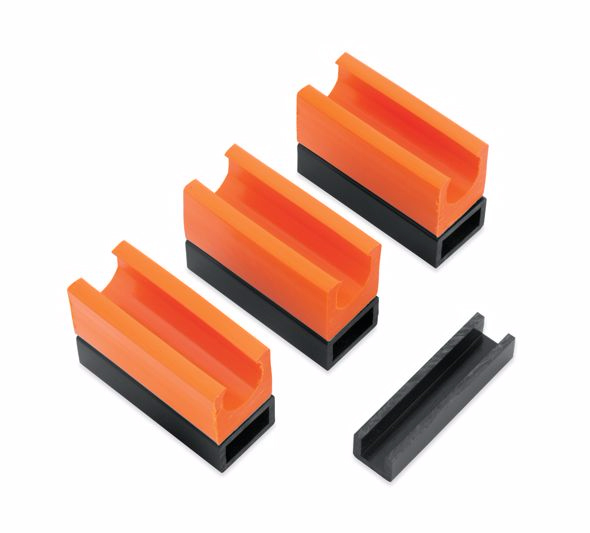
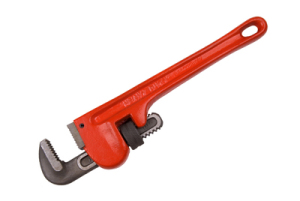
Service Lift Adapter. Click for larger image.
Sure, you can cut up some 2×4 blocks to fit. But when I bought the bike I took the easy way out and bought the gen-you-wine H-D Service Lift Adapter. WTF, it was only $25 or so and offered some distinct advantages over crude wood blocks. See image.
So where am I going? Oh, yeah, the night before Biketoberfest I needed to change out a rear tire. When I finished I dropped the bike to the floor, kicked the tools aside, and went inside to eat. This tire change was unscheduled work and we were hungry. The burgers off the grill tasted oh, so good.
The next morning we were off and a fine weekend was had by all.
Some days later I was cleaning up the tools and discovered that two of the four Lift Adapter parts were missing. I scoured the shop – nope, they were gone. I was about to give up when Pam suggested checking the bike. “Uh huh, yeah, right,” I thought, “it’s been hundreds and hundreds of miles, if I’d left ’em in place they’d have fallen off, long gone fer sure.” But I looked anyway and waddya know, there they were!
So, it’s product endorsement time. Service Lift Adapter # 98965-99 is easy to place, exactly the right size for the job, and grips the frame members well enough that they’re hard to lose. Not that I’d recommend ridin’ with ’em in place. But if you do, perhaps after the stress of some unscheduled work, they probably won’t fall off at the wrong moment, maybe hurting you in the process. Two thumbs up.
[Tip o’ the ol’ lid to Marjorie over at Thunder Press for catchin’ my transposition of a couple o’ digits in the part number!]
Pam and I had gone to the local pizza place for some takeout. In typical “I’ll buy, you fly” mode, Pam drove the F-150 with me in the passenger seat. She parked head-on by the front door and waited while I ran in for the goods.
It was just past closing time. Staffers killed the lights and ran out the door behind me.
Pam selected reverse and backed out, then pulled the lever for drive, hit the gas – AND THE TRUCK SURGED BACKWARD!
There wasn’t much room in the lot so she maneuvered to the curb, occupying about three marked spaces, and killed the engine.
It’s dark, beginning to rain, maybe three or so miles from home, hot food in the back seat, and we’re hungry. I called the kid for a lift home. We’d eat and think, then come back. Maybe the rain would pass.
The console lever felt sloppy, disconnected, I suspected a mechanical issue like a linkage or cable had worked its way loose. The console lever has a history. I removed the plastic shroud and felt around as best I could in the darkened cab; nothing felt out-of-place and my earlier hack/repair felt intact.
The kid soon arrived. We locked up and left to eat.
Sure enough, a bit of Internet searching turned up lots of similar failures! The most common issue came down to the cable-end detaching from the transmission lever. We returned to the truck armed with a good flashlight and I crawled under for a look. Before you ask, yes, the rainwater had pooled underneath…
Now it was clear that the cable-end was no longer attached. By manipulating the console and transmission levers it was possible to reattach, but when the console lever moved the cable end fell right off. The press-fit retention was no longer retaining!
I figured we could get the truck home, though. That’d free up parking for the restaurant and make for more comfortable work. The safety interlock only allow the truck to start in park and I could manipulate the levers to do that from beneath. With the truck started I could move the transmission lever into drive while Pam applied the brake. Then I’d crawl out she could drive home.
Pam was less than thrilled with the idea. But she did it. She probably pressed that brake pedal almost through the floorboard while I was under the truck fiddling with the transmission lever, engine running!
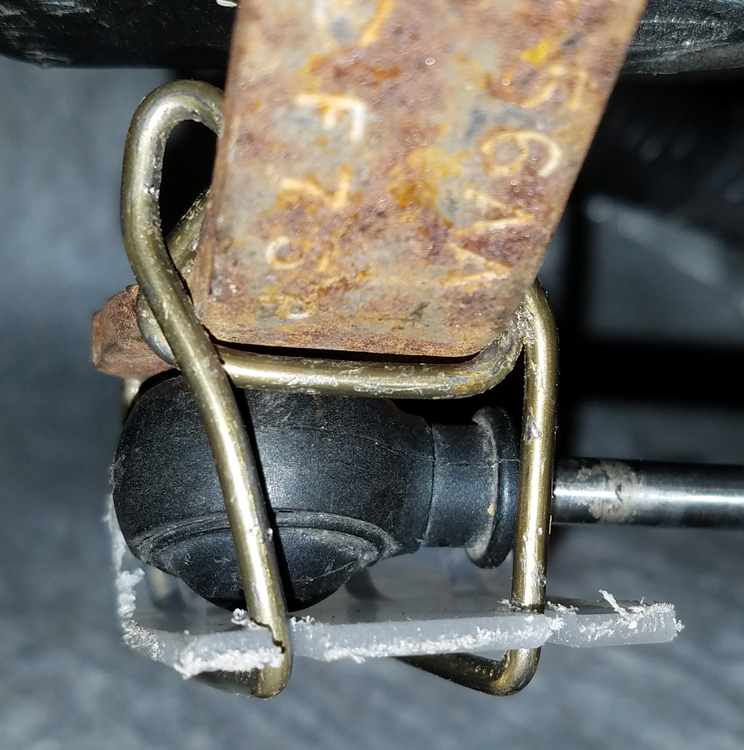
Cable end at top, transmission lever at bottom. The white plastic bit captures that knob.
The Root Cause The cable end is a roundish half-bowl of plastic molded onto the semi-flexible metal rod that extends from its sleeve. In the picture you can see a white plastic insert fitting in the black bowl. The transmission lever has a protruding machined knob that’s captured by that bit of white plastic.
Failure occurs when the white plastic insert no longer captures the knob.
The cable assembly is not adjustable. The length is exactly what it is. That’s important because…
When the console lever’s placed in park – that’s how the truck spends much of its time since being manufactured – there’s much linear force being applied against the transmission lever. By that I mean if you select park and slip the cable end free of the transmission lever (easy to do, now that the part’s failed), the cable end springs out extend a good 3/8″ past the transmission lever. You cannot put it back in place without manipulating the console lever positions, the end-to-knob alignment is that far off. So of course that 29-cent bit of plastic will fail eventually! It’s designed to fail!
The Repair The cable assembly – part number 4L3Z-7E395-CA for my 2004 unit – is available on Amazon for about $48. I don’t have a shop manual – that’s another story for another time – but it looks like it could be replaced in a couple of hours. Beer optional.
Obviously, a dealership could handle the repair. I heard that runs around $300-$350, including parts.
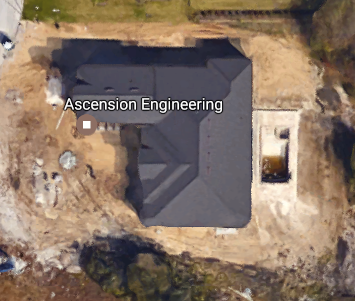
Ascension Engineering’s current location, under construction when Google Earth grabbed this shot.
But let me introduce you to Ascension Engineering. They produce a line of replacements for those little white pieces of plastic – apparently it’s a common failure mode across a wide variety vehicles, not merely Fords. The parts sell through their website, BushingFix.com. And business is apparently pretty damned good – Ascension Engineering’s principal relocated to some considerably nicer digs between May 2015 and March of 2016…
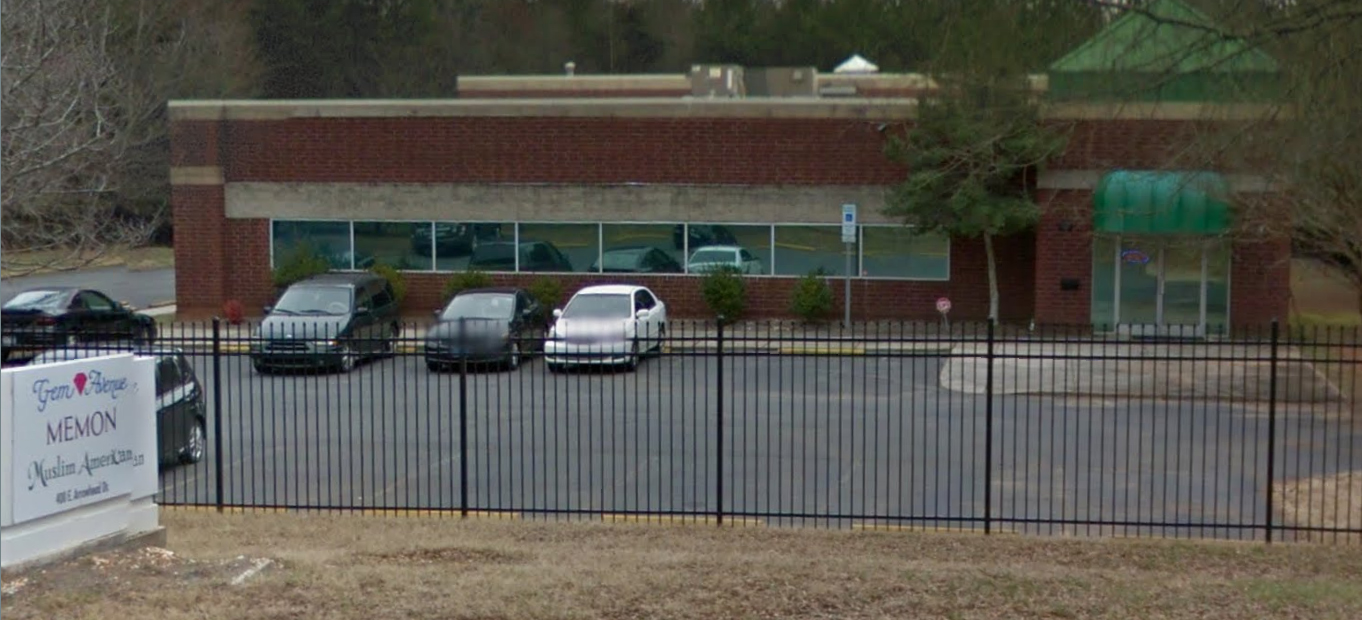
Shipping origin. Click for detail.
Y’know, $25 is a lot of money for a bitty bit of plastic. (Update: I learned, when sending a link to this article to the manufacturer for review, that the price is now reduced. My luck, right?) Okay, there’s design, tooling costs, manufacturing, but any number of Chinese outfits will do all that. Probably including the engineering design, too. It seems likely that they already manufacture those little bushings for the auto manufacturers. That Mr. Smith, he’s one smart cookie!
Screw it. I ordered a kit. There was sales tax, we’re both in Florida. And shipping was, I thought, a little high at just under $6 for USPS. The total cost was $32.29. I showed up at my door in a few days, shipped from Charlotte, North Carolina.
The cage-hack. See text for features. Click to enlarge for detail.
But First, An Interim Hack A couple of weeks before the order and permanent repair, a simple hack was necessary to keep the truck on the road. A truck’s a useful tool here in rural Florida. There’s trash and recycling to haul, stuff like that.
I hacked up a little cage from (what else?) coat-hang wire – easy to work with, yet stiff enough to enclose the cable end.
It’s got some nifty features. First, it’s a cage. It’s solidly attached to the transmission’s shift lever and doesn’t contact the cable or its end except where it absolutely must, to prevent the thing from slipping off the knob. That contact is minimized by a custom thrust plate constructed of softer plastic. (Don’t be fooled, the thrust plate is from a plastic storage bin. We use the bins as high-walled litter boxes for our feline residents, and this is the material cut out to form a door.) Notice the bend in the thrust plate, and the cutouts so the cage retains it.
The hack would likely outlast the truck. But a replacement part was on the way.
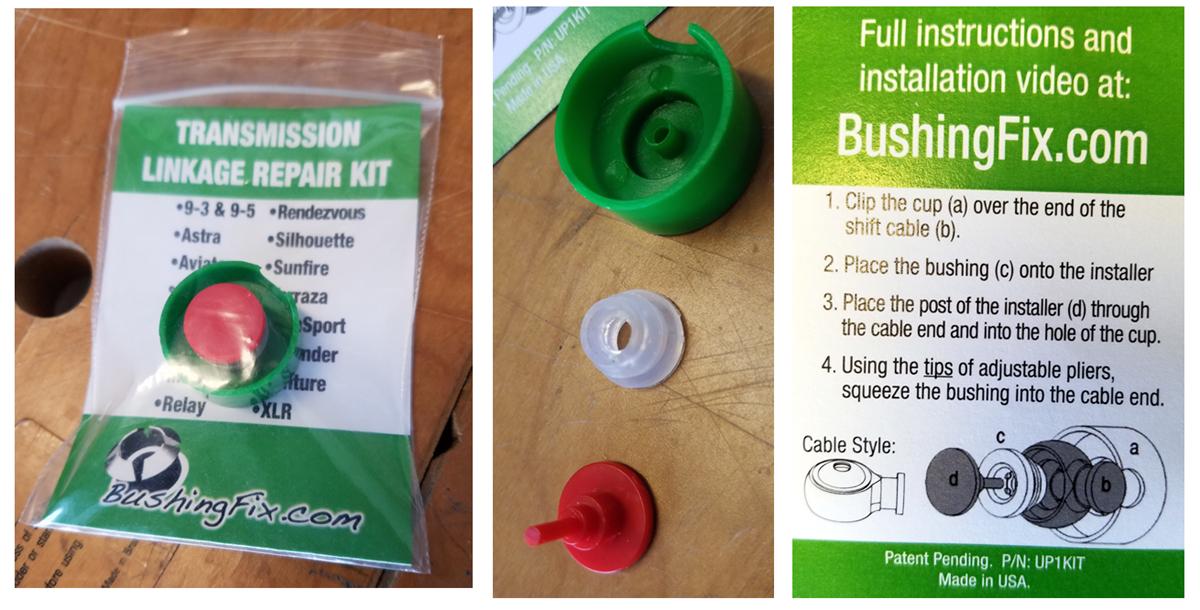
The Replacement Bushing It arrived in about a week. Here’s what $32.29 bought me:
The package, as received, followed by the individual parts and instructions. It’s actually well-thought out and about as foolproof as it gets. Click for a larger image.
Three bits of plastic: the bushing itself plus two more that served as press-blocks. Click to enlarge the image and see the instructions. Leaning way towards foolproof, I’ve gotta say. It took me longer to remove my hack than it did to install the replacement.
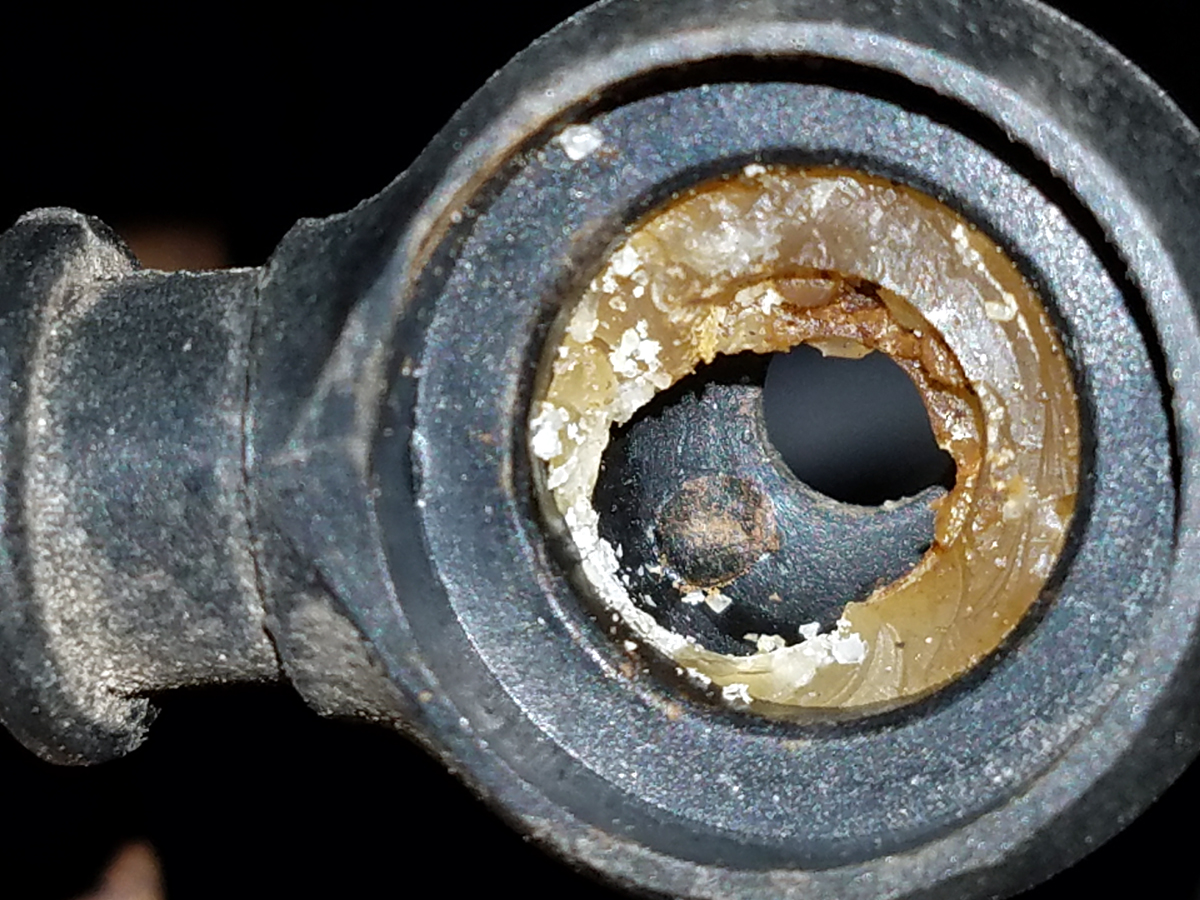
Debris in my cable-end cup. The rear of the truck is the right side of the image. The cable presses rearward when the transmission is in park. Click to enlarge.
Part of the install involves digging out any old bushing parts from the cable end cup. I used a carbide-tipped scribe and it cleaned up in a few seconds. Here’s a shot of what was left in my cup before that step. Pretty disgusting. But what’s clear as an unmuddy lake is how the linear force of sitting in Park had basically ruined one side while the other remained basically unworn. Ford’s non-adjustable setup is designed to fail. It’s only a matter of time.
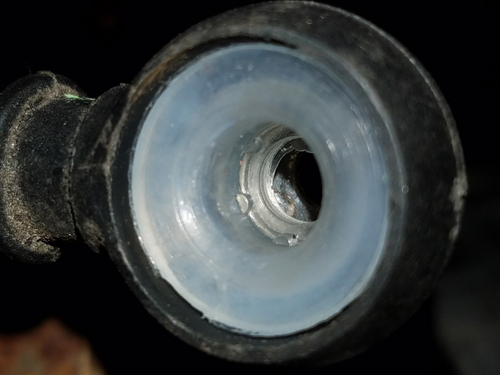
Bushing installed. Click to enlarge.
I assembled the sandwich of plastic bits and used a pair of Channellock pliers to give it a squeeze. I chose the Channellocks because of the adjustable jaws but I think a pair of ordinary pliers like those found in the average person’s tool bag would have done the job just as well. You’d need pliers, though, it’s a bit much for fingers alone.
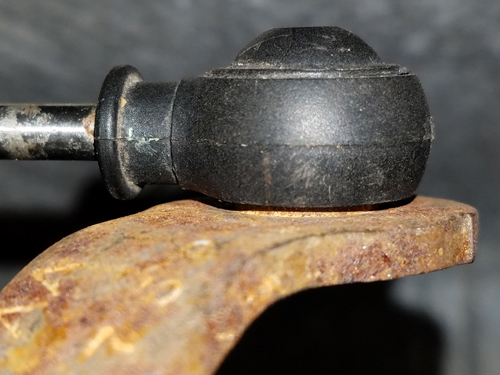
Repair complete. Click to enlarge.
The rejuvenated cable end mated to the transmission lever with a satisfying click. Then I exercised the console lever. It felt great.
Notice in the completed repair image that there’s a slight gap between the cable-end cup and the transmission shift lever. This tells me that the replacement bushing is the proper size for the job. If the knob sat too deep then the two parts would rub, wearing the cable-end cup.
So How’s It Holding Up? It’s been a few months since all this went down and so far, so good.
No issues, no complaints, the repair feels as tight as ever. How long will it last? Hard to say. Ford’s designed-to-fail assembly of the subsystem remains unchanged. What’s a worse environment? New Jersey winters or the Florida heat? Time will tell.
Back in 2013 I wrote about how my 2004 F-150 stranded me with an R203 relay failure. Since then I haven’t gotten any closer to a cause or solution. I’ve periodically replaced the relay as needed. But I’ve got a few more observations to add.
The DTC codes reported by the in-dash diagnostics (Engineering Mode) have meaningless meanings. D900 is just a general communication fault, not helpful, like “syntax error”. D950 is apparently an instrument cluster issue. Both make sense. No power to the PCM will tend to inhibit communications. No PCM data means the instrument cluster will be data-starved despite being powered up. Duh.
When running, the R203 relay runs HOT. You can hardly keep a finger on it.
It’s not necessary to replace the R203 relay as soon as it balks. In the beginning, simply removing and replacing it will often get it working again. After a while, stronger ‘persuasion’ is needed. I’ve gotten good at pulling the relay, giving it a couple of raps on the pillar, and jamming it home – even in the dark. Eventually the relay requires replacement.
The part of the relay that fails is the energizing circuit. A completely failed relay seems physically distorted by the heat over time. I haven’t been able to correlate this to long trips – we don’t use the truck that much – but it wouldn’t surprise me. A cross-country trip involving all-day use might be troublesome. Conclusion: there’s a high current draw on that circuit somewhere. I doubt it’s the relay itself, too many parts have been in there. Maybe the fuse panel itself?
Ambient heat worsens the problem. In winter (like Florida has a ‘winter’, right?) the failure doesn’t happen as often. Leaving the kickpanel off helps extend life. Â I’ve considered sandwiching the relay with Peltier devices, maybe something like this. Yeah, that’s fixing the symptom and not the cause, but WTF.
That’s about all I’ve got.
Maybe someone out there has the Ford shop manual pages for the fuse/relay panel? And/or the wiring diagram page(s) for the PCM power relay circuit? (2004 Ford F-150, SuperCrew, 5.4L V8, automatic transmission.)
Today I spent a goodly part of the day wrenchin’ the Dyna. An interval service was a bit overdue and I wanted t get it done before Biketoberfest. Bummer, I found a few issues…
There’s a bit of debris in the thick part of the tread on the rear tire. It’s about a millimeter thick by maybe 3 millimeters long. No leak, I doubt it goes all the way through, but I didn’t pull it out, either. When I get back I’ll order a new tire. I’m not happy because this tire, while not new, isn’t all that old either. But I don’t like to screw with tires, they’re too important. For the near term I’m going to gamble that it’ll survive the next week or so. I hope that’s not a mistake.
There’s been a nagging hot-start issue for a while now. No issue on cold starts at all, only hot. So I tore into the starter wiring which, for this bike, meant removing the battery and the caddy it lives in, along with associated hardware. I discovered the boot covering the battery positive on the starter had obviously been dislodged for a while. The terminal nut’s torque was a bit under spec, too, so I cleaned that all up and put it back together. Not sure if it cured the issue but it hasn’t been touched since 2008 so maybe…
While the battery caddy was out I had partial access to the back of the electrical caddy on the other side of the bike. I’ve wanted to get back there for a while. For nearly a year I’ve chased an intermittent demon that causes a fuse to blow. The fuse takes out the signals and brake lights. Not good.
Intermittent problems are hard, but careful observation has me believing it’s only triggered when actuating the left signal. It never occurs when I ride alone, only when Pam’s ridin’ bitch. The frequency has been on the rise.
So, poking around back there with a powerful flashlight I thought I saw the glint of copper through some worn insulation. Digging a little deeper confirmed it. The harness had rubbed the back of the starter housing, and apparently for some time.
It’s going to take some effort to effect a permanent repair. There’s very limited access there, and no less than three separate bundles enter the harness just upstream from that spot. It’s all got to come apart so I can open the harness. From there it might be as simple as wrapping the worn spots or as hard as replacing one or more individual wires.
I just don’t have the time now, I need the bike running for Biketoberfest. So I wrapped the offending spot with insulating tape as best I could.
The lesson here is not to put off service until a few days before an event. You never know what you’re going to find.
Tomorrow I’ll finish up, clean and put away the tools, Â and give the ‘ol Dyna a much-needed bath.
See you in Daytona!
[UPDATE – August 20th – Not a single fuse has blown in several hundreds of miles of two-up ridin’ so I think that’s one problem fully identified. The permanent fix will be a bit of a pain in the ass, but that’s okay. The hot-start issue remains. Daytona was  a blast.]
On the way to the local Johnny Rockets we hit some heavy rain. Some of the puddles on the right side of the road were rather deep and I found myself quite glad for the new tires we put on some months back. They cut right through but sent water flying everywhere. The truck didn’t miss a beat. We lucked out and parked right in front of the eatery, and went inside to consume heart attack inducing burgers washed down with some of the best milkshakes on Earth.
Satiated, we left the restaurant and climbed into the truck. I knew something was wrong the instant the key moved through the positions, the usual sounds and bongs were… well, they were different.
The mini message center displayed a cryptic message: Check Gauges in that odd font that LCDs use when making text from a limited set of segments. No starter crank at all. Instead, only an audible click coming from the fuse box under the passenger side kick-panel.
Hoping to avoid a call to Triple-A I dialed some friends to beg a ride (thanks Randy & Rose!), intending to leave the truck where it sat and troubleshoot in the morning. I felt pretty strongly that the problem was moisture-related – that was an awful lot of water! Maybe it would dry out overnight.
Around noon the following day I returned. The truck started as though nothing happened. I listened for a few minutes – nothing odd – turned it off and went home to get Pam to drive the thing home.
The round trip took about an hour. Pam jammed the key in and… yup, no crank! I got behind the wheel and gave the key a few disgusted twists. Wonder of wonder it fired and settled into a welcome idle. Pam drove it home without incident. But in the driveway it wouldn’t start again until the problem was found and solved.
When it comes to auto (and motorcycle) repairs there’s nothing in the world like the actual factory shop manuals. I have ’em for all our vehicles – except this truck. That’s because you can’t simply buy the shop manual for the F150. About the best you can do without springing for an expensive subscription to the online manual – like a dealer has – is to rent access to a section for a day. And that really sucks! So when things go wrong this truck either goes to the dealer or I use the Internet to learn from those before me.
The first likely candidate for failure seemed to be the Fuel Pump Driver Module (FPDM). This aluminum and plastic box, which regulates fuel pressure by modulating the voltage pulses sent to the fuel pump, is mounted directly to a steel crossmember under the bed, above the spare tire. The dissimilar metals tend to corrode the FPDM’s case, eventually allowing water to harm the circuitry inside. Water. I dropped the spare and unbolted the module, disconnected the single plug and brought it to the bench. The metal case was plenty corroded but intact. I didn’t open the plastic cover. Back onto the truck it went, with no change in symptoms. I never learned whether FPDM failure would cause a no-crank condition, or simply a no-start condition.
I entered the truck’s test mode and scrolled through the displays in mini message center. I found DTCs D900 and D950, but searching online for those codes brought no insight. It seemed like there was fuel pressure, consistent with an undamaged FPDM. There was lots of other stuff in the displays but much was undecipherable.
The Actron U-Scan model CP9599 is a dongle for your car’s diagnostic port which talks via Bluetooth to your smart phone.
I figured it was time to add a new tool to my collection: a reader to plug into the truck’s diagnostic port. I grabbed one of the bikes and took a ride down to the local parts store, the nearest was Advance Auto Parts. I intended to just get a simple reader but ended up going a little more spendy for a unit that promised to talk to my Android phone and deliver more comprehensive information. The device I bought is called U-Scan by Actron, model number CP9599.
I had problems with the CP9599. It didn’t seem to want to talk to my truck – but it had no trouble at all talking to my Jeep. This proved to be an important clue. Instead of just some random failure, now the trouble seemed like something was awry with the PCM. Maybe it had taken on some water? Maybe communications, maybe power, hmmm.
I pulled and inspected the condition of all the under-hood accessible plugs I could find, checking for changes after each. No change. In the passenger-side kickpanel box, I pulled and checked every fuse. No issues found. The fuse box also contains several relays of two different types. I began swapping positions of like-type relays to see whether the problem would move. After swapping the relays in positions R202 and R203 (the final pair to try – figures, right?) all the symptoms disappeared!
The truck cranked and started; the CP9599 connected and displayed DTC P1000 (which is normal after a PCM reset). I swapped the relays back to their original positions and the problem returned in all its glory. Relay R203 is documented as PCM power.
The original engineering part number for R203 was F57B-14B192-AA. It’s been superseded by Ford part number F5TZ-14N089-B, which costs about $15 from the dealer. I sprung for a pair of ’em, figuring a spare might be handy.
The truck is running normally now but there’s still a some work to do. I want to mount the FPDM on standoffs, which should halt the dissimilar metal corrosion. This ‘mounting on standoffs’ is part of the repair kit if you buy a replacement FPDM from Ford. Also, when in the fuse box, I found a significant amount of water in the passenger side rocker panel, which leads back from the area under the fuse box. I found the water accidentally. When pulling fuses from the back of the fuse box it seemed as though a dropped fuse could be troublesome to retrieve, so I reached down to see how hard that might be. There are no electrical connections in the rocker panel tunnel, only wire bundles, but I did find some evidence of moisture on a few fuse blades during my check. There’s water getting in there from somewhere! Online, some owners have mentioned trouble with gasket sealing on the brake/bed light housing, and I’ve had that off several times over the years. But I also have a sunroof. More investigation of the water’s source is needed.
I was minding my own business, on my way to the local Costco in my 12-year-old Jeep when I thought I noticed the brake pedal move just a little bit lower than usual. “Probably just my imagination,” I thought to myself as I approached the next traffic light. The pre-rush traffic was beginning to build. I modulated the pedal, trying to tease out the difference I thought I might have felt.
At the next light it became clear that there was a serious problem. The pedal abruptly sunk most of the way to the floor. The idiot light on the dash came on simultaneously: BRAKE. The brakes themselves weren’t very effective at all. I used the engine in low gear – it’s a Jeep, it has a really low low gear – to slow for the light. I shoved the clutch in coasted to a stop. “That wasn’t so bad,” I thought.
The shopping center parking lot on the next block seemed like a good place to look things over. The light changed. I made my way into the mostly empty lot and again coasted to a stop.
A walk-around revealed the problem quick enough: the left rear brake line had ruptured. The puddle of brake fluid grew, revealing the general area of the damage. The nearly empty reservoir confirmed what I already knew.
My insurance company provides roadside assistance and maybe this was a good time to use it. It’d probably take a while, I figured, it usually does. But there was a Wal-Mart in the shopping center. I could buy a can of brake fluid and try for home, maybe 15 miles away. It was a gym day, late afternoon, and waiting for the tow would probably make me miss a workout. But wrecking the Jeep would probably do that, too. I calculated the odds…
I bought the fluid, filled the reservoir and set out for home. No brakes. Well, not quite. I found that when topped off I’d have about 20% brakes for maybe 5 brief applications. Maybe. Panic stops were definitely out of the question.
Between anticipating the need to slow and stop and using the manual transmission and engine braking for speed control the ride home went without incident. Full stops even became easy: slow in low gear and kill the ignition. I didn’t make any new friends in the cars following.
When I got home I used the creeper, rolling underneath for a better look. Finding the exact point of the rupture was easy. The line was corroded and it finally let go. Jeeps are the easiest vehicles in the world to service, one of the reasons I love mine. The brake line is double-wall tubing running the length of the frame, all very accessible. I mentally ticked off the steps. Obtain a replacement brake line, maybe the other side, too. They’d have to come from a dealer, probably special order. Pull and replace the lines. The fittings at the master cylinder, brass, probably, having never been turned for the life of the vehicle, could be troublesome. Likely the same with the fittings at the slave cylinders, but I wasn’t about to pull a wheel just to confirm. Finally, refill and bleed the system. Oh, and those bleeders might prove tough to turn, too… I estimated a half-day of work on my back in the driveway – IF nothing went wrong on the way. It just might be worth sending this job out.
The next day I phoned up a place that’s done some work for me in the past. I described the problem. “So the pedal feels spongy and the indicator light is on?” Eddie asked. I laughed. “Dude! The pedal’s on the floor! The corroded double-wall line has a hole and the fluid’s all over the ground. Yeah, the light’s on alright. I need you to replace the line, maybe replacing both of ’em’s a good idea as long as you’re in there.” “Got Triple-A?” “No, I don’t, Eddie. I’ll drive it in.” There was a long pause. “You know, I can’t advise you to do that,” Eddie began. I think I could almost hear him suppressing a laugh, but it was probably just the cell connection. “Let me get you a tow,” he tried. “Nah, I’m good.”
Later that afternoon I drove it to the shop. No brakes. Pam followed me. I think she was more nervous than I was. Again, there were no incidents. A Beemer had stopped quickly to make a left on a two-lane but I had anticipated it and slowed appropriately. On a bike, if you don’t evaluate lots of possibilities ahead of time you get hurt. The training paid off.
As I dropped the key I reminded Eddie, “Maybe you should put a sign on the dash, y’know, for safety.”
Soon I should hear what the job will cost. If I like what I hear maybe I’ll have him replace the factory exhaust system, which has finally reached its end of life…
The primary on my 2008 Dyna has been a little on the noisy side for some time now. Oh, it’s not so bad, just a little annoying intermittent noise, sort of resonating in the primary case, and only at low-speed deceleration. Hard to describe, as those noises tend to be.
The other day I was doing some interval service on the thing anyway so I decided to open it up.
Everything looked fine, I think. The chain looks great, no burrs or signs of any abrasion. This primary has the automatic tensioner, and its shoe looks great, too. No grooves or other signs of wear. If I press down on the bottom of the chain, simulating the forces of deceleration, I get about a half-inch of deflection, maybe a little less. There’s no specification for that in the service manual but it seems reasonable to me.
These images of the innards are clickable for more detail.
2008 Dyna primary showing the automatic tensioner.
The only thing that might seem a little questionable to me is the toothed ramp at the bottom. There’s a toothed block that rides up the ramp with the help of a spring on the right side of the block, visible to the right of the wedge-shaped block in the image above.
In the image below it appears that the teeth might be a little buggered up. I could see that happening, maybe, under seriously hard deceleration. After all, the levers that translate the downward force to a force against the teeth would serve to amplify that force, and how much surface area could those teeth offer against those forces?? Well, it could happen…
Block and ramp detail, showing possible wear.
Trouble is, I’ve never seen a new automatic tensioner so I’ve got no frame of reference for what normal looks like. Tomorrow I’m going to be at a dealer for other reasons so I may have the opportunity to chat up a tech and/or see what a new part looks like.
Until then, if any readers have comments I’d love to hear ’em.
I’ve got a Fender Stratocaster, one of the infamous “Splatter Stats“. Purely stock except for the strings, it’s always had a couple of quirks that I’ve wanted to address. It’s time.
I use Ernie Ball Super Slinky strings and the G string in particular has always sounded a bit on the dull side. It’s because of the way the string passes through the nut. One can brighten up the open string by dampening it a little between the nut and the tuning peg (but it’s inconvenient to play that way). I keep the tremolo bridge free-floating, which makes tuning somewhat more challenging. I don’t use the whammy bar but I sometimes ‘wobble’ the sound with my palm on the bridge. Once in tune it tends to stay in tune but lots of bendy work will tend to detune the bendy string. I chalk that one up to string friction.
Graph Tech makes what they call a Supercharger Kit that seemed like just the ticket. [addendum June 2013: Graph Tech has revised their product numbering and web site since this post was written. The link to the kit now points to the updated product. The biggest apparent difference is that my string trees are black with squared-off corners. They probably have a little more string contact.][updated again November 2019: They’ve gone and changed their website again, so the link is updated. Here’s the part number I used: PN-8000-00] The kit includes a set of saddles, a replacement nut and nut blank, and string trees. The kit also includes an Allen key for setting string height, some emery paper for nut shaping, plus instructions. Oh, yeah, and a pick. You can read about their claimed benefits on their Web site.
The Graph Tech parts that contact strings are made of a material that promises to self-lubricate, leading to less string breakage according to their literature. I was hoping that by reducing friction, bends would return to original tune more consistently. Finally, others on the net had mentioned my preferred strings when discussing the Graph Tech nut. My shop isn’t equipped for cutting new nuts. I don’t want to invest in a set of seldom-used nut files so the closer I get to a stock nut the better.
The work is easy, but quite a bit of setup is necessary after swapping the parts around. If you’re not comfortable setting string heights and intonation then you’ll be better off having your tech do the work instead. If the setup is incorrect your instrument will sound bad. Very bad.
Here’s my Strat on the floor ready for supercharging, using the kit of parts shown. You can click these images for a better look.
The stock saddles have been removed and the Graph Tech parts are ready for installation. The instructions tell you to remove the strings but I wanted to keep them a little longer; I only changed them a week ago. Since they were all loose, though, this was an excellent opportunity to clean the fretboard and other areas that aren’t often so fully exposed. (When I change strings I change them one at a time in order to keep the neck tension reasonably constant.) So these won’t be seated right and I expect setup will be harder that it would be with new strings. So it goes.
Graph Tech saddles installed, though obviously not adjusted. Some say the black parts don’t look as good as the stock chrome but I disagree.
The stock nut removed. I was ready for battle but mine literally fell out with a little bit of thumb pressure. Normally you’ll want to score the lacquer around the nut with a sharp Xacto blade so it doesn’t crack. This could explain why I’ve always felt the nut was just a tad low; the shop may have modified it before selling it. (Or, maybe what was sold as new was actually a return that had been set up?) According to the serial number, the guitar I bought August 14, 2004 was built in the Ensenada, Mexico plant in 2003-2004.
Here are the stock and Graph Tech nuts. Note the tab on the Graph Tech – some Strats have a receiver for that tab and some don’t, I’m told. The string slots are not as deep. The new nut is a little longer than stock; I needed to remove the tab and shorten it a little, removing equal amounts of material from each side. It was easy do do using the emery included in the kit.
In the shop, a Dremel tool held by the rubber-jawed vise next to the lathe made the work of removing the tab easy. After the tab was removed, the thickness of the nut was reduced by hand to make for a snug fit in the nut slot. Then the bottom of the nut was reduced – by hand, a little bit at a time, tuning to pitch in between – to set the nut height. The supplied instructions give a good starting point but I set it a little on the high side. I’m conservative that way, figuring I can always lower the nut in the future. Raising the nut means ordering a new one and starting again.
The nut’s in place and you can see the new string trees as well. Yes, now there are two string trees! What’s not evident in the photo (my bad) is that the trees are different heights. The bottom one’s shorter and guides the high E and B strings – exactly like the stock tree. Graph Tech supplies a second, taller tree in the kit. I thought about it for a long time before placing it as I did. The additional tree guides the G string but isn’t low enough to touch the B string at all. I didn’t want the tree to touch the D string because I felt it would make the nut-to-tree angle too severe. I’m not sure how the extra tree will hold up long term, guiding only one string, but we’ll see. I drilled the pilot hole for the new screw with a 0.058-inch bit chucked in a hand drill.
Here’s the finished product. You can see the black replacement parts and the extra string tree. The setup and intonation are roughed in, good enough to start playing. I know me – it’ll a period of time of adjusting to get it just the way I like it – and I may need to further lower the nut – but so far it looks like a huge success!
The instrument tunes easier and stays in tune better despite long bends. The G string now rings true! The overall sound is decidedly different. The unamplified sound is louder and brighter. Amplified, you immediately notice the increased sustain.
Mine is – er, was. It began as an intermittent – now there’s a word that no wrench likes to hear – problem. Then, one day, Pam almost got stranded.
I’ve got a pretty good relationship with the dealership. They handle most of the maintenance work on this truck mostly because I don’t have a shop manual. (They’re important, y’know, and I have one – or a set – for all of the other vehicles, but that’s a story for another day.) The dealership treats me pretty good. They allow me into the service area to chat directly with the techs and even cut me nice price breaks often enough to matter.
Shifter hack – before and after.
There’s a procedure in the user manual for overriding the interlock on the shifter. (I wouldn’t have thought so, but Pam suggested looking there. For once I listened. Smart girl.) So override I did and went to let the pros have a look. Two birds, one stone, it was time for the 75K service interval anyway.
A couple of hours later they told me the shifter assembly needed to be replaced. Actually, it was just one part of the assembly, but I had to buy the whole thing: $370 for the assembly, $130 for the labor to install it, plus tax and what have you. They’d have to order it so in the meantime the tech managed to get this one working. My options were to order the part and schedule the swap, or leave it be and see how long the fix would last. When it failed (when, not if, I noticed the choice of words) I could call the order in and they’d take if from there.
I chose to let it go for now and take my chances. That was the end of June and now it’s the beginning of August. I was in Asbury Park one night last weekend when it failed. I applied the override and got on my way.
Today I implemented my own fix, which I suspect will last longer than theirs. Before I continue I need to tell you that I’m not recommending that you perform this hack on your own vehicle. It disables a part of the safety interlock that prevents you from accidentally shifting out of Park. I personally don’t have a problem with that because I’m an Old Guy that grew up without those damned interlocks, back when you could freely shift the transmission however you pleased at any time.
Let me describe the interlock system. There’s a button on the shift handle which, through a series of internal levers, must physically move a lock that trips whenever the lever is placed in Park. That kind of interlock has been around forever. Some column shifters, for example, required you lift the handle toward you before they’d move out of Park. Implementations vary but they all accomplish the same thing. But there’s an additional interlock here, one that prevents the button from moving unless the ignition is on and your foot is on the brake. Naturally, this is an electrical interlock. There’s a solenoid in the shifter assembly that, when electrically actuated, moves a smaller physical interlock within the button, allowing it to move. This second interlock is tied into the ignition circuit and the brake lamp circuit. Yes, what you’re thinking is true; if your brake lights fail in certain ways or if the fuse for that circuit blows, you’re stuck in Park. When the system is working properly you listen can carefully and hear the solenoid actuating as you press and release the brake. The override mechanism mentioned earlier is a tiny lever that, when pressed, simply does what the solenoid does – allows the button on the shifter to move. In fact, when the system is working properly you can see the override lever move when the solenoid actuates. Whenever the lever is not in Park, the lever remains in the override position.
In my case, I knew from testing that the ignition, brake, and brake lamp circuits were operating properly. The intermittent was that sometimes the solenoid would actuate and sometimes it wouldn’t. Solenoids are simple electromechanical devices. I’m guessing that there could be an intermittent open circuit, maybe caused by something as simple as a solder joint gone cold from vibration or age. Or the mechanical part of it is sticky or binding, where the correct electrical signal is present but it can’t physically move, sometimes. Either way, the shifter assembly needs to be removed for disassembly and troubleshooting. There’s where that shop manual, the one I don’t have, would be handy.
My fix is simpler. I took a few small zip ties, daisy-chained them together to an appropriate length, and positioned them such that the interlock override lever is in a permanently-overridden position. The small daisy-chain of zip ties doesn’t interfere with anything and has enough slack that it can be removed without tools, if necessary for some reason. The zip ties are bright yellow so they’re obvious to anyone looking in there.
The effect is that the shifter now behaves as they used to in the 60s. You can’t shift out of Park without deliberation, but you can do so without the ignition on and stepping on the brake.
So, half a grand in parts and labor, before tax? Or a couple of zip ties? The difference will put lots of gas in the bikes. See you on the road.
Update, November 24, 2012: I’ve noticed that this is a popular post. Between the comments and the email, well, this is apparently a common failures. And here I just read in Fortune magazine about how hard Ford works to make sure their parts are reliable. But I digress. I simply wanted to add that my fix is working just fine to this day. Haven’t touched it. No problems.
On the way back from New York a couple of weeks ago – a spirited ride along the Hudson with the OCC crew – I noticed a rather loud clunking noise that seemed to come from the front end of the Wide Glide. It only happened on the worst of the road irregularities and didn’t interfere with handling, so I made a mental note and pressed on.
Over the next few days I made an effort to find the source of the noise. It sounded like metal-on-metal and it seemed to be getting worse. Neck bearings, fall-away, pinch bolts, motor mounts, swing bearings, everything in the Critical Fasteners list, and a whole lot more, all came under scrutiny. Sometimes, but not often, one thing or another would take a little torque. And several times I was convinced I had found the problem only to find that, no, that wasn’t it after all.
I’ve been convincing myself that major disaster was lurking to strand me, or worse. You know, that whole “death or serous injury” thing that you find on nearly every page of the service manual.
But today I found the problem!
I was riding with Pam. She was the lead bike; I was taking the opportunity to hit every possible hole in the road while placing my hands on everything I could reach. And there it was!
The fuel tank mounting bolts – probably the ONLY thing that had escaped my torque wrenches – had grown quite loose. The front was worse than the rear. Both are easy to reach.
There are plenty of good potholes just down the street from my garage. I guess I’m lucky that way. (Sarcasm cranked to 11. So happens I wrote checks for my property taxes today and I’m disgusted with the road maintenance – or lack of same – in my town. Shovel-ready my ass. But I digress.) A quick road test confirmed the clunk was gone!
Lesson learned: Sometimes noises come from places other than where they sound like they’re coming from. Check the easy stuff first and don’t skip a thing.
Yesterday I found that the 2008 Parts Catalog for the Dyna, publication number 99439-08A, contains a typo.
On page 64 there is an illustration (duplicated on page 66) of the front fork. The screws for the axle holder (end cap) are shown as having different lengths and index numbers. Index number 1 is listed on page 65 as part number 4042, which is correct. Index number 31 is listed on page 67 as part number 46614-06. This is incorrect, as are both illustrations.
According to an H-D tech I spoke with yesterday, you should use two part number 4042 screws to secure the end cap, even though the illustration shows a shorter screw on the trailing side of the cap.
It logically follows that the lockwasher, index number 3, part number 7062, should be used in both places as well.
The first rule of working on color TVs is simple. You remove your rings, your watch, and so on. Some take the rule a step further and keep one hand in their pocket, unless it’s needed for the task at hand.
The reason for the rule is simple. That stuff is metal, and there be large electrical potentials lurking within – even when the TV’s been turned off for long periods of time.
Variants of the rule apply in lots of situations that have nothing to do with television repair. One popular variant is removing your tie before working with machinery. You get the idea.
Well, I neglected the rule. The other day I set out to introduce some refrigerant into the air conditioning system of a Buick. I was prowling around under the hood – the engine off and keys in my pocket – seeking the location of the low-side port. It wasn’t jumping out at me. So I’m feeling my way around the lines, my arm snaked into the engine compartment to the shoulder when the FZZZT hit and my left wrist exploded in pain. I hastily yanked out the limb, gouging chunks of flesh from my bicep and elbow. But the real problem was my watch - the one that I had no business wearing, had I followed the rule. The stainless steel band had apparently shorted a starter terminal to ground. The heat had spot-welded the clasp shut and I found myself in panic mode trying to get the blasted thing off. And finally I did, but not before it had burned a rather impressive looking depression into my wrist. No blood from the wrist; it was cauterized but the red stuff had begun to leak from the other holes…
That was a couple of days ago. It’s all on the mend now and most of the pain has subsided. It still looks plenty ugly under the bandage, but it’s improving every time I look.
Lesson learned: pay attention to those rules, they’re there for a reason.
Oh, and the air conditioner? I found the low-side port against the firewall and added the needed refrigerant. It’s working fine again. Anybody want to buy a Buick wagon?
Yesterday I dealt with a minor problem with the Harley, one that had been bugging me for a month or so. When applying the rear brake the stop light wasn’t coming on as quickly as I would like.
I was thinking that it might have something to do with the master cylinder rebuild I did some months back. That wasn’t merely convenience, it was a necessity! The pliable parts of the piston had largely disintegrated leaving the rear brake absolutely useless. The switch is actuated by hydraulic pressure so perhaps a bit of debris had made its way down the line and into the switch. Odd, since I completely purged the circuit and bled it thoroughly as part of the rebuild.
I noticed the trouble with the stop light during a pre-ride check so I bled the circuit again. The trouble cleared but soon returned. Another bleed, another temporary fix. This time when the trouble returned I did the electrical checks (all good) and gave in to replacing the switch.
So yesterday was the day. Luckily the local dealer had one for me and lightened my wallet by a twenty. I considered myself fortunate; they usually don’t have whatever part I happen to be looking for. Since it was my first visit to the dealer since they stocked the 2008 models I couldn’t resist browsing just a little…
Back in the garage, it took about fifteen minutes to replace the switch (with a metric wrench, so much for American Iron, eh?) and bleed the circuit yet again. The stop light was back to functioning normally at the lightest pedal touch.
I suppose I should have inspected the old switch to try to determine if it had any debris in it causing the trouble. But I just pitched it in the bin, grabbed a helmet, and went out for a test ride. Today they picked up the trash.
My garage door had been making a little extra noise and seemed to be moving just a little bit slower lately. I did what anyone would do – I checked the log and found that I had neglected my lubrication duties! So I pulled on a pair of latex gloves, grabbed an old towel for the inevitable mess and went to work. I mopped up the old grease from the tracks – the towel collected the gobs of gritty goop nicely. I shot the rollers and the chain with fresh lithium grease. I ran the mechanism several times, paying attention that I’d gotten the grease into all of the moving parts. It appeared that over the years the chain had stretched some and I wondered briefly when it would fail…
And suddenly it stopped, mid-cycle! What’s more, I think I saw wisps of smoke curling from within the motor power head’s housing. Smelled like… and I would later confirm… eau-de-silicon. More precisely, the motor’s startup capacitor was had fried.
Stanley, the manufacturer of the unit, stopped making garage door openers back in the late 90s, the Web told me. Not much chance of finding replacement parts.

 Today I spent a goodly part of the day wrenchin’ the Dyna. An interval service was a bit overdue and I wanted t get it done before Biketoberfest. Bummer, I found a few issues…