Tag Archives: software

Killing IE May Be More Complicated Than It Looks

I ran across this article, also on ZDNet, which digs a little deeper into why getting rid of Internet Explorer may have other implications.

Saying goodbye to Internet Explorer might be more complicated than you realise [sic]

Could this be the beginnings of a workaround for legacy applications like Eudora? Does this even matter? I’m keeping my eye on it anyway because of Eudora’s dependency upon the “Microsoft Viewer”, when it’s selected to display messages.

Microsoft Internet Explorer in the news

Someone pointed me at an article appearing on ZD-Net’s Extreme Tech site – Microsoft Will Put Internet Explorer Out of Its Misery Next Year – which states that IE will be sunset for good June 15, 2022.

The article is focused on the aging browser itself but then these sentence appear.

It’s clear Internet Explorer doesn’t have a place in Microsoft’s online efforts with its clunky old rendering engine. After the shutdown, Internet Explorer will no longer be available on any consumer version of Windows 10.

Isn’t that “clunky old rendering engine” what Eudora’s using when Microsoft’s viewer is selected for viewing messages? As it happens, the answer is yes.

So, what will happen in 2022? Only Microsoft knows for sure. I suppose it comes down to whether or not Microsoft will actively remove the files that make up the rendering engine.

I raised the topic this morning on the Eudora for Windows list and some discussion is beginning to take shape. As someone there said, it’s not time to panic.

Edited to add a link to another article that may be related to this topic: Saying goodbye to Internet Explorer might be more complicated than you realise [sic].

Hydra

This is a story about Hydra. Hydra’s a box, a computer, that up and died the death that old machines sometimes do.

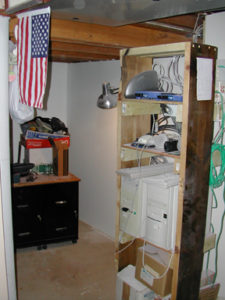
Hydra, dead, stripped of all innards save the CPU and motherboard, awaiting transport to the parts shelf. Click for full-size image in a new tab.

I’m not 100% certain why Hydra’s dead, but pulling everything except the CPU still won’t elicit so much as a measly POST beep from the aged motherboard. I meter-tested the power supply. (I had another box on the bench for a PSU replacement, so I briefly stuffed the new PSU into Hydra just to make sure.) There’s nothing left to die except the mobo or CPU!

“So what,” I hear you thinkin’, “who TF cares about yer old box?”

Well, I do.

See, Hydra’s served the house in various capacities for a long, long time before retiring to the un-insulated sun room by the pool deck – most definitely an unfriendly environment for computers. The moisture, for one: Florida’s humid. The there are the temperature swings; in winter it can drop to near freezing and closed up in the summer it might reach 115F – or more. Environmental extremes have been the story of Hydra’s life. Finally, Hydra’s kinda remarkable in that it’s one of the oldest processors that Windows 10 will run on: the AMD Athlon 64 3200+.

So yeah, it’s worth taking a few minutes to write about little Hydra’s uncomfortable life.

Dex (left) & Reptar, circa 2002, about four years before Hydra.

For that we have to go back to Monday, October 16, 2006. That’s the day I walked into a local Comp-USA (remember that name?) with the idea of upgrading the house servers. At that time there were two. A more-than-10-year-old Pentium Pro box named Dex running Win2K Server, and a slightly newer Pentium II box named Reptar doing file server duty. Dex and Reptar were simply running out of gas.

I wanted a 64-bit CPU, a couple of GB of RAM with room for some future expansion. Remember, memory was considerably more expensive than it is today. I wanted the ability to use my existing IDE drives plus some SATA ports for later. I wanted a PCI bus. Overall, just something a bit more modern, something that would run VMware so I could segment the family’s workload.

I walked out with basically this:

Plus assorted support stuff like a cheap case, power supply, optical drive, and so on. Came to about six hundred bucks. Sure, I could have done better online but WTF, that’s what retail’s all about; getting it now. I assembled and IPLed the box that very afternoon and Hydra took up residence in the dusty, dark basement. Right next to the furnace. So Hydra’s twenty-four seven life began.

Hydra survived much abuse. The second phase of the basement refinishing project comes to mind. The drywall work deposited a coating of dust on Hydra’s innards that called for a weekly blowout to keep it from burning up. The un-insulated NJ basement was a harsh home.

Over the years came more memory, a couple of hardware RAID cards, more drives, and still more drives. That little case became dense and heavy. And ugly, as I cut more holes for fans. Yeah, it got loud, too, but in the basement it didn’t matter.

Win2K Server gave way to a bare-metal hypervisor for a while. Fast like shit through a goose, but tricky to administer. Bare-metal gave way to Linux. Hardware RAID gave way to software. The years passed.

In December 2012 we moved to Florida. We unceremoniously tossed Hydra into a U-Haul trailer with the rest of the stuff we didn’t trust the movers to handle and pulled to its new home.

Environmentally the new network closet was an absolute step up. But Hydra screamed like a jet on full afterburner with all those drives and fans. In the old basement it didn’t matter but the closet’s just off the office, quite distracting…

By the end of the first quarter of 2013 Hydra entered a much-needed semi-retirement. The replacement, named dbox, was a quad-core box from the parts shelf, with way more memory and fewer, but higher capacity drives. By then all the server roles were running as virtual machine guests. The migration was super-fast and super-easy.

In the garage, Hydra rested on the parts shelf before being called upon to support a Facebook project Pam had launched. I don’t really remember exactly when that began. Hydra was much quieter, stripped to a single drive running Windows 7. We shoved the headless case under the healing bench near the door and Pam ran her project from her Windows desktop, logged in using the Remote Desktop Connection tool. It wasn’t the highest performance configuration in the world but it got the job done.

Without the benefit of a proper UPS poor Hydra suffered a new peril: power glitches. We got used to looking for the power light under the workbench as we passed. If it was dark anyone could thumb the power button and go about their business.

That arrangement lasted about a year. Pam’s project wound down and Hydra went back into retirement.

Meanwhile, in the real world Windows 10 was getting legs. I’d come to like the Tune In Radio app. One can only take so much country and classic rock from the local stations and I’d had my fill. I wondered… could a Windows 10 box and Tune In Radio bring superior tunes to the pool deck? Was there any spare hardware around that could run Win10? Microsoft took great pains to exclude older hardware, even while offering free upgrades. Would Win10 run on Hydra’s CPU, now approaching twelve years since its introduction?

It turns out the answer was yes! Well, there were issues to overcome along the way, but yes.

A Win10 license costs more than the budget for this venture, which was exactly zero. Microsoft was still offering free upgrades from Win7 so the plan was to follow that path. Hydra had a Win7 Pro 64-bit OS from Pam’s project so we got that upgrade started. The several-gigabyte download took forever over the crappy ADSL connection. Then the upgrade failed.

That’s how I learned that Hydra’s Athlon 64 CPU doesn’t support the CMPXCHG16B instruction. This instruction, commonly called CompareExchange128, performs an atomic
compare-and-exchange between 16-byte values. And 64-bit Win10 (and 64-bit Windows 8.1) requires this instruction.

CMPXCHG16B isn’t required by a 32-bit Win10. The path became clear. Install a 32-bit Windows 7. This meant giving up any installed memory over the 3.5 GB mark. Fine. Get Windows 7 activated. Install all the service packs and patches. Finally, upgrade it to Win10. Remember that crappy little error-prone ADSL connection? That, along with the lengthy downloads and general slowness of the ancient hardware… there went a couple of days. Thankfully it didn’t need much attention.

But it worked!

And that’s where Hydra lived out its days. Providing great radio out on the pool deck. Enduring temperatures from near-freezing to well over a hundred degrees.

The evening of May 15, 2017, I attempted to kick Hydra to life to collect the latest Win10 updates. I thumbed the power button, and heard it starting up as I walked away. Later I noticed it had gone down. Hydra never booted again.

A few interesting observations…

  • Hydra began and ended life on a Monday. (Watch out for Mondays.)
  • Hydra ran ten years and seven months. 10-7. If you remember the old 10-codes the cops and CBers used to use, 10-7 means “out of service”.
  • Hydra ran 24/7 for most of its life. If we assume about 9 years of total running life, that works out to about three-quarters of a cent per hour against its original installed cost. Absolutely worth every nickel.
  • Hydra died on its side, on the floor, in an overheated room, alone, behind the bar. A noble death.

And that’s where today’s story ends.

Maybe you’ve got an old AMD Athlon 64 3200+ floating around in your parts bin? Maybe you’d like to give it a new home? If it resurrects Hydra then it’s mine and I’ll give you a nice, fat mention in this story AND a link in the sidebar. If not, I’ll send the chip back to you with my thanks for a noble effort.

But wait! What about the tunes out on the deck? It just might be resolved. Well, at least some preliminary testing seems to show that it can be resolved with a little bit of creativity.

So that part of the story needs to wait. But I can promise you that if this scheme works it’ll be even weirder.

Revisiting Eudora SSL Certificate Failures

updatedIntroduction
Back in January I wrote an article about remedying failed certificate errors in Eudora. The article came about because I had a problem, the solution I puzzled out wasn’t terribly obvious, and I hoped to help others in a similar bind.

The article exceeded my expectations! Go read the comments and you’ll see what I mean. I’ll wait.

I’ve learned a lot, too! There are WAY more Eudora enthusiasts than I had ever imagined. There’s a rather active, reasonably high signal-to-noise ratio mailing list dedicated to Eudora for Windows (eudora-win@hades.listmoms.net) where you’ll find plenty of expertise. There I learned a few other tweaks and adjustments that have made my Eudora experiences even better, despite my many years using it.

Thank you all for your support and for passing my article around! I can’t believe some of the help desks it’s touched.


Criticism
While the solution I discovered was effective, I received criticism that it was more complicated than necessary. There’s no need to go through the steps to import or install a certificate, I was told, and in fact, the import/install steps could actually lead to other problems.

I’ve since learned that this is largely true – although I haven’t heard of any instances where trouble actually resulted from the import/install steps I outlined.

This article presents a shortened solution. It omits the unnecessary steps and borrows a bit from stuff on the mailing list. It includes images of the dialogue panels you can expect to see – because I received a ton of positive feedback on that.


Revised Steps
Once again, I’m using Eudora version 7.1.0.9. I can’t think of a single reason anyone should use an earlier version. I’m also running on Windows 10, which should lay to rest any doubt that Eudora runs just as well there as ever. I think that’ll  stay true until email address internationalization becomes a standard and gains traction.

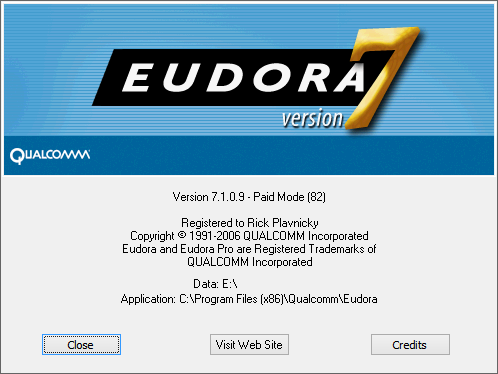
A quick word about the dialogue panel graphics shown in this article. They’re actual screen shots so the default action button appears slightly different from the other buttons. (This graphic, for example, shows the Close button as the default action.) In the instructions which follow, however, the button(s) that require clicking are not necessarily the default action.


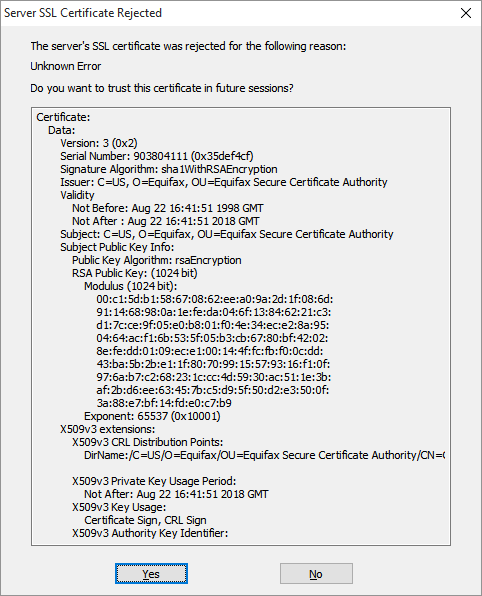
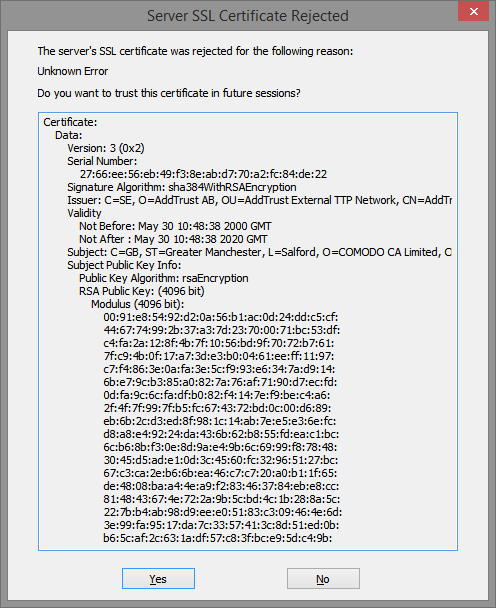
It’s most likely that you’ll encounter a certificate rejection when checking email; most of us check email more often than we send. And failures occur with increased frequency lately with Gmail; they seem to change certificates more often than other providers. So let’s assume that’s the case and Eudora has thrown this error panel at us during a check on Gmail:

Server SSL Certificate Rejected
Server SSL Certificate Rejected during a Gmail check.


Take note of the Eudora Persona which produced the error, if you can. A clue sometimes be seen in the status area. In our example it’s one of my Gmail accounts.

The status area at the bottom of the screen may tell you which Persona has produced the certificate error.
The status area at the bottom of the screen may provide a clue as to which Persona has produced the certificate error.


If you use multiple Persona in Eudora and can’t tell which one experienced the certificate rejection then you’ll need to look at each until you find the correct Persona to adjust. Working with the wrong one will just frustrate you. We’ll come back to this a little later.

For now, Click the Yes button in the Server SSL Certificate Rejected panel. Clicking Yes won’t actually fix the problem but it’ll let Eudora finish the tasks that are running. Allow Eudora’s activities to continue until they complete.

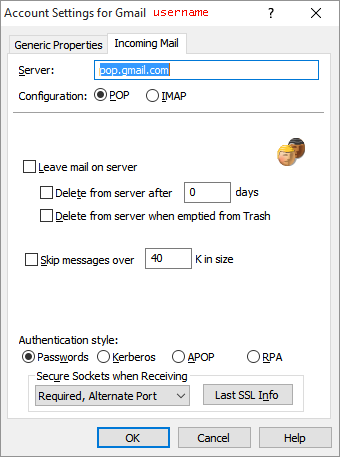
Without closing Eudora, access the Properties of the Persona with the rejected certificate.  In our example, we know the rejection occurred during a mail check so we’ll access the Incoming Mail tab of that Persona. The Properties appear in the Account Settings panel.

The account settings panel for the Persona that rejected the certificate.
The account settings panel for the Persona that rejected the certificate. We’re looking at the Incoming Mail tab because we know the certificate rejection occurred while checking for new email. Had the rejection occurred during a send we’d be looking at the Generic Properties tab instead.


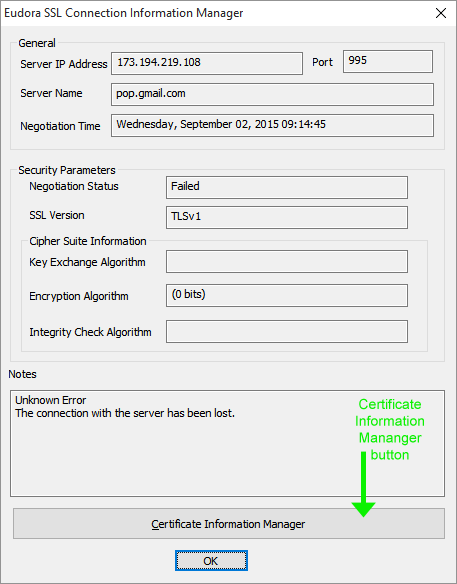
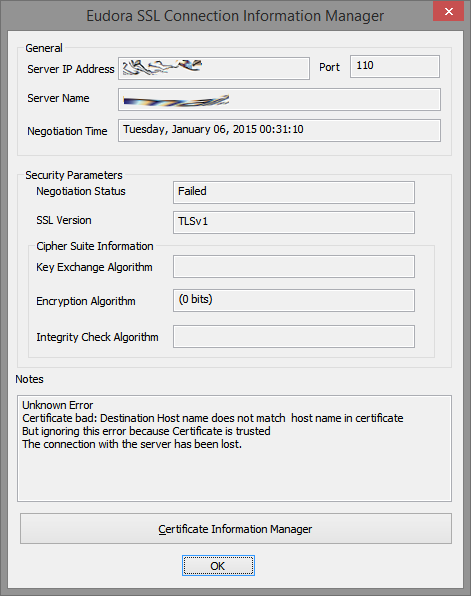
Click the Last SSL Info button. The Eudora SSL Connection Information Manager panel appears.

eudoracert04-3
The Last SSL Info button will only show this panel if this Persona has used SSL since Eudora was last launched. The green arrow indicates the Certificate Information Manager button mentioned below. Yes, that large grey bar is a button!


Click the Certificate Information Manager button, which I’ve indicated with a green arrow in the graphic above. DO NOT click OK if you are trying to get to the Certificate Information Manager. The Eudora Certificate Information Manager panel appears.

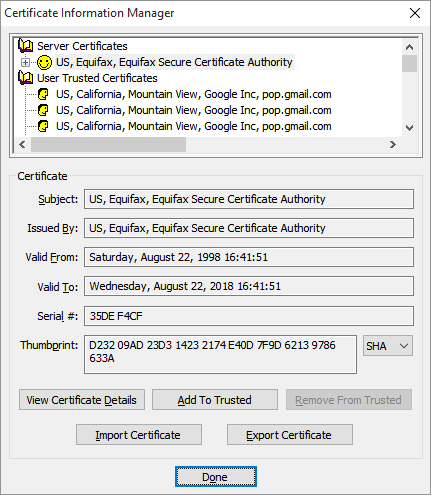
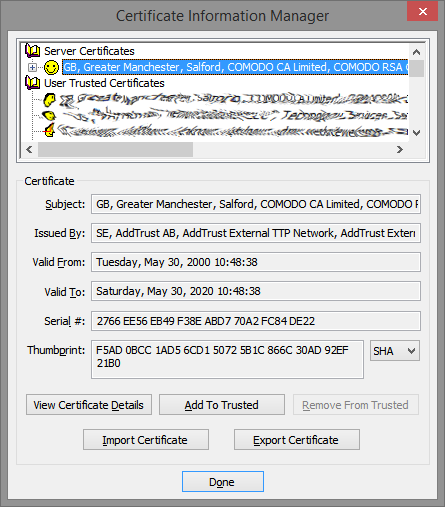
The Certificate Information Manager displays and allows you to manipulate the certificate chain.


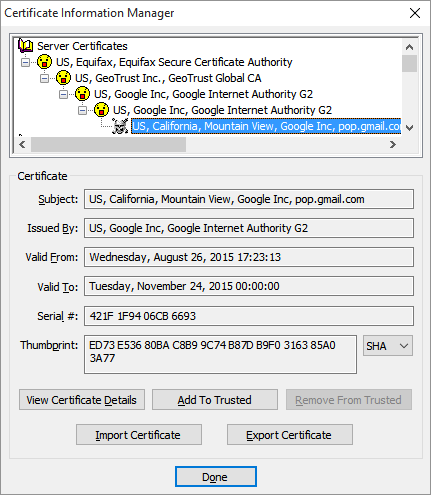
Looking at the top-most section of the Certificate Information Manager panel, the first row under Server Certificates (that’s the topmost row with the smiley face in the image above) contains the rejected certificate. You can’t actually see the problem certificate yet because it’s actually the last (or near the last) in a chain of certificates. Like the layers of an onion, you can’t see inside until you remove a layer. (Some refer to it as a series of locked doors, where you need to unlock one before you can see the next.) In any case, the rejected certificate we seek is inside. Click the plus sign next to the top smiley row to expand the chain, which is like peeling away the first layer of the onion.

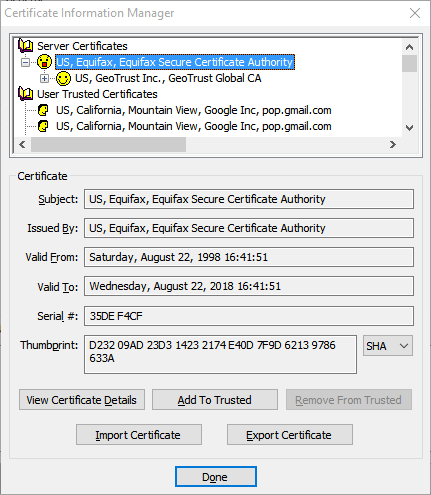
Here we've expanded the chain of certificates just once.
Here we’ve expanded the chain of certificates just once. Notice the smiley face icon we saw earlier changes to an open mouth. The expansion has revealed… another certificate with another smiley face – the next link in the certificate chain.


Keep expanding the certificate chain by clicking the plus sign of each certificate in turn, peeling away layer after layer of our imaginary onion. Eventually you’ll see a skull and crossbones icon instead of a smiley face.

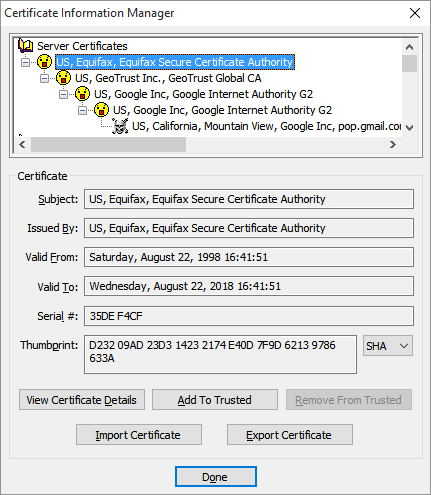
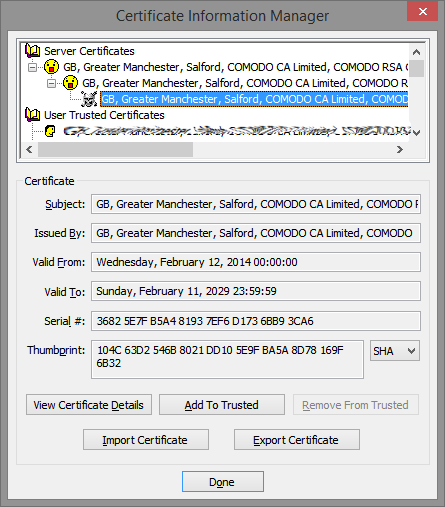
Here we see the fully expanded certificate chain. The final certificate - the one with the skull and crossbones icon - is the one that was rejected because it was untrusted.
Here we see the fully expanded certificate chain. The final certificate – the one with the skull and crossbones icon – is the one that was rejected because it was untrusted.


In this example I needed to expand the chain four times to reach the problem certificate. You may need to expand the chain more times or less times, and that’s perfectly okay.

Remember several steps back I mentioned working with the correct Eudora Persona when chasing a rejected certificate, and that I’d come back to it later? Welcome to later.

Let’s imagine for a second that we took all these steps and expanded the certificate chain all the way to the end – no more plus signs to click – yet didn’t end up with a certificate marked with a skull and crossbones. What then?

Simply, it means that we’re looking in the wrong place! If you’re not seeing the rejected certificate you can’t very well fix it, can you? So if you gotten this far with no skull and crossbones then close the Certificate Information Manager panel and close the Eudora SSL Connection Information Manager panel. Choose another Persona to work with (or the other tab of the Persona if you don’t know whether you were receiving or sending when the error appeared) and try again.

In order to get Eudora to accept the failed certificate you must first find it! And it’s indicated by a skull and crossbones icon. No skull equals no fix. This is sometimes a point of frustration.

But let’s assume that you have found the certificate with the skull and crossbones. Select it by clicking on it, so it looks like this in the Certificate Information Manager:

The rejected, untrusted certificate with the skull and crossbones icon is selected, indicated by appearing highlighted.
The rejected, untrusted certificate with the skull and crossbones icon is selected.


Now we’re ready for action!

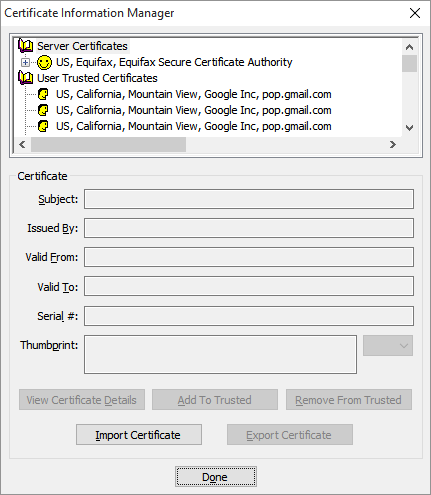
Click the Add To Trusted button. When you do that the certificate chain we took so much trouble to expand will contract. The Certificate Information Manager panel will look much the same as it did when we first opened it.

The Certificate Information Manager panel just after the Add To Trusted button is clicked.


All that’s left to do is dismiss all these panels and test.

Click the Done button in the Certificate Information Manager panel to dismiss it. Click the OK button in the The Eudora SSL Connection Information Manager panel to dismiss it. Click the OK button in the Account Settings panel to dismiss it.

Finally, try collecting (or sending) your email again.

Did it work? It did? Great, you’re done. Well, until next time Eudora rejects an untrusted certificate.

Oh, wait, it didn’t work? Don’t panic. Just go back and follow the steps again.

Think back to the certificate chain, the onion layers, the series of locked doors. You need to trust a certificate in the chain before you can see what lies beyond it. The next run though the steps you’ll find that the certificate chain expands one more time before revealing another certificate with the skull and crossbones icon. When you find it, trust it and test again.

As non-intuitive as that may sound, you may need to step through the fix two or more times before achieving success.


Conclusion
If you compare this discussion to my earlier article you’ll see that there are actually WAY fewer steps. Once you’ve gotten through it a few times (and you certainly will if you use Gmail) you’ll see that trusting new certificates only takes a handful of clicks.

Yes, this article seems/is long and ponderous, with several panel images that look nearly the same. That’s because I’m trying to do a better job describing the areas about which I’ve fielded many questions privately.

A tip o’ the hat to Jane who, after working through some frustration, circled back to tell me what she had learned. Jane helped bring clarity to a possibly confusing section of this article. Thanks!

Eudora and SSL Certificate Failures

September 9, 2015 – I’ve revised this article, simplifying and shortening the steps involved!

See the revised article here.


Eudora rocks.

I’ve used this old and outdated Windows mail client since it was kind of new, more than 25 years ago. I chose it when I was moving my message store from a shell account to a PC, right around when PCs started to get reliable enough such work. Eudora was the first client I discovered whose message store was a simple transfer from Unix, drop-in, and run. I never looked back. Since then I’ve developed a rather extensive set of filters and such to efficiently manage dozens of email accounts and tens of GB of messages.

Bummer, Eudora hasn’t been actively supported since Qualcomm gave it up in 2006. Yeah, I know, it went Open Source. But IMHO they went and screwed it up.

As with any unsupported software, sometimes the passage of time breaks things. More than a few times I’ve cast about for another capable email client. It’s always gone the same way: I find none, get tired of searching, and turn my attention to propping the old girl up just a bit longer.

One afternoon in October last year one of my email hosts suddenly rejected its SSL certificate. It happens. When it does, Eudora offers to trust the new certificate. Thereafter all’s well. Not this time.

It wasn’t my host, and it wasn’t a critical account. Via trouble tickets, I went back and forth with the admins at the hosting company for the better part of a month. They’d suggest something, I’d try it – and maybe try a few things on my own – but nothing worked. Along the way I cast about for a replacement client and I came up dry. Finally I just shut off SSL for the account and got on with life. Not the best solution, but it worked. I really do need to find a new client! Maybe tomorrow… Yeah, right.

Last night Eudora rejected more certificates. This time it affected a multiple accounts on different domains. These were more important to me so I needed a solution.

And I found one.

First, some groundwork. My Eudora is version 7.1.0.9 running on Windows 8.1 Update 1. Of note, Eudora has a patched QCSSL.dll, needed since Microsoft made some changes to a library that caused the old client to loop for a Very… Long… Time… on the first use of SSL. I think that was around the time Windows 7 launched. Depending on your version(s), you may find differences in the dialogues and steps. I tried to give enough detail that you might find your way.

Let’s get started. The certificate rejection error looks like this:

Server SSL Certificate Rejected

See the question in the dialogue, “Do you want to trust this certificate in future sessions?”

It once was a simple matter of clicking the Yes button and that would be that. But that didn’t work in October and it didn’t work last night either.

Heres what to do to fix the problem.

Close the error dialogue and open Properties for the affected Persona. On the Incoming Mail tab (because it’s likely that a receive operation failed first), click the Last SSL Info button. The Eudora SSL Connection Information Manager opens. It looks like this:

Eudora SSL Connection Information Manager

There’s some weirdness in this dialogue, some confusion over host names. I think it’s a junk message. Click the Certificate Information Manager button. The Certificate Information Manager opens, and it looks like this:

Certificate Information Manager

Look at the section called Server Certificates. See the smiley face? That means trusted status. Expand that certificate tree in the usual way – click the plus sign next to it. Keep expanding, drilling down until you see one that’s untrusted. That’s the one with the skull ‘n crossbones. Of course.

The Certificate Information Manager panel, with the untrusted certificate, will now look something like this:

Certificate Information Managed - Expanded to show untrusted certificate
Certificate Information Managed – Expanded to show untrusted certificate

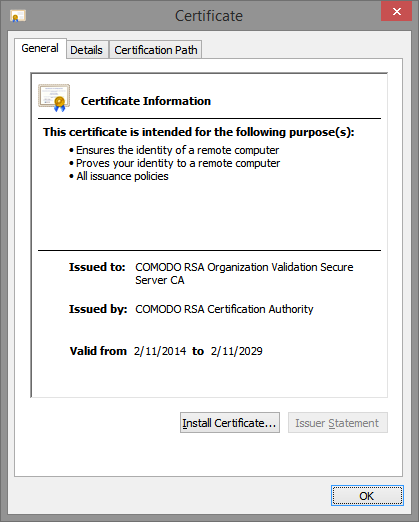
Click the offending untrusted certificate to select it then click the View Certificate Details button. The Certificate opens. It looks like this:

Certificate panel
Certificate panel

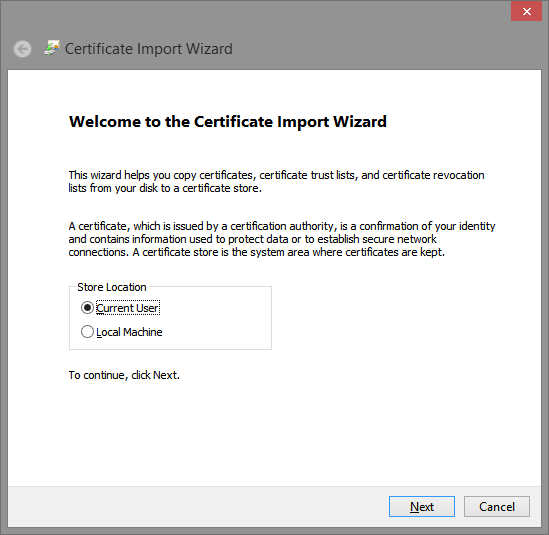
Select the General tab, if necessary, and click the Install Certificate button. The Certificate Import Wizard panel opens. It looks like this:

Certificate Import Wizard
Certificate Import Wizard – Location

Choose a Store Location – Current User or Local Machine – as needed for your situation. I chose the Current User because I’m the only user on this box. Click the Next button. The Certificate Import Wizard continues, and it looks like this:

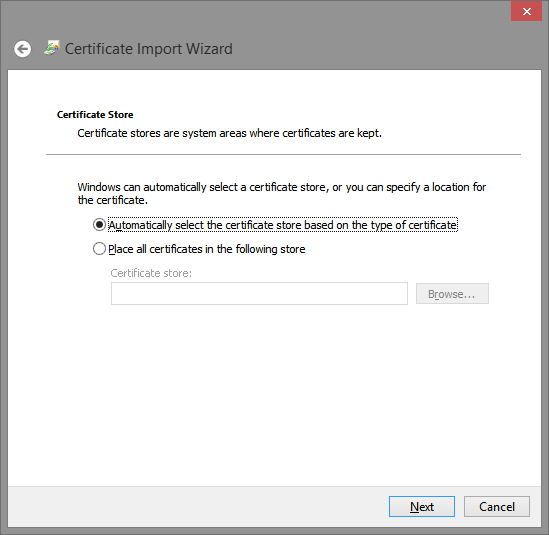
Certificate Import Wizard – Certificate Store

The wizard asks where to store the certificate. Windows can automatically choose the Store based on the type of certificate, and that’s a pretty good choice. It’s also the default. Click the Next button to display a confirmation panel. It looks like this.

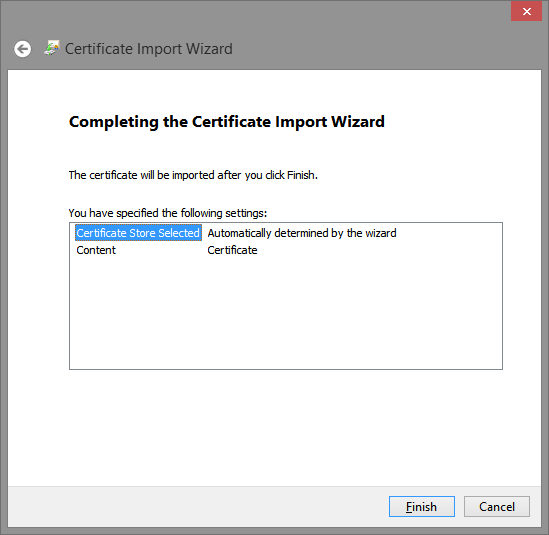
Certificate Import Wizard - Completing the Certificate Import Wizard
Certificate Import Wizard – Completing the Certificate Import Wizard

Click the Finish button.

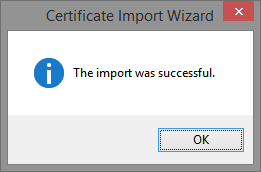
Whew! It looks like the import was successful.

Certificate Import Wizard - Success!
Certificate Import Wizard – Success!

Click the OK button to close the Certificate Import Wizard.

Now, you’ll be looking at the Certificate Information Manager again, just how we left it.

Certificate Information Managed - Expanded to show untrusted certificate
Certificate Information Managed – Expanded to show untrusted certificate


With the untrusted skull ‘n crossbones certificate highlighted, click the Add To Trusted button. Then click the Done button to close the Certificate Information Manager.

Finally, try to reach the server that rejected the SSL certificate in the first place.

Did it work?

If it did then you’re finished.

Uh oh, waddya mean, it didn’t work?

You’ll need to go back and follow those steps again.

I hear you now. “Only an idiot does the same thing over and over expecting different results.”

Well, you’ll notice that the next time through the Certificate Information Manager will show a deeper tree of Server Certificates before you get to the untrusted certificate. You’ll need to drill deeper.

You may need to import and add several before achieving success. After a couple of imports it’s easy to forget the Add To Trusted button. Don’t ask me how I know!

I hope that helps someone.

Sometimes I think I’m the very last Eudora user out there. I’d love to hear from others. In fact, if you’ve moved off Eudora and found a decent replacement, I’d love to hear that, too. I know it’s only a matter of time.


Additional information added April 17, 2015…

One person described, in the comments below, that he she had some difficulty with the Add To Trusted button in the Certificate Information Manager when working with Google’s new certificates. His Her insight came when he she realized that he she was simultaneously viewing this post with Google Chrome. When he she closed Chrome and went through the process again, everything worked.

A big THANK YOU goes out to one Pat Toner for checkin’ in and increasing the value of this post with his her feedback. I owe you a beer, Pat. And an apology for my gender assumption based on name.

Moving Photos – A little Test

A long time ago I was talking with some folks on the Facebook about the Route 1/130 traffic circle. The site of countless crashes over the decades – from fender-benders to fatalities – the infamous circle was finally replaced by a modern flyover-style intersection.

Eventually I moved the photos over to Google+ to reach a wider audience.

Here I’m testing the Google+ API that allows embedding of posts. I’m pleased to say it works well.

Enjoy.

SimCity

Or should I just call it SimShitty, as some have taken to calling the recent launch?

The other day Pam plunked down her sixty bucks, minus five with a coupon, plus another fifteen for a strategy book… lemme check the math, that’s seventy smackers, plus some Florida tax… damn, my head’s swimmin’. And for what? Not a lot.

She’s gone through the tutorial and that’s about it. The Origin servers are all down and there’s nothing else to be done. No serv-o, no play-o. The stuff she learned in the tutorial’s largely forgotten. After all, what you don’t put to use in 24 hours of learning is gone the next day, the brain folks love to tell us at training seminars. Use it or lose it.

SimCityOkay, everything’s social now. I get it. But SimCity’s largely a game where a single player tries their hand at lording over an infrastructure that happens to include, well, a simulated population. It’s not like your city’s populated with Aunt Jane or the dork you went to school with or… damn… your boss. No, the social part of this title is nothing more than a bag on the side.

So tell me… why’s it necessary to connect to Origin’s server to play?

Oh, yeah, DRM. Those evil thieves… er customers… are trying to steal your stuff.

Listen up, Electronic Arts.

You’ve got this customer, her name’s Pam. She’s known about you since you were one of many. Back when I used to game. Think Archon on the Apple ][. Yeah, that long ago. She got into The Sims. I bought her a box to play it on. She bought every expansion pack. Then Sims 2. I built her a (then) kick-ass box to play that on and she bought all of those expansion packs, too. Sims 3? Yup. I think she has all of those packs. Books and guides for the lot of ’em, too. I know, I just packed and moved ’em all – a pretty big box – from Jersey down here to Paradise. So Pam knew Sim City from when I played it on the Amiga, and Sim City 2000, too. The ads and previews for the newest SimCity were pretty damned enticing. And not one review – as far as I know – had mentioned this insane reliance on a server connection. So here’s this customer, a good customer, a spendy customer, that threw Electronic Arts a pile of greenbacks for a promise.

And EA failed her.

Over the past few days she’s checked in to try to play, all hours of the day and night. All servers are down.

You failed her bad. There’s no reason to require a remote server connection for single player play. None.

If Pam listens to me, or to our son, or to countless others with similar experiences, she won’t be back.

Shame on you, Electronic Arts.

As big as you are, you really should know better.

SSD

When I built Whisky, my current work-a-day desktop, back in November 2009 I wanted to boot from one of those blazin’ solid-state drives. Bummer, though, either they were seriously expensive or performed poorly. Poorly, of course, was a relative term; for the most part even the poorest smoke conventional hard drives. Still, as the build expenses mounted the SSD finally fell off the spec list.

Sometime after the build, Seagate brought their hybrid drives to market. Hybrids combine a conventional spinning disk and conventional cache with a few gigabytes of SLC NAND memory configured as a small SSD. The system sees the drive as it would any other drive; an Adaptive Memory (Seagate proprietary) algorithm monitors data use and keeps frequently used stuff on the SSD. You’ll find people arguing over whether or not a hybrid drive provides any kind of performance boost. I wrote about my experiences with the Seagate Momentus XT (ST95005620AS) back in June 2010. Today when I build a multiple drive system I routinely spec a hybrid as a boot drive. It’s cheap and it helps.

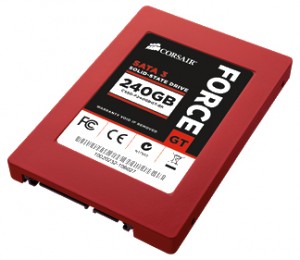
Corsair Force Series GT CSSD-F240GBGT-BKSo about a month ago I ran across a good deal on a fast SSD, a Corsair Force Series GT (CSSD-F240GBGT-BK) and I jumped on it. The specs are just tits: sequential reads and writes of 555 and 525 MB/s respectively. (Sure, that was with a SATA 3 interface and my motherboard only supports SATA 2; I wouldn’t see numbers like that, but still… It even looks great.

Integrating the thing into a working system was a bit of a challenge, mostly because I didn’t want to purchase additional software simply to clone the existing boot drive. I’ve got no trouble paying for software I use; it simply seemed like too much for something to be used but once. So part of the challenge was to find a cost-free alternative.

Strategy and Concerns

The general strategy would be to clone the current two-partition boot drive to the SSD, swap it in and enjoy the performance boost. The SSD partitions would need to be aligned, of course, and somewhere along the way the C partition would need to shrink to fit onto the smaller SSD.

The top concerns came down to security and reliability. Erasing a conventional hard drive is easy: repeatedly write random data to each block. You can’t do that with SSDs. Their blocks have a specific (and comparatively short) lifetime and so on-board wear-leveling routines become important. When data is overwritten, for example, the drive writes the data elsewhere and marks the old blocks for reuse. And unlike conventional drives, it’s not enough to simply write over a block marked for reuse; the entire block must first be erased. The bottom line is you can’t ever know with certainty whether or not a SSD is ever clear of confidential data. Disposing of them securely, then, means total destruction.

As for reliability, a conventional hard drive has to have some pretty serious problems before it becomes impossible to recover at least some data. There’s generally a bit of warning – they get noisy, start throwing errors, or something else that you notice – before they fail completely. Most often an SSD will simply fail. From working to not, just like that. And when that happens there’s not much to be done. This makes the issue of backups a little more thorny. If it contained confidential data at the time of failure you’ve got a hard choice to make: eat the cost and destroy the device, or RMA it back to the manufacturer (losing control of your data).

Considering backups, you can see that monolithic backups aren’t the best solution because they’re outdated as soon as they’re written. Instead, a continuous backup application, one that notices and writes changed files, with versioning, seems prudent.

In my case, this is to be a Windows 7 boot drive and and all confidential user data is already on other storage. The Force Series GT drive has a 2,000,000 hour MTBF, fairly high.

Software

SSDs are fast but they’re relatively small. It’s almost certain that existing boot partitions will be too big to fit and mine is no exception. Windows 7 Disk Manager will allow you to resize partitions if the conditions on those partitions are exactly right. There are commercial programs that will do the job where Windows won’t but my favorite is MiniTool Partition Wizard. I didn’t really want to do that in this instance. The fundamental problem I had with pre-shrinking is that it would involve mucking with a nicely working system. Come trouble, I wanted to simply pop my original drive back in the system, boot and get back to work.

For cloning and shrinking partitions there are several free or almost free applications. I found that most of them have drawbacks of one sort or another. I’ve used Acronis before – Acronis supplies OEM versions of their True Image software to some drive manufacturers, it’s an excellent product. But their free product won’t resize a partition image, bummer. I used EaseUS some years back, too, but a bad run-in once with their “rescue media” – in that case a bootable USB stick. My disks got hosed pretty bad from simply booting the thing and I… wasn’t pleased. Maybe they’ve gotten better, people say good things about ’em, but I wasn’t confident… Paragon seemed very highly rated but in testing I had too many validation failures with their images. Apparently the current version is worse than the back revs. Whatever, I was still uneasy. I ended up settling on Macrium Reflect from Paramount Software UK Ltd. For no rational reason the name of this product bothered me, sending it to the bottom of the test list. Macrium. The word makes me think of death by fire. I was reluctant to even install it. About the only negative think I’ve got to say about Macrium is that it takes a fair bit of effort to build the ‘rescue disk’ – bootable media to allow you to rebuild a failed boot volume from your backup image(s). The rescue media builder downloads and installs, from a Microsoft site, the Windows Automated Installation Kit. WAIK weighs in at more than 2 GB. The end result is a small ISO from which you can make bootable media of your choice. Except for that final burn – you’re on your own for that – the process is mostly automated; it just takes a while. Probably has to do with licensing or something.

Finally, I bought a copy of Genie Timeline Pro to provide the day-to-day realtime backup insurance, mentioned earlier, that I wanted.

Preparation for Migration

I started by installing both Gene Timeline Pro and Macrium Reflect and familiarized myself with each. I built the rescue media for each, booted from the media, and restored stuff to a spare drive in order to test. It’s an important step that many omit, but a backup that doesn’t work, for whatever reason, is worse than no backup at all.

I did some additional maintenance and configuration which would affect the C: partition. I disabled indexing and shrunk the page file to 2GB. The box has 8GB RAM and never pages. I suppose I could omit the page file entirely, but a warning is better than a BSOD for failure to page. I got rid of all the temp junk and performed the usual tune-up steps that Windows continues to need from time to time.

Satisfied, I imaged the System Reserved partition and the C: partition of my boot volume, verifying the images afterward. For each partition, which I backed up with separate operations, I used the Advanced Settings in Macrium Reflect to make an Intelligent Sector copy. This means that unused sectors aren’t copied, effectively shrinking the images. Then I installed the SSD via an eSATA port. Yes, this meant it would run even slower than SATA 2 but it saved a trip inside the box.

It was at this step that I noticed the only negative thing about this drive. The SATA cable is a bit of a loose fit. It doesn’t accept a retaining clip, if your cable is so equipped. Ensure there’s no tension on a cable that might dislodge it.

Creating Aligned Partitions

Partition alignment is important on SSDs both for performance and long life. Because of the way they work, most will read and write 4K pages. A very simplistic explanation is that when a partition is not aligned on a 4K boundary, most writes will require two pages rather than one which decreases performance dramatically and wears the memory faster. (There’s more to it than that, really, but you can seek that out on your own. The Web’s a great teacher. Being the curious sort I learned more than I needed to.)  Windows 7, when IPLed, will notice the SSD and build correctly aligned partitions for you. Some commercial disk cloning software will handle it automatically, too. But migrating users are on their own. Incidentally, it’s theoretically possible to adjust partition alignment on the fly, but if you think about the logistics of how this might be done – shifting an entire partition this way or that by some number of 512 byte blocks to a 4K boundary – you’ll realize it’s more trouble than it’s worth. Better to simply get it right in the first place.

Fortunately it’s easy!

Using an elevated command prompt (or, in my case, a PowerShell), use DISKPART. In my case, my existing System Reserved partition was 71 MB and change, and the remainder of the SSD would become my C: partition.

diskpart
list disk
select disk <n>
(where <n>is the disk number of the SSD)
create partition primary size=72 align=1024
active
(the System Reserved partition needs to be Active)
create partition primary align=1024
(no size specification means use the remaining available space)
exit

You can also use DISKPART to check the alignment. I’ll use mine as an example.

diskpart
list disk
select disk <n>
(where <n>is the disk number of the SSD)
list partition
exit

My partition list looks like this.

Partition ### Type             Size    Offset
------------- ---------------- ------- -------
Partition 1   Primary           70 MB 1024 KB
Partition 2   Primary          223 GB   73 MB

To check the alignment, divide the figure in the Offset column, expressed in kilobytes, by 4. If it divides evenly then it’s aligned. For Partition 1, the System Reserved partition, 1024 / 4 = 256, so it’s good. Partition 2’s Offset is expressed in megabytes so we have to convert to kilobytes first by multiplying it by 1024. So, 73 * 1024 = 74752 and 74752 / 4 = 18688, so it’s good, too.

Whew!

It’s worth noting that what DISKPART didn’t show in the list is the tiny unused space – about 2MB in my case – between Partition 1 and Partition 2 which facilitated alignment.

Someone pointed out to me that partition alignment can be checked without DISKPART. Fire up msinfo32. Expand Components, then expand Storage, then select Disks. Find the drive in question and divide the Partition Starting Offset fields by 4096. If it divides evenly you’re all set!

Migration

I used Macrium Reflect to restore the partition images I created earlier. Rather than allowing the software to create the partitions (which would negate our alignment effort) I pointed it to each target partition in turn. When the restore was finished I shut the system down.

I pulled the SSD from the eSATA port and pulled the existing boot drive from the system. I mounted the SSD in place of the old boot drive. (Windows gets upset when it finds multiple boot drives at startup, so it’s a good idea to have just one.) I took extra care with the data cable.

I powered up and entered the system BIOS, walked through the settings applicable to a drive change, saved and booted.  Things looked good.

Living With the SSD

Wow! Coldstarts are fast. (See below.) So fast that getting through the BIOS has become the perceived bottleneck. Applications start like lightning, especially the first time, before Windows caches them. Shutdowns are snappy, too. (See below.) There’s no shortage of anecdotes and benchmarks on the ‘net and I’m sure you’ve seen them. It’s all delightfully true.

But all wasn’t perfect. After a week or two some new patterns seemed to be emerging.

Every so often, unexpectedly, the system would become unresponsive with the drive use LED full-on solid, for some tens of seconds. Most of the time the system would return to normal operation but depending on what application was doing what at the time, the period of unresponsiveness could sometimes cause a crash. Sometimes the crash would be severe enough to bring on a BSOD. The biggest problem I have with BSODs or other hard crashes is that it causes the mirrored terabyte data drives to resync, and that takes a while. Usually the System Log would show Event ID 11 entries like this associated with the event:

The driver detected a controller error on \Device\Ide\IdePort6.

And once, following a BSOD, the boot drive was invisible to the BIOS at restart! A hard power cycle made it visible again and Whisky booted normally, as though nothing abnormal had ever occurred.

Hard to say for sure, but it seemed as though these oddities were happening with increasing frequency.

Firmware Update

Prowling the ‘net I found others reporting similar problems. What’s more, Corsair was on the case and had a fresh firmware update! The update process, they claimed, was supposed to preserve data. I checked my live backup and made new partition images anyway. The drive firmware update itself went exactly as described, took but seconds and left the data intact. The next boot had Windows installing new (or maybe just reinstalling?) device drivers for the drive, which then called for another boot. All this booting used to be a pain in the ass but when the box boots in seconds you tend to not mind that much.

Benchmark performance after the update was improved, but only marginally – nothing I’d actually notice. The troublesome hangs I mentioned seem to occur on bootup now, when they occur at all. They seem less ‘dangerous’ because they don’t interrupt work in progress at that time. So far, anyway, I just wait out the length boot and log in, followed by a cold shutdown. The next coldstart invariably goes normally, that is, very, very fast.

What’s going on? Maybe some periodic housekeeping going on in the drive? Maybe some housekeeping that was underway when I interrupted with a shutdown? Or maybe it’s that data cable? Remember, I mentioned it’s sort of a loose fit without a retainer clip. Time will tell.

Videos

I goes without saying that SSDs are fast. Many people like to judge that by how fast Windows loads. I threw together a couple of videos to illustrate.

System Startup with SSD
00.00 - Sequence start
01.30 - Power on
04.06 - Hardware initialization
13.20 - Video signal to monitors
15.83 - BIOS
23.93 - Windows Startup
39.83 - Login prompt
44.93 - Password entry complete
54.50 - Ready to work

Power on to Windows startup duration is 22.63 seconds.
Windows startup to login prompt duration is 15.90 seconds.
Password entry to ready-to-work duration is 9.57 seconds.


System Shutdown with SSD

00:00:00 - Sequence start
00:08.32 - Shutdown initiated
00:24.27 - Shutdown complete

Shutdown initiation to power off duration: 15.95 seconds.


iPad

People that know me know that I’m not a big Mac fan. By extension, not a big Apple fan either. That’s why people that know me are astonished when they learn that there’s an iPad in my house. The initial shock gives way to questions so I figured I’d just handle some of them here.

My friend Will, just the other day over on Google+, said “Trims atas advise nya.” Oh, wait a minute. iPad2That’s spam from some shitstain with an anonymous gmail account. Will actually said “Rick, what do you use it for? On TV people are watching videos, email or looking at pictures on it – nothing very interesting. Is it a glorified internet appliance?”

Well, it’s a funny thing. Tablets have been the Next Big Thing for a while and everyone has been bringing them to market. For most, er, scratch that, for everyone except Apple, success in the tablet space has been varied. For Apple success has been astounding. Eventually, I figured, we’d have to get one to play around with, to see what all the hype was about.

I think it started with a TV commercial. I casually said to Pam, “So maybe you want one of those?” and she said she wouldn’t mind. So a few days later I drank some Kool-Aid…

I’ve gotta admit, the iPad’s an absolute marvel of design and engineering. It feels really good in your hand, looks really great to your eye (both the display and the form-factor), and the UI is slick and responsive. Besides the device there’s not much in the box: a cable and charger cube (which promptly got lost for weeks) and a cute little Apple sticker. I powered it up, answered a few questions, and in a minute or two I was exploring the built-in apps. Apps. I was playin’ with apps. I felt so… trendy. We picked up the Smart Cover a day or two later. It, too, is a product of incredible thought and design. Just as you hold it near, wondering how it attaches, it attaches itself magnetically, in perfect alignment. Forty bucks.

Getting the iPad onto my network was a bit harder. We have two active WiFi networks in the house. Each serves different purpose and both are reasonably secure. (Hold your comments about being neighborly and running an open hotspot; I don’t care and I’ll only ignore you.) So I cleared the way for the iPad and tried and tried to get authenticated. Didn’t work. A search turned up plenty of others with similar problems. I forget exactly which magic incantation did the trick but after a while it was working. And here’s the thing: other than that initial hurdle the iPad connects and makes itself ready to communicate the moment you pick it up. The secret? It keeps a periodic chatter going with the router or access point, all the time. It’s always ready.

Instant-on network performance like that is usually a battery suck but Apple seems to have nailed the power management. Battery life is several weeks to a month.

“Huh? Did you say a month? Don’t you use it?”

Yup, that’s what I said: a month. And, mostly, nope, we don’t really use it all that much. None of us do. Three different people with three widely varying sets of interests and the iPad hasn’t become relevant to any of us. WTF.

What I sought most from such a device was simple (and, I might add, completely satisfied by my old netbook). I wanted to read, mostly stuff from my network where I keep a fair library of subscription material. I wanted to write, notes, posts like this, etc. And I wanted to be able to control different parts of my network, logging into a Linux console, adjusting this or that, maybe a bit of ftp to import or export a file or two, maybe shutting things down during an extended power failure.

Producing written material with the virtual keyboard is an exercise in futility. I’m not the best keyboardist in the first place but my meager productivity dropped like a stone. Y’know how they say to use strong passwords for stuff? Let me tell you, the way you need to switch modes for numbers, caps, punctuation, and everything else will have you setting your passwords to ‘asd123’ – and wishing you could skip the digits altogether – in no time flat. Forget writing.

On to reading. Well, this is actually pretty good. The display is nice, like I said. Consuming some written matter – WIRED comes to mind – the content designed for this device is, in some ways, superior to the print experience. You miss out on the tactile enjoyment of well-laid-out pulp – the color, the rich fonts – but the ease of navigation (no continued on page 134) and embedded multimedia could be a valid trade. Sometimes, at least. I mentioned that I have a rather large cache of subscription material – professional publications, books, newsletters, etc. – on a server here. The vast majority is in PDF format of one type or another. Reading any of those makes for a pretty good experience. The iPad will try to add them into the built-in iBooks app, which simply means that they’re downloaded and stored locally for use off-network.

Next up, handling network chores. Nope, can’t do that. Maybe buying a terminal app would fix that, maybe not. I’m not pressing because I have other alternatives. Also, you can’t get files onto or off of the iPad. In fact, the very concept of files on the iPad seems profoundly foreign. I’ll bet a dollar Apple would call that a feature.

Now, Pam’s expectations are markedly different from mine. She’ll play a few games, use Google+ and – gasp – Facebook, and use the Web browser. She’s bought a few apps. Sorry, can’t tell you which ones. Since the iPad is hers, it’s tied to her computer and it synced with her iTunes library painlessly and quickly. I can tell you that the Google+ client, while touted as made for the iPad, is simply an iPhone app that lives in the middle of the screen. Sizing it for the larger screen looks chunky and childish. When I tried, Hangouts didn’t work at all. Sort of too bad, that, as the hardware seems like it’d be perfectly suited to video conferencing. YouTube videos play nicely, but content-rich sites that don’t offer Flash alternatives fail.

I expected Damian to play with the iPad but he doesn’t. Not at all. Some weeks after it had been floating around in such obvious places like the dinner table, he said “Oh? We have an iPad now?” That was that. I don’t think he’s touched it since. That was a little unexpected since I think he’s in the target demographic. Oh well.

I’ve got a few closing random thoughts… The lack of multitasking hurts. The instant-on, instantly-connected Web browser – albeit a weak one like Safari – is a definite win. The lack of Flash can sometimes make a Web site unusable. Not that I’m arguing for that insecure wart on the side that is Flash, but some sites, well, that’s what they do. Sort of the way a site might be built for IE and render poorly on a standards-compliant browser. You can wish for a long time that it weren’t so. The security model kinda blows. I wouldn’t store any confidential stuff on the device. The virtual keyboard encourages the use of weak, easy-to-use passwords because good ones are such a pain to type, yet even routine updates prompt for the Apple account password.

The bottom line? I guess all told I spent something under $800 for the device, a cover and some apps. Worth it? For design, lots of points. For usefulness, very few points. Did I learn some stuff? Undoubtedly. Do I feel trendy? No, I feel like I threw away a wad of cash.

If I knew then what I know now, would I buy an iPad? No.

[edited 29 October to include this unique use for the device.]

Communicating With The Outside World

I recently set out to upgrade a virtual host server from VMware Server to Oracle’s VirtualBox. The upgrade was a huge success. This is one of several articles where I talk about various aspects of that upgrade, hopefully helping others along the way. You might want to go back and read the introductory article Virtualization Revisited. Added 5-May-2011: Originally written using Ubuntu Server 10.04, this configuration also works without change on Ubuntu Server 11.04.

One of the things that I wanted from the new VM host was alerts for anomalous situations. Manually polling for trouble begins as a noble effort but trust me – after a while you’ll stop looking. About a year ago I was almost caught by a failing hard drive in a RAID array. Even after that incident, within a month or two I had pretty much stopped paying regular attention.

While setting up monitor/alert mechanisms on an old Windows server is quite the pain in the ass it’s a snap on Linux. Delivery of alerts and status reports via email is just perfect for me. All I wanted was the ability to have the system generate SMTP traffic; no messages would ever be received by the system. To prepare for that I set up a send-only email account to use the SMTP server on one of my domains solely for the VM host’s use as a mail relay. Then I got on with configuring Postfix, the standard Ubuntu mailer – one of several excellent sendmail alternatives.

Now maybe I’m just a dummy, but I found various aspects of the Postfix and related configurations to be a little tricky. Hence this article, which details what worked for me – and should work for you, too.

(In the stuff that follows, my example machine is named foo and it’s on an internal TLD called wan. My example machine’s system administrator account is sysadmin. My SMTP server is on mail.example.com listening on port 1212. The SMTP account is username with a password of yourpassword.)

Getting Started – Basic Configuration

Begin by installing Postfix, as you would any package.

$ sudo apt-get install postfix

For now, just hit Enter through the install questions. We’ll configure it properly following the install. You’ll be asked for the general type of mail configuration and Internet Site will be the default. Accept that by pressing Enter. You’ll be asked for the System mail name and something will probably be pre-filled. Accept that, too.

Now, go back and do a proper basic configuration.

$ sudo dpkg-reconfigure postfix

Several questions will follow. Here’s how to respond.

For the general type of mail configuration choose Internet Site.

Set the domain name for the machine. The panel provides a good explanation of what’s needed here, and chances are good that it’s pre-filled correctly. By example, foo.wan.

Provide the username of the system administrator. The panel provides a good explanation of what’s needed here. Use the name of the account that you specified when you installed Ubuntu. By example, sysadmin.

Provide a list of domains for which the machine should consider itself the final destination. The panel provides an OK explanation and it’s probably already pre-filled more-or-less correctly. But look carefully at the list that appears in the panel and edit it if it has obvious errors like extra commas. Again, using my example machine, a list like this is appropriate:

foo.wan, localhost.wan, localhost

You’ll be asked whether or not to force synchronous updates on the mail queue. Answer No, which is likely the default.

Next, specify the network blocks for which the host should relay mail. This entry is pre-filled based on the connected subnets. Unless you’ll be using an external SMTP server that requires it, you can simply remove all of the IPv6 stuff that appears here, leaving only the IPv4 entry which will probably look something like this:

127.0.0.0/8

Specify the mailbox size limit. The default is zero, meaning no limit. Accept that. Remember, all we’re planning to do is send mail, not receive it.

Set the character used to define a local address extension. The default is +. Accept it.

Choose the Internet protocols to use. Again, keeping with our earlier IPv4 decision select ipv4 from the list and accept it.

That’s it for the basic Postfix configuration! Next you’ll configure Postfix to do SMTP AUTH using SASL (saslauthd).

SMTP AUTH using SASL (saslauthd)

Since there are several commands to issue as root it’s convenient to sudo yourself as root to save some typing. Good practice dictates you should logout the root account just as soon as you’re finished.

Be careful. In this list of commands there is one – it sets smtpd_recipient_restrictions – that is quite long and may have wrapped on your display. Be sure to issue the entire command.

$ sudo -i
# postconf -e 'smtpd_sasl_local_domain ='
# postconf -e 'smtpd_sasl_auth_enable = yes'
# postconf -e 'smtpd_sasl_security_options = noanonymous'
# postconf -e 'broken_sasl_auth_clients = yes'
# postconf -e 'smtpd_recipient_restrictions = permit_sasl_authenticated,permit_mynetworks,reject_unauth_destination'
# postconf -e 'inet_interfaces = all'
# echo 'pwcheck_method: saslauthd' >> /etc/postfix/sasl/smtpd.conf
# echo 'mech_list: plain login' >> /etc/postfix/sasl/smtpd.conf

Then press ctrl-D to logout the root account.

The next step is to configure the digital certificate for TLS.

Configure the Digital Certificate for TLS

Some of the commands that follow will ask questions. Follow these instructions and answer appropriately, modifying your answers to suit your situation. As earlier, sudo yourself to root and logout from root when finished.

$ sudo -i
# openssl genrsa -des3 -rand /etc/hosts -out smtpd.key 1024

You’ll be asked for the smtpd.key passphrase. Enter one and remember it. You’ll need to type it twice, as is customary when creating credentials. Then continue.

# chmod 600 smtpd.key
# openssl req -new -key smtpd.key -out smtpd.csr

You’ll be asked for your smtpd.key passphrase. Enter it.

Next you’ll be asked a series of questions that will make up a Distinguished Name, which is incorporated into your certificate. There’s much you can leave blank by answering with a period only. Here’s a sample set of responses (underlined) based on my US location and example system.

Country Name (2 letter code) [AU]:US
State or Province Name (full name) [Some-State]:Texas
Locality Name (eg, city) []:.
Organization Name (eg, company) [Internet Widgits Pty Ltd]:.
Organizational Unit Name (eg, section) []:.
Common Name (eg, YOUR name) []:Rick
Email Address []:sysadmin@foo.wan
A challenge password []:some-challenge-password
An optional company name []:.

Then continue.

# openssl x509 -req -days 3650 -in smtpd.csr -signkey smtpd.key -out smtpd.crt

You’ll be prompted for your smtpd.key passphrase. Enter it.

Then continue.

# openssl rsa -in smtpd.key -out smtpd.key.unencrypted

You’ll be prompted for your smtpd.key passphrase. Enter it.

Then continue.

# mv -f smtpd.key.unencrypted smtpd.key
# openssl req -new -x509 -extensions v3_ca -keyout cakey.pem -out cacert.pem -days 3650

You’ll be asked for a PEM passphrase. Enter one and remember it. You’ll need to type it twice, as is customary when creating credentials.
Like earlier, you’ll be asked a series of questions that will make up a Distinguished Name, which is incorporated into your certificate. There’s much you can leave blank by answering with a period only. Here’s a sample set of responses (underlined) based on my US location and example system.

Country Name (2 letter code) [AU]:US
State or Province Name (full name) [Some-State]:Texas
Locality Name (eg, city) []:.
Organization Name (eg, company) [Internet Widgits Pty Ltd]:.
Organizational Unit Name (eg, section) []:.
Common Name (eg, YOUR name) []:Rick
Email Address []:sysadmin@foo.wan

Next, issue the remaining commands.

# mv smtpd.key /etc/ssl/private/
# mv smtpd.crt /etc/ssl/certs/
# mv cakey.pem /etc/ssl/private/
# mv cacert.pem /etc/ssl/certs/

Then press ctrl-D to logout the root account.

Whew! We’ll continue by configuring Posfix to do TLS encryption for both incoming and outgoing mail (even though we’re only planning on sending mail at this point).

Configure Postfix to Do TLS Encryption

As earlier, sudo yourself to root and logout from root when finished.

$ sudo -i
# postconf -e 'smtpd_tls_auth_only = no'
# postconf -e 'smtp_use_tls = yes'
# postconf -e 'smtpd_use_tls = yes'
# postconf -e 'smtp_tls_note_starttls_offer = yes'
# postconf -e 'smtpd_tls_key_file = /etc/ssl/private/smtpd.key'
# postconf -e 'smtpd_tls_cert_file = /etc/ssl/certs/smtpd.crt'
# postconf -e 'smtpd_tls_CAfile = /etc/ssl/certs/cacert.pem'
# postconf -e 'smtpd_tls_loglevel = 1'
# postconf -e 'smtpd_tls_received_header = yes'
# postconf -e 'smtpd_tls_session_cache_timeout = 3600s'
# postconf -e 'tls_random_source = dev:/dev/urandom'

This next configuration command sets the host name, and this one uses my example machine’s host name. You should use your own instead.

# postconf -e 'myhostname = foo.wan'

Then press ctrl-D to logout the root account.

The postfix initial configuration is complete. Run the following command to start the Postfix daemon:

$ sudo /etc/init.d/postfix start

The Postfix daemon is now installed, configured and runing. Postfix supports SMTP AUTH as defined in RFC2554. It is based on SASL. It is still necessary to set up SASL authentication before you can use SMTP.

Setting Up SASL Authentication

The libsasl2-2 package is most likely already installed. If you’re not sure and want to try to install it you can, no harm will occur. Otherwise skip this command and simply continue.

$ sudo apt-get install libsasl2-2

Let’s continue the SASL configuration.

$ sudo mkdir -p /var/spool/postfix/var/run/saslauthd
$ sudo rm -rf /var/run/saslauthd

Create the file /etc/default/saslauthd.

$ sudo touch /etc/default/saslauthd

Use your favorite editor to edit the new file so that it contains the lines which follow. Just to be clear, the final line to add begins with “MECHANISMS=“.

# This needs to be uncommented before saslauthd will be run
# automatically
START=yes

PWDIR="/var/spool/postfix/var/run/saslauthd"
PARAMS="-m ${PWDIR}"
PIDFILE="${PWDIR}/saslauthd.pid"

# You must specify the authentication mechanisms you wish to use.
# This defaults to "pam" for PAM support, but may also include
# "shadow" or "sasldb", like this:
# MECHANISMS="pam shadow"

MECHANISMS="pam"

Save the file.

Next, update the dpkg state of /var/spool/portfix/var/run/saslauthd. The saslauthd init script uses this setting to create the missing directory with the appropriate permissions and ownership. As earlier, sudo yourself to root and logout from root when finished. Be careful, that’s another rather long command that may have wrapped on your display.

$ sudo -i
# dpkg-statoverride --force --update --add root sasl 755 /var/spool/postfix/var/run/saslauthd

Then press ctrl-D to logout the root account.

Test using telnet to connect to the running Postfix mail server and see if SMTP-AUTH and TLS are working properly.

$ telnet foo.wan 25

After you have established the connection to the postfix mail server, type this (substituting your server for mine, of course):

ehlo foo.wan

If you see the following lines (among others) then everything is working perfectly.

250-STARTTLS
250-AUTH LOGIN PLAIN
250-AUTH=LOGIN PLAIN
250 8BITMIME

Close the connection and exit telnet with this command.

quit

We’re almost there, promise.

Setting External SMTP Server Credentials

Remember, we set out to use an external Internet-connected SMTP server as a mail relay and this is how that is set up. I mentioned at the beginning of the article that I had set up a dedicated account on one of my domains. You might use one on your ISP. I would not, however, use your usual email account.

You’ll need to manually edit the /etc/postfix/main.cf file to add these lines:

smtp_sasl_auth_enable = yes
smtp_sasl_security_options = noanonymous
smtp_sasl_password_maps = hash:/etc/postfix/saslpasswd
smtp_always_send_ehlo = yes
relayhost = [mail.example.com]:1212

Of course, you’ll modify the relayhost = line to specify your external SMTP server. If you don’t need a port number then simply leave off the colon and port number following the closing bracket. I included the port number as a syntax example in case you needed to use one.

Did you notice the hash file mentioned in the lines you just added to/etc/postfix/main.cf? It holds the SMPT server logon credentials, and it’s time to create it.

$ sudo touch /etc/postfix/saslpasswd

Use your favorite editor to edit the file, adding the credentials with a line like this:

mail.example.com username@example.com:yourpassword

The components of the line you’re putting in the new file should be obvious.

(Before you cry foul… Yes, I’m well aware of the risk of storing credentials in the clear. It’s a manageable risk to me in this case for the following reasons. The physical machine is under my personal physical control. The credentials are dedicated to this single purpose. If the server becomes compromised I can disable the credentials from anywhere in the world I can obtain an Internet connection. If I’m dead and can’t do that, well, I guess it’s SEP and my incremental contribution to the SPAM of the world will torment my soul until the end of time. Your situation may be different and I leave it to you to secure the credentials.)

Anyway, before postfix can use that horribly insecure file it needs to be hashed by postmap:

$ sudo postmap /etc/postfix/saslpasswd

With that done, restart postfix.

$ sudo /etc/init.d/postfix restart

Applications that know how will now be able to generate mail but it’ll be convenient to be able to do it from the command line. Besides making testing of this configuration easier you’ll then be able to have your own scripts send messages with ease. For that you’ll need just one more package.

Installing the mailutils Package

Simple. Install the mailutils package.

$ sudo apt-get install mailutils

That’s it!

Try test sending some email from the command line. Substitute the address at which you usually receive mail for my example youraddress@yourserver.com.

$ echo "body: outbound email test" | mail -s "Test Subject" youraddress@yourserver.com

Check your inbox.

Wrapping Up

Well, that wasn’t so bad.

VirtualBox on the 64-bit Ubuntu Server 10.10

I recently set out to upgrade a virtual host server from VMware Server to Oracle’s VirtualBox. The upgrade was a huge success. This is one of several articles where I talk about various aspects of that upgrade, hopefully helping others along the way. You might want to go back and read the introductory article Virtualization Revisited.

Installing Ubuntu Server 10.10 is very fast and straightforward – maybe 10 minutes tops. There’s no shortage of coverage of the install procedure so I won’t bother with it again.

But in case you’re not familiar, I’ll mention that the Ubuntu installer will offer to configure the server with a selection of packages right off the bat. Like many others, I prefer to do those configurations myself in order to tailor the instance exactly to my needs. I make an exception with Open SSH so I that can reach the server from the comfort of my desk by the time it’s booted itself for the first time.

So let’s assume you’ve just finished the IPL, popped the install media, booted for the first time and logged in. The very first thing to do is catch up on any pending updates.

$ sudo apt-get update
$ sudo apt-get upgrade

For the sake of completeness, if anything is shown as kept back you should probably do a distribution upgrade followed by a reboot. If not, skip ahead.

$ sudo apt-get dist-upgrade
$ sudo shutdown -r now

Next I install Lugaru’s epsilon editor, a very capable emacs-like editor that I run on all my boxes. Believe me: there’s great value in having one editor that behaves in exactly the same way no matter what keyboard’s under your fingers! I’ve been a Lugaru customer since the 80s and I’m pleased to recommend their rock-solid product. Go test fly their unrestricted trial-ware. Anyway, the epsilon installation needs to build a few things and installing this bit first allows that (as well as other routine software builds that might be needed in the future) to simply happen.

$ sudo apt-get install build-essential

To The Business At Hand: Installing VirtualBox

Download the key and register the repository for VirtualBox. The key has changed recently, so what you see here might be different from other articles.

$ wget -q http://download.virtualbox.org/virtualbox/debian/oracle_vbox.asc -O- | sudo apt-key add -

The key fingerprint is

7B0F AB3A 13B9 0743 5925 D9C9 5442 2A4B 98AB 5139
Oracle Corporation (VirtualBox archive signing key) info@virtualbox.org

Edit the file /etc/apt/sources.list to add the following lines, which simply adds the appropriate repository.

# VirtualBox 3.2.10 VirtualBox for Ubuntu 10.10 Maverick Meerkat
deb http://download.virtualbox.org/virtualbox/debian maverick non-free

Make your system aware of the newly added repository.

$ sudo apt-get update
$ sudo apt-get upgrade

Now you’re ready for the actual VirtualBox install.

$ sudo apt-get install virtualbox-3.2

Finally, add any users that will need to run VirtualBox to the vboxusers group.

Don’t forget the -a flag in the command! This is especially important if you’re manipulating your administrator account. (The flag indicates that the group should be added to the the account, rather than replacing any/all existing groups.)

$ sudo usermod -a -G vboxusers <username>

And that’s all there is to it!

[ed. Appended later…]

There have been a couple of comments in email about networking setup. “You must not be making your VMs visible to your LAN. There’s nothing mentioned about bridge adapters…”

In fact I am using bridged adapters in my VMs! Last time I looked at VirtualBox it was quite the pain to set up that way. When I came to that part I just gave it a WTF and tried to simply bridge eth0. It works just fine!

Thanks for asking.

Virtualization Revisited

I’ve been virtualizing machines the home network for many years. The benefits are simply huge (but relax – I’ll not go into them in detail here). Suffice it to say that it beats the snot out of stack of old PCs with their attendant noise and energy consumption.

The server I built on a shoestring one August afternoon many years ago has (ahem) served us well. A mile-high overview of the hardware includes an NVIDEA motherboard from BFG, several GB of commodity RAM, a SATA RAID card from Silicon Image driving a handful of 3.5-inch SATA drives, and an IDE boot drive. The mini-tower case – told you I cheaped out – is somewhat dense inside so there are extra fans to keep the heat in check. The host OS has been Windows 2000 Server Service Pack 4.

Yeah, yeah, I know. It’s a 32-bit OS on 64-bit hardware. A nice chunk of RAM is ‘lost’ to insufficient address space right off the bat. I figured to upgrade the OS one day but never quite got around to it. The virtualization software is VMware Server, which I’ve been using since the beginning. Their current version is 2.0.0 Build 116503 (wow, 2008, when dinosaurs roamed the Earth). The guest OSs are a mix of Linux and Windows servers handling core dedicated roles as well as a changing mix of experimental/test/research stuff: DOS, Windows 3.1, Chrome OS, OS/2 Warp (OMG what a hack that was!), a couple of OTS appliances, more. What can I say? I’ve got an interest in history. Besides, the look on my kid’s face when he sees an ancient OS actually running (as opposed to just static screen shots on some Web page) is worth it.

Anyway, there are lots of problems with this setup. VMware Server, their free product, is getting long in the tooth. The Web-based interface doesn’t work with the Chrome browser; it’s one of the few things that continues to force me to use IE. Sometimes the service side of the interface goes MIA altogether. The 32-bit Win2K is finally hopelessly out of date, absolutely no more updates. The list goes on and on.

So every now and again I look around for alternatives. The last serious contender was VMware’s ESXi. The idea of a supported bare-metal virtualization platform sure sounded appealing! I spent a day or two experimenting but ended up dismissing it. Getting it to run on the (albeit weak) hardware proved do-able but not without difficulties. In the end it just seemed too fragile for the long-term. I chalked it up to more trouble than it was worth, restored the old setup and got on with life.

The October 2010 issue of Communications of the ACM carried an interesting article, Difference Engine: Harnessing Memory Redundancy in Virtual Machines. Excellent article! A side effect of reading it led me to think again about the clunky mess humming away in the basement. And it was at roughly that time when another interesting article came through the news flow, How do I add a second drive to a Windows XP virtual machine running in VirtualBox? [link is dead]

Hmmm, VirtualBox. I had looked at VirtualBox a long time ago. I grabbed a current release and installed it on my desktop. Wow, it’s apparently matured a great deal since I last paid attention! I found it intuitive and fast to not only create and use new guests but also to simply import and run my existing VMs. (Well, okay, so there were a few gotchas, but no showstoppers.) Yes, this could be a contender for the basement server!

I pulled out an old laptop for some preliminary testing. I loaded it up with Ubuntu Server 10.10, installed VirtualBox and parked it in the basement. The goal? Well, VirtualBox is very easy to control through its GUI but I’d need to learn to run it entirely via command line and build my confidence for a smooth migration. I just  knew I’d run into problems along the way – nothing’s ever as easy as it looks at first glance – and I wanted to be able to anticipate and solve most of them in advance.

As usual, the ‘net came through as a truly incredible learning resource and I made copious use of it along the way. But every situation is different. By documenting my work in a series of articles, well, maybe it’ll help some wayward soul have an easier time of it.

Language Analysis, Anyone?

Pam‘s not much of a gamer but she plays The Sims. Has for years. Started with the first one, now they’re up to The Sims3. Quite a piece of software that is!

If you’ve played (or watched it played) you know that it’s a chatty game. That is, those simulated entities never shut up. Some of the sounds are universal. Babies crying, sounds of disgust (“Ugh!”) and so on. But conversationally they seem to have a language all their own.

I was wondering about that. First, does what they say have any consistency? By that I mean, say, when one of ’em is hungry and mentions it, do they always say “oot grickle mem sitto zerk!” (or whatever that incomprehensible jabber is)? I don’t play, but I asked Pam and she said she thinks they might – but admitted she never paid attention.

By extension, if they do ‘speak’ with consistency then has anyone out there worked out the grammar? Is there anyone on the planet that can speak Sim?

Why not? There are people that can speak (and understand) Klingon. The ‘net delivers example after example of people that clearly have an abundance of free time. So why not?

Boosting SSD Performance

I’ve done some traveling this summer and the netbook I wrote about some time back has proved to be a worthy companion. The portability and battery life have more than offset the lower performance and cramped screen real estate. And the HP Mini 1000 has proven to be as reliable as a brick!

When I configured the box I chose the SSD over traditional hard drive. HDs tend not to last very long when transported via Milwaukee Vibrators. Sure, SSDs are considerably more expensive and offer less capacity, but I was looking for reliability and it’s certainly delivered that. Read speeds are fantastic, making for fast boot times even on the slow Atom processor. But small writes – the kind that Windows is famous for doing constantly – really suck.

I wanted to mention FlashFire, an SSD accelerator. According to their site, it’s “especially useful for the system using low-end SSDs.” It works. I haven’t bothered to upgrade the slow stock SSD mainly because FlashFire makes it tolerable.

Before you ask, yes, additional buffering can leave you with an increased risk of data loss if a crash occurs before the flush is complete. But the dirty little secret is that the higher-performance SSDs already use on-board DRAM buffers to boost performance, so is it really all that much different? I guess it depends on your needs. For me, the tradeoff – performance for a little more risk – is worth it.

If you’re grumbling and second-guessing your SSD decision, go give FlashFire a try.