I'm living in rural Florida (USA) with my wife, son, two cats, and quite a few computers. I actively work in several areas of interest but still find time to manage several websites, execute home improvements, ride the Harleys, and play with cool toys. I'm reasonably fit for an Old Guy, equally comfortable wielding a keyboard, torque wrench, or spatula. I've got a scary-low tolerance for bullshit.
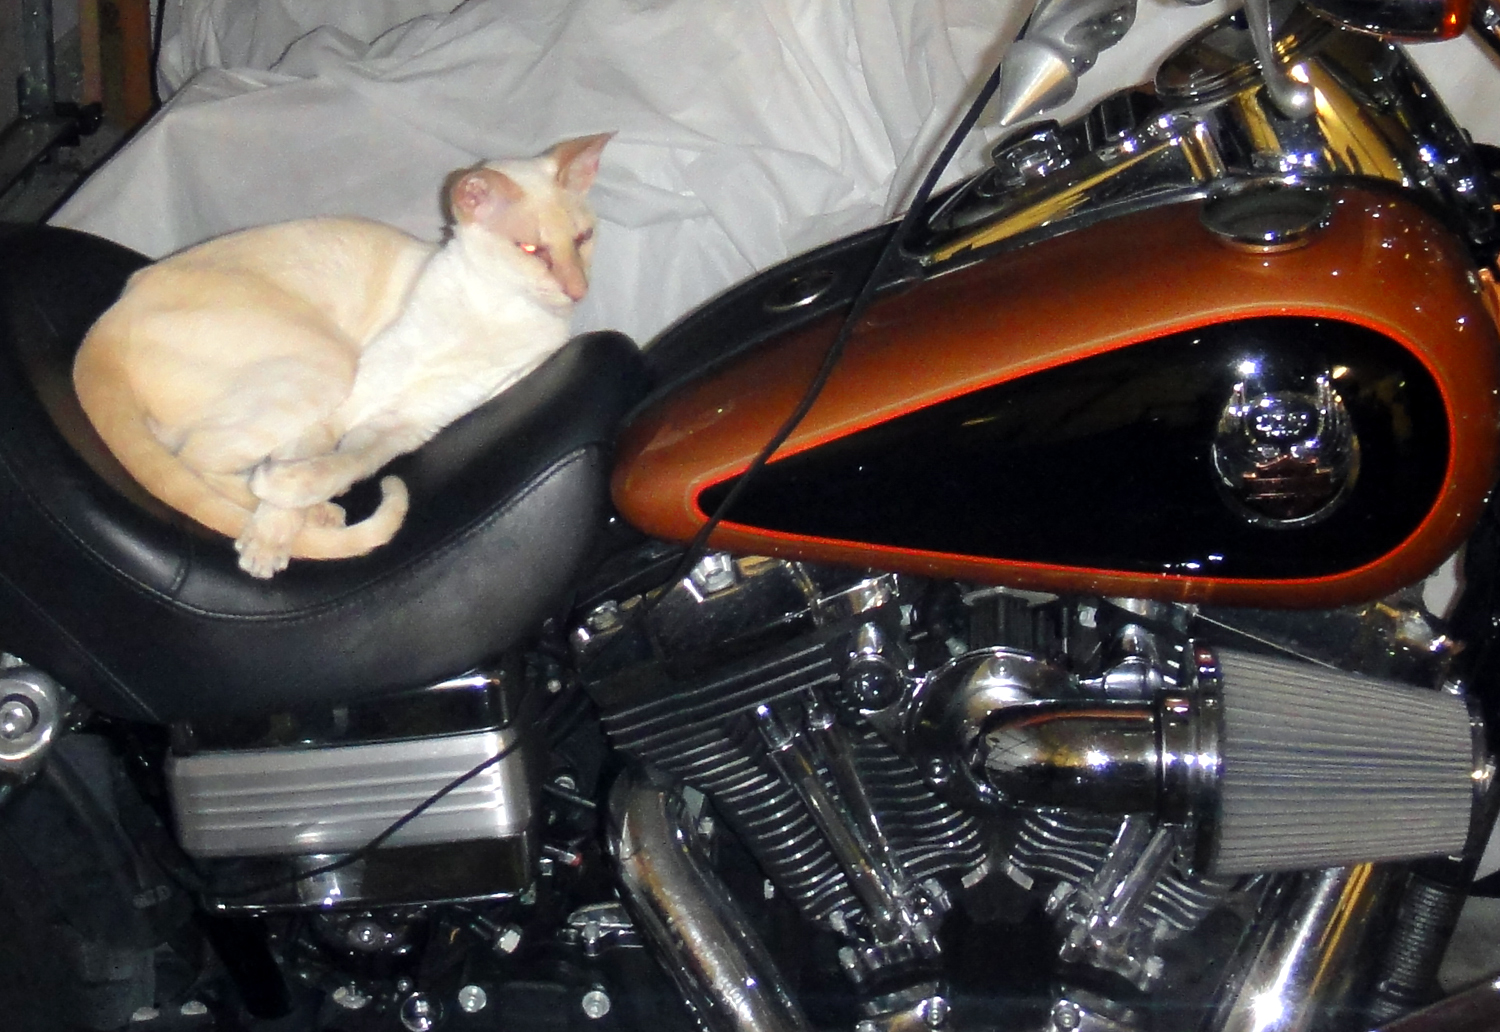
It’s been more than three-quarters of a year since I wrote about medicating one of our resident felines. Yes, Wiley’s done well and continues act like his old self – thanks for asking! His weight’s dropped about a quarter pound from a year ago. Our vet raised an eyebrow at that change, “cats his age usually gain and gain,” but I think it’s because he’s much more relaxed. That, and the two-year-old almost-kitten gives him a run for his money. Wiley recently turned ten.
Anyway, I ran into a situation the other day that calls for some comment.
It was time to renew Wiley’s prescription. I buy a 30-tablet bottle – the quarter-tablet doses last 120 days. But when I cracked the seal something was different: these tablets were noticeably smaller and lacked the usual blue coating.
I first checked the veterinarian’s label. It was correct. I needed to see the manufacturer’s label beneath. Over-labels are notoriously difficult to remove, I suppose to prevent abuse, but with patience I was able to peel back label to see what I needed.
I learned that the origin of this latest bottle was India and not the usual Israel. (The cost was $2.10 less, too.)
The label told me that per-tablet dose hadn’t changed. But the tablet mass was clearly different. Now I needed to re-weigh and re-calculate my capsule fills. Here’s where it got weird.
I won’t bore you with the 30-tablet list, but the variance between tablets quickly became clear. The smallest and largest measurements were 0.099 g and 0.107 g! Tablets from Israel were way more consistent, tablet-to-tablet.
The average worked out to 0.1023 g, yielding a quarter-tablet dose of 0.0256 g. This would be near the lower end of the capabilities of my scale: 20 grams with milligram resolution.
I’m pleased to report that my first 12-day compounding run worked out perfectly. Finished capsules are less full than usual, naturally.
But I’ll still be bringing my feedback to the vet with my next refill.
Wiley’s only been using the new batch for a few days now so it’s too early to tell if this change will have any effect on him. It should not, but you never know.
Pam and I had gone to the local pizza place for some takeout. In typical “I’ll buy, you fly” mode, Pam drove the F-150 with me in the passenger seat. She parked head-on by the front door and waited while I ran in for the goods.
It was just past closing time. Staffers killed the lights and ran out the door behind me.
Pam selected reverse and backed out, then pulled the lever for drive, hit the gas – AND THE TRUCK SURGED BACKWARD!
There wasn’t much room in the lot so she maneuvered to the curb, occupying about three marked spaces, and killed the engine.
It’s dark, beginning to rain, maybe three or so miles from home, hot food in the back seat, and we’re hungry. I called the kid for a lift home. We’d eat and think, then come back. Maybe the rain would pass.
The console lever felt sloppy, disconnected, I suspected a mechanical issue like a linkage or cable had worked its way loose. The console lever has a history. I removed the plastic shroud and felt around as best I could in the darkened cab; nothing felt out-of-place and my earlier hack/repair felt intact.
The kid soon arrived. We locked up and left to eat.
Sure enough, a bit of Internet searching turned up lots of similar failures! The most common issue came down to the cable-end detaching from the transmission lever. We returned to the truck armed with a good flashlight and I crawled under for a look. Before you ask, yes, the rainwater had pooled underneath…
Now it was clear that the cable-end was no longer attached. By manipulating the console and transmission levers it was possible to reattach, but when the console lever moved the cable end fell right off. The press-fit retention was no longer retaining!
I figured we could get the truck home, though. That’d free up parking for the restaurant and make for more comfortable work. The safety interlock only allow the truck to start in park and I could manipulate the levers to do that from beneath. With the truck started I could move the transmission lever into drive while Pam applied the brake. Then I’d crawl out she could drive home.
Pam was less than thrilled with the idea. But she did it. She probably pressed that brake pedal almost through the floorboard while I was under the truck fiddling with the transmission lever, engine running!
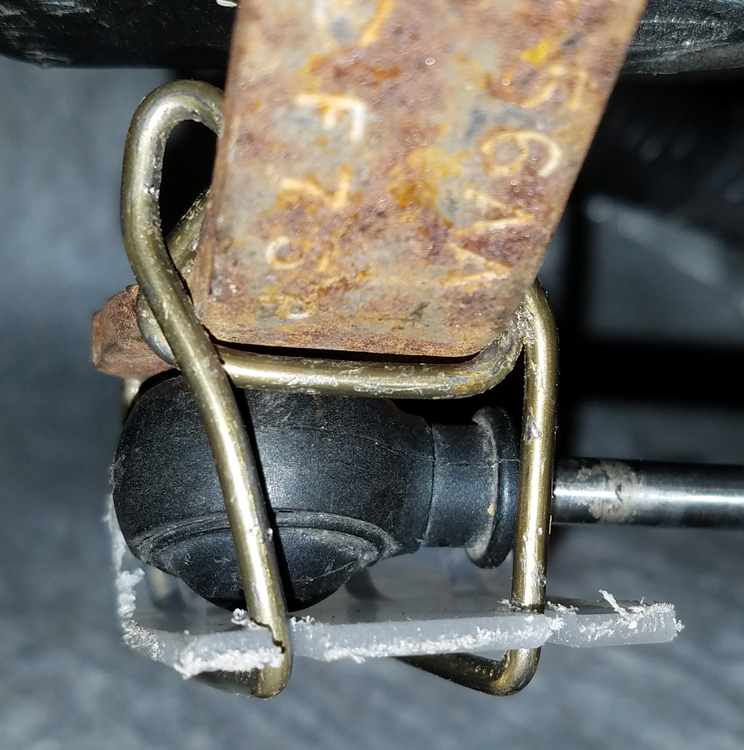
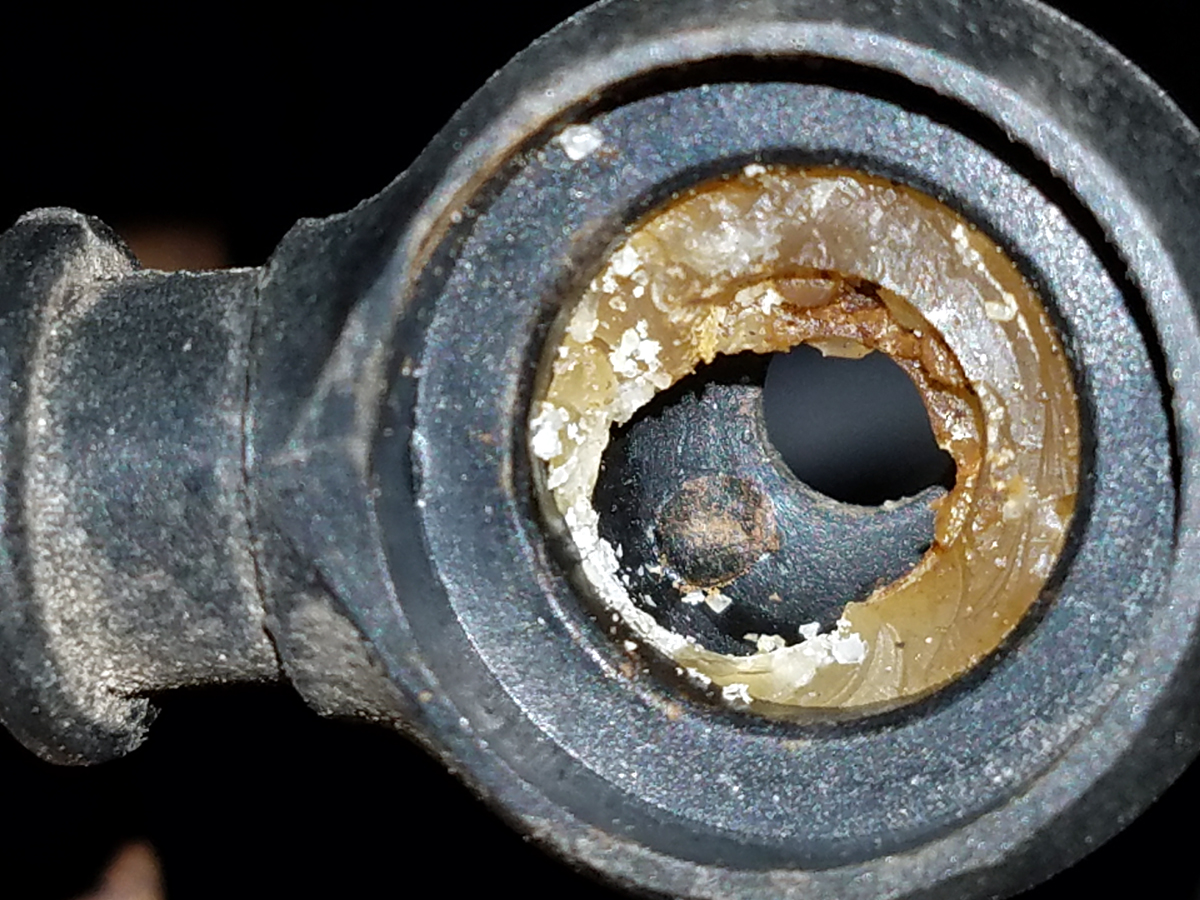
Cable end at top, transmission lever at bottom. The white plastic bit captures that knob.
The Root Cause The cable end is a roundish half-bowl of plastic molded onto the semi-flexible metal rod that extends from its sleeve. In the picture you can see a white plastic insert fitting in the black bowl. The transmission lever has a protruding machined knob that’s captured by that bit of white plastic.
Failure occurs when the white plastic insert no longer captures the knob.
The cable assembly is not adjustable. The length is exactly what it is. That’s important because…
When the console lever’s placed in park – that’s how the truck spends much of its time since being manufactured – there’s much linear force being applied against the transmission lever. By that I mean if you select park and slip the cable end free of the transmission lever (easy to do, now that the part’s failed), the cable end springs out extend a good 3/8″ past the transmission lever. You cannot put it back in place without manipulating the console lever positions, the end-to-knob alignment is that far off. So of course that 29-cent bit of plastic will fail eventually! It’s designed to fail!
The Repair The cable assembly – part number 4L3Z-7E395-CA for my 2004 unit – is available on Amazon for about $48. I don’t have a shop manual – that’s another story for another time – but it looks like it could be replaced in a couple of hours. Beer optional.
Obviously, a dealership could handle the repair. I heard that runs around $300-$350, including parts.
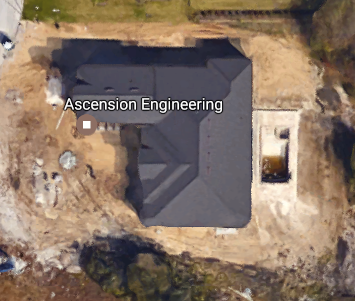
Ascension Engineering’s current location, under construction when Google Earth grabbed this shot.
But let me introduce you to Ascension Engineering. They produce a line of replacements for those little white pieces of plastic – apparently it’s a common failure mode across a wide variety vehicles, not merely Fords. The parts sell through their website, BushingFix.com. And business is apparently pretty damned good – Ascension Engineering’s principal relocated to some considerably nicer digs between May 2015 and March of 2016…
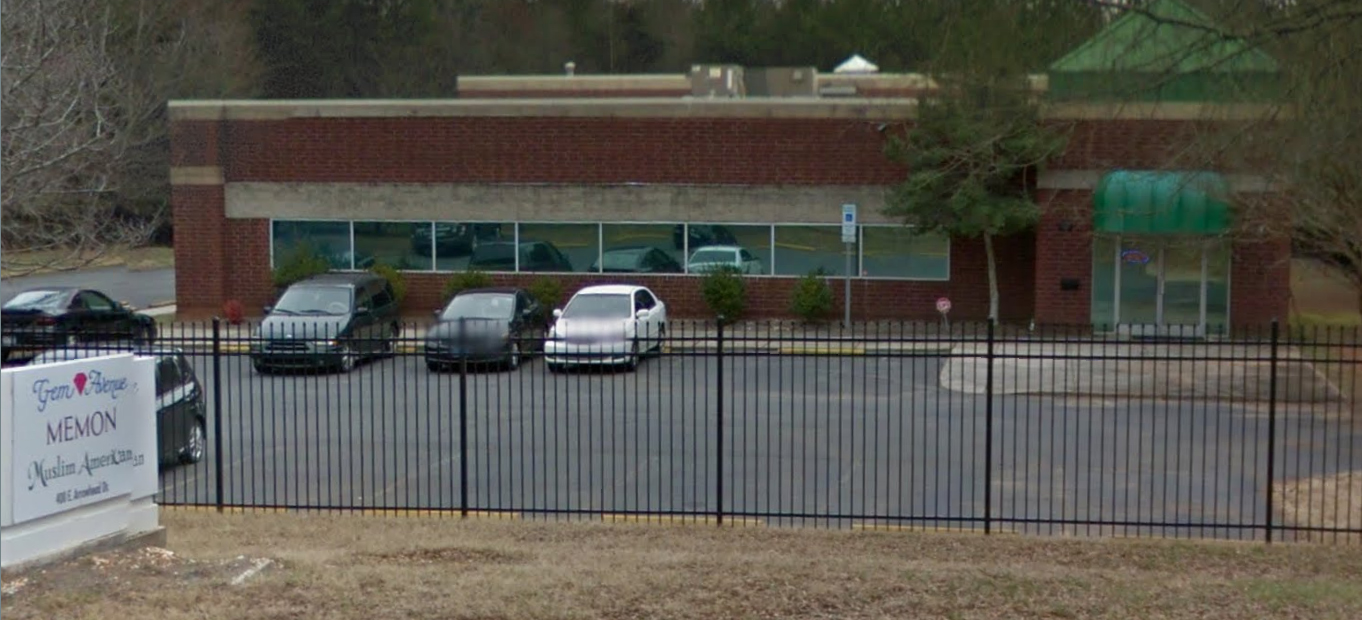
Shipping origin. Click for detail.
Y’know, $25 is a lot of money for a bitty bit of plastic. (Update: I learned, when sending a link to this article to the manufacturer for review, that the price is now reduced. My luck, right?) Okay, there’s design, tooling costs, manufacturing, but any number of Chinese outfits will do all that. Probably including the engineering design, too. It seems likely that they already manufacture those little bushings for the auto manufacturers. That Mr. Smith, he’s one smart cookie!
Screw it. I ordered a kit. There was sales tax, we’re both in Florida. And shipping was, I thought, a little high at just under $6 for USPS. The total cost was $32.29. I showed up at my door in a few days, shipped from Charlotte, North Carolina.
The cage-hack. See text for features. Click to enlarge for detail.
But First, An Interim Hack A couple of weeks before the order and permanent repair, a simple hack was necessary to keep the truck on the road. A truck’s a useful tool here in rural Florida. There’s trash and recycling to haul, stuff like that.
I hacked up a little cage from (what else?) coat-hang wire – easy to work with, yet stiff enough to enclose the cable end.
It’s got some nifty features. First, it’s a cage. It’s solidly attached to the transmission’s shift lever and doesn’t contact the cable or its end except where it absolutely must, to prevent the thing from slipping off the knob. That contact is minimized by a custom thrust plate constructed of softer plastic. (Don’t be fooled, the thrust plate is from a plastic storage bin. We use the bins as high-walled litter boxes for our feline residents, and this is the material cut out to form a door.) Notice the bend in the thrust plate, and the cutouts so the cage retains it.
The hack would likely outlast the truck. But a replacement part was on the way.
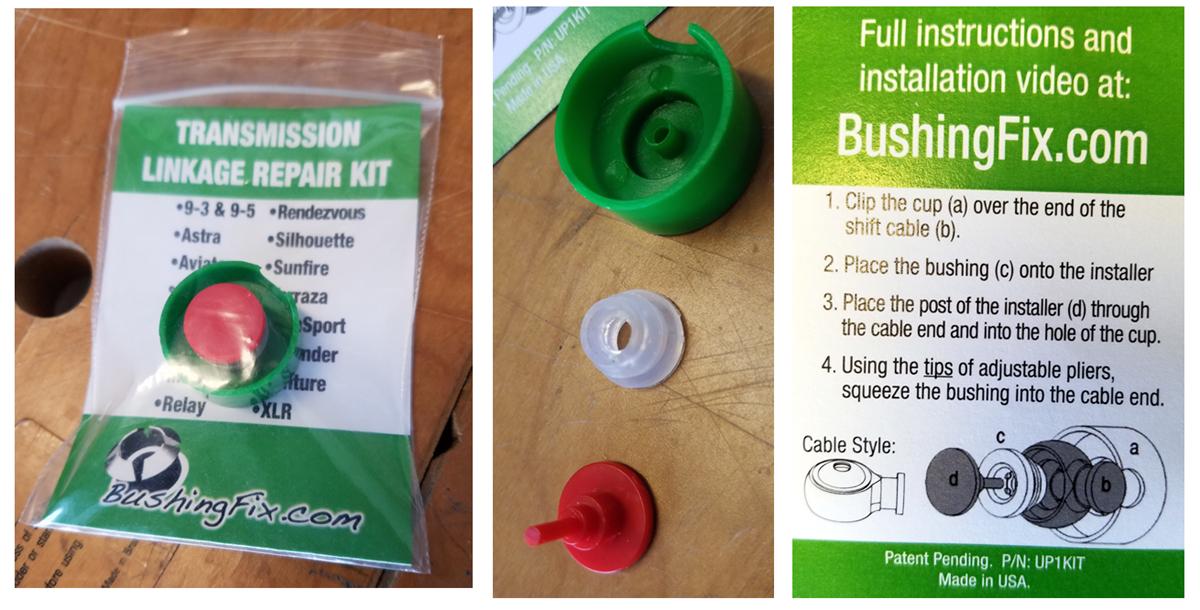
The Replacement Bushing It arrived in about a week. Here’s what $32.29 bought me:
The package, as received, followed by the individual parts and instructions. It’s actually well-thought out and about as foolproof as it gets. Click for a larger image.
Three bits of plastic: the bushing itself plus two more that served as press-blocks. Click to enlarge the image and see the instructions. Leaning way towards foolproof, I’ve gotta say. It took me longer to remove my hack than it did to install the replacement.
Debris in my cable-end cup. The rear of the truck is the right side of the image. The cable presses rearward when the transmission is in park. Click to enlarge.
Part of the install involves digging out any old bushing parts from the cable end cup. I used a carbide-tipped scribe and it cleaned up in a few seconds. Here’s a shot of what was left in my cup before that step. Pretty disgusting. But what’s clear as an unmuddy lake is how the linear force of sitting in Park had basically ruined one side while the other remained basically unworn. Ford’s non-adjustable setup is designed to fail. It’s only a matter of time.
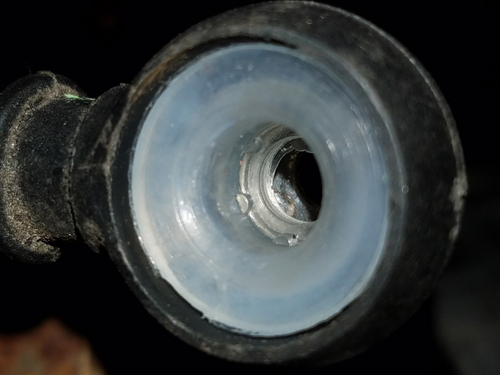
Bushing installed. Click to enlarge.
I assembled the sandwich of plastic bits and used a pair of Channellock pliers to give it a squeeze. I chose the Channellocks because of the adjustable jaws but I think a pair of ordinary pliers like those found in the average person’s tool bag would have done the job just as well. You’d need pliers, though, it’s a bit much for fingers alone.
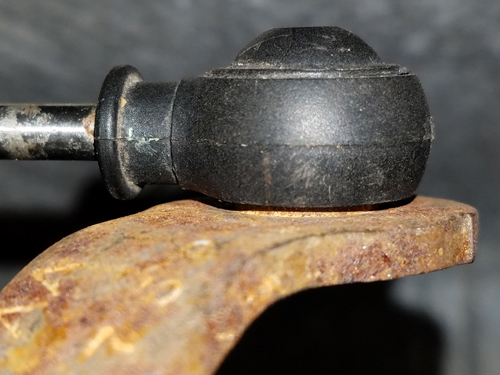
Repair complete. Click to enlarge.
The rejuvenated cable end mated to the transmission lever with a satisfying click. Then I exercised the console lever. It felt great.
Notice in the completed repair image that there’s a slight gap between the cable-end cup and the transmission shift lever. This tells me that the replacement bushing is the proper size for the job. If the knob sat too deep then the two parts would rub, wearing the cable-end cup.
So How’s It Holding Up? It’s been a few months since all this went down and so far, so good.
No issues, no complaints, the repair feels as tight as ever. How long will it last? Hard to say. Ford’s designed-to-fail assembly of the subsystem remains unchanged. What’s a worse environment? New Jersey winters or the Florida heat? Time will tell.
A long time ago having one’s own photo gallery running on the web was a thing, it’s not so important today. Mine was on the old Gallery3 platform but that hasn’t been supported for several years now.
I finally got around to moving it to Coppermine, software that’s still supported.
On the way I purged a bunch of albums. [shrug] The remaining stuff is mostly nostalgia and inertia. You can have a look if you want.
I can only think of one good reason to maintain a personal gallery these days. It’s for those times when you need a permanent URL to an image for one reason or another, and want to manage those images efficiently. It seems likely that I’ll move most of mine somewhere else eventually. But you know how that word – “eventually” – tends to work.
I picked up this skull ring in a New Hope, PA shop in August 2005 and I’ve worn it daily ever since. It’s an attention-getter with mass and warmth that only solid chunk of silver can deliver.
Skull ring on my gnarly meathook. It stares at me. I’ve worn this for almost twelve years now, the little dings give it character. Click to enlarge in a new window or tab.
This sucker weighs a ton. I’ve got take care for my desktop is glass and yes, I’ve already chipped the glass.
The ring originated in Hamburg, Germany. I’m told that it’s identical to the ring Keith Richards has been famously wearing pretty much forever. Here are a couple of shots – decide for yourself.
Looks pretty darned close to me, but I’m not makin’ any claims!
I have another skull ring that’s been with me even longer. (If you know me at all then you know that if something works I tend to stick with it.) I can’t remember exactly how long I’ve had the ring. But I do clearly remember the motorcycle I was riding at the time and that dates it solidly from the summer of 1980.
My oldest skull ring, acquired in 1980. It was definitely not new when I found it at the famous Englishtown (NJ) flea market. I’ve never, ever seen another like it. Click to enlarge the image in a new window or tab.
The ring was already old when I bought it. Didn’t matter, it was solid silver and fit perfectly.
In the 37 years I’ve worn this one I’ve never seen another like it. The nearest I’ve come to any kind of story is through a nurse that worked at a gym I joined in 1986. She commented that the ring looked exactly like one worn by her father when she was a little girl in California.
Go ahead, click the image for a much-enlarged look. Have you seen another ring like it? If so, I’d love to hear from you.
Back in 2013 I wrote about how my 2004 F-150 stranded me with an R203 relay failure. Since then I haven’t gotten any closer to a cause or solution. I’ve periodically replaced the relay as needed. But I’ve got a few more observations to add.
The DTC codes reported by the in-dash diagnostics (Engineering Mode) have meaningless meanings. D900 is just a general communication fault, not helpful, like “syntax error”. D950 is apparently an instrument cluster issue. Both make sense. No power to the PCM will tend to inhibit communications. No PCM data means the instrument cluster will be data-starved despite being powered up. Duh.
When running, the R203 relay runs HOT. You can hardly keep a finger on it.
It’s not necessary to replace the R203 relay as soon as it balks. In the beginning, simply removing and replacing it will often get it working again. After a while, stronger ‘persuasion’ is needed. I’ve gotten good at pulling the relay, giving it a couple of raps on the pillar, and jamming it home – even in the dark. Eventually the relay requires replacement.
The part of the relay that fails is the energizing circuit. A completely failed relay seems physically distorted by the heat over time. I haven’t been able to correlate this to long trips – we don’t use the truck that much – but it wouldn’t surprise me. A cross-country trip involving all-day use might be troublesome. Conclusion: there’s a high current draw on that circuit somewhere. I doubt it’s the relay itself, too many parts have been in there. Maybe the fuse panel itself?
Ambient heat worsens the problem. In winter (like Florida has a ‘winter’, right?) the failure doesn’t happen as often. Leaving the kickpanel off helps extend life. Â I’ve considered sandwiching the relay with Peltier devices, maybe something like this. Yeah, that’s fixing the symptom and not the cause, but WTF.
That’s about all I’ve got.
Maybe someone out there has the Ford shop manual pages for the fuse/relay panel? And/or the wiring diagram page(s) for the PCM power relay circuit? (2004 Ford F-150, SuperCrew, 5.4L V8, automatic transmission.)
Whoa! Not sure how it happened, but a key file went missing – or, more precisely, became empty – the other day. The problem rendered all but the front page inoperable.
Imperial Star Wiley Raz-Ma-Taz, our flame-point Siamese, was born April 21, 2007. I think he’s had a pretty good life so far but, poor guy, he’s been having some trouble coping lately. Maybe he’s been watching the news too much… Whatever, we set out to help him.
I won’t bore you with the details. But over the course of a month or so working with a local veterinarian we settled on a successful drug regimen. The miracle drug? Fluoxetine, better known as Prozac. Yeah, this is an off-label use of the drug. I’ve since learned that it’s more common than one might think.
Wiley’s always been an easy cat to pill. Maybe it’s a trust thing. Sometimes he appears to look forward to his next dose, perhaps he somehow knows that it brings comfort.
Unfortunately his dosage requires that the 10 milligram tablet be quartered. That breaches the coating and that means it tastes awful! It’s bitter (self-tested) as all get-out. Mixed with saliva from an angry cat it foams and dribbles and… well, you get the idea.
Never underestimate the fury of an unhappy feline – especially when you’re working near its mouth!
Medication time quickly turned into a nightmare to which none of us looked forward. Even though the drugs helped Wiley this was putting a serious hurt on our relationship!
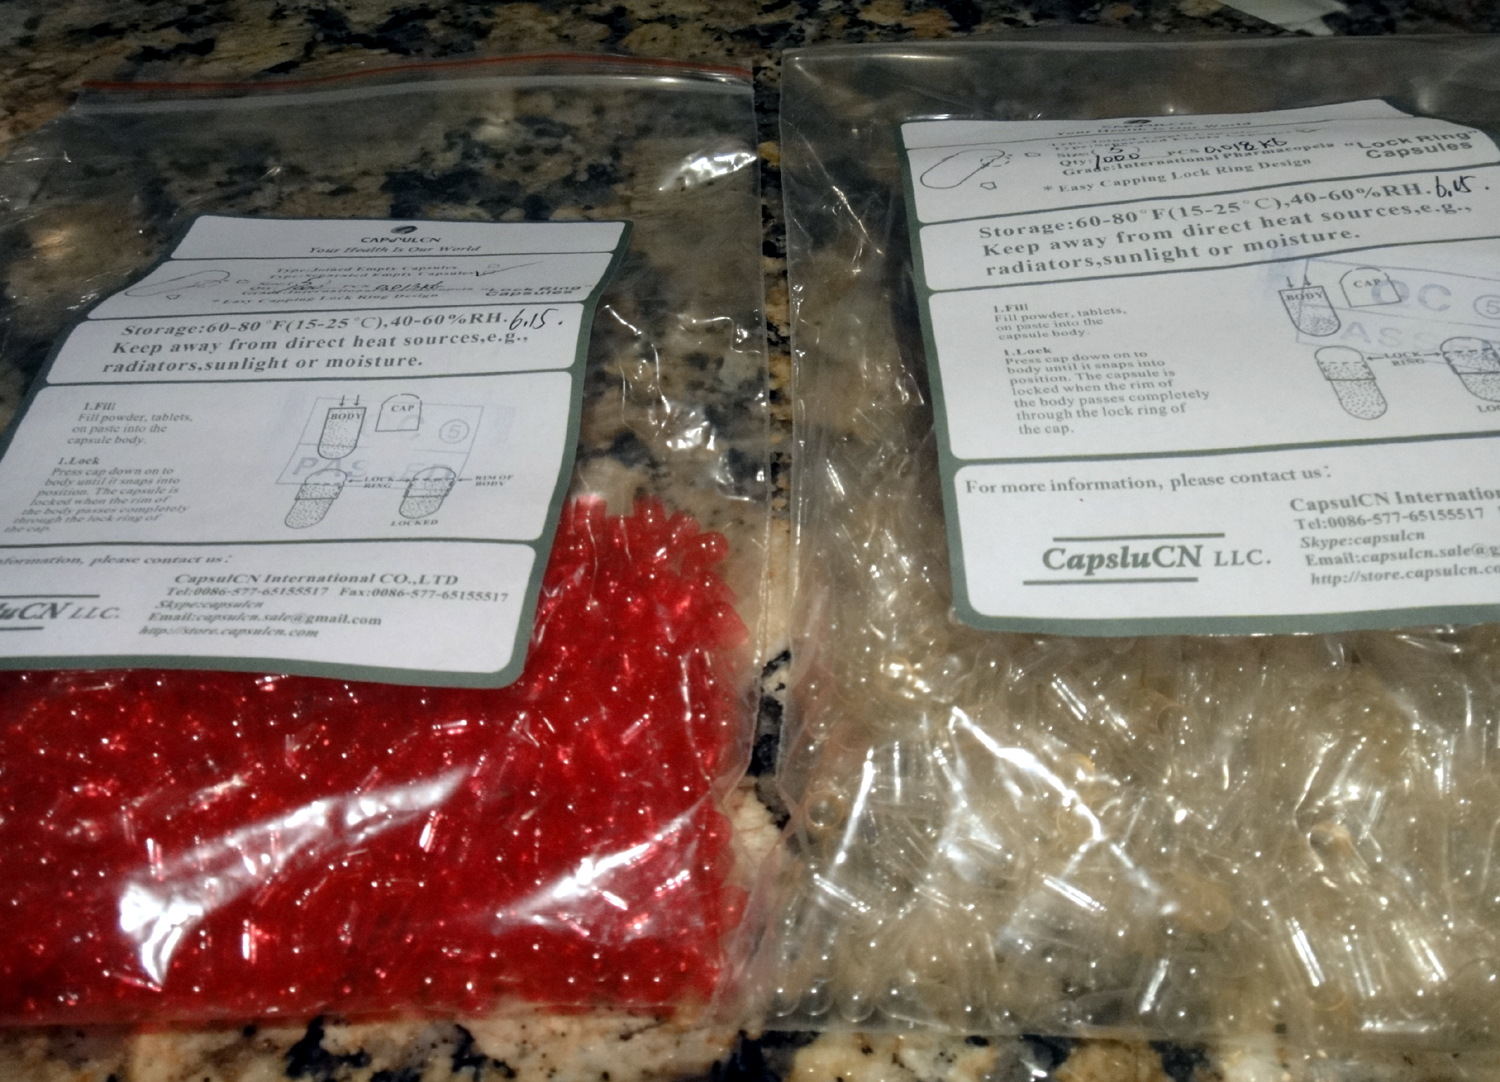
Pam found a place in China to buy unfilled gel-caps online and ordered some.
A thousand size-5 gel-caps, sourced from China. They were cheap, too. The estimated ship estimate spanned the better part of a month, which was a little scary, but they actually showed up in a week or so. You can click this or any other image in this article for a larger view which will appear in a new window or tab.
The quartered tablet fragments fit pretty well into the gel-caps. Life started to improve. Still, the quartering process troubled me. No matter how careful, no matter how sharp the razor blade, the size of the quarters varied and sometimes even became damaged beyond being useful.
Imprecise dosage and waste: there were still two problems to solve!
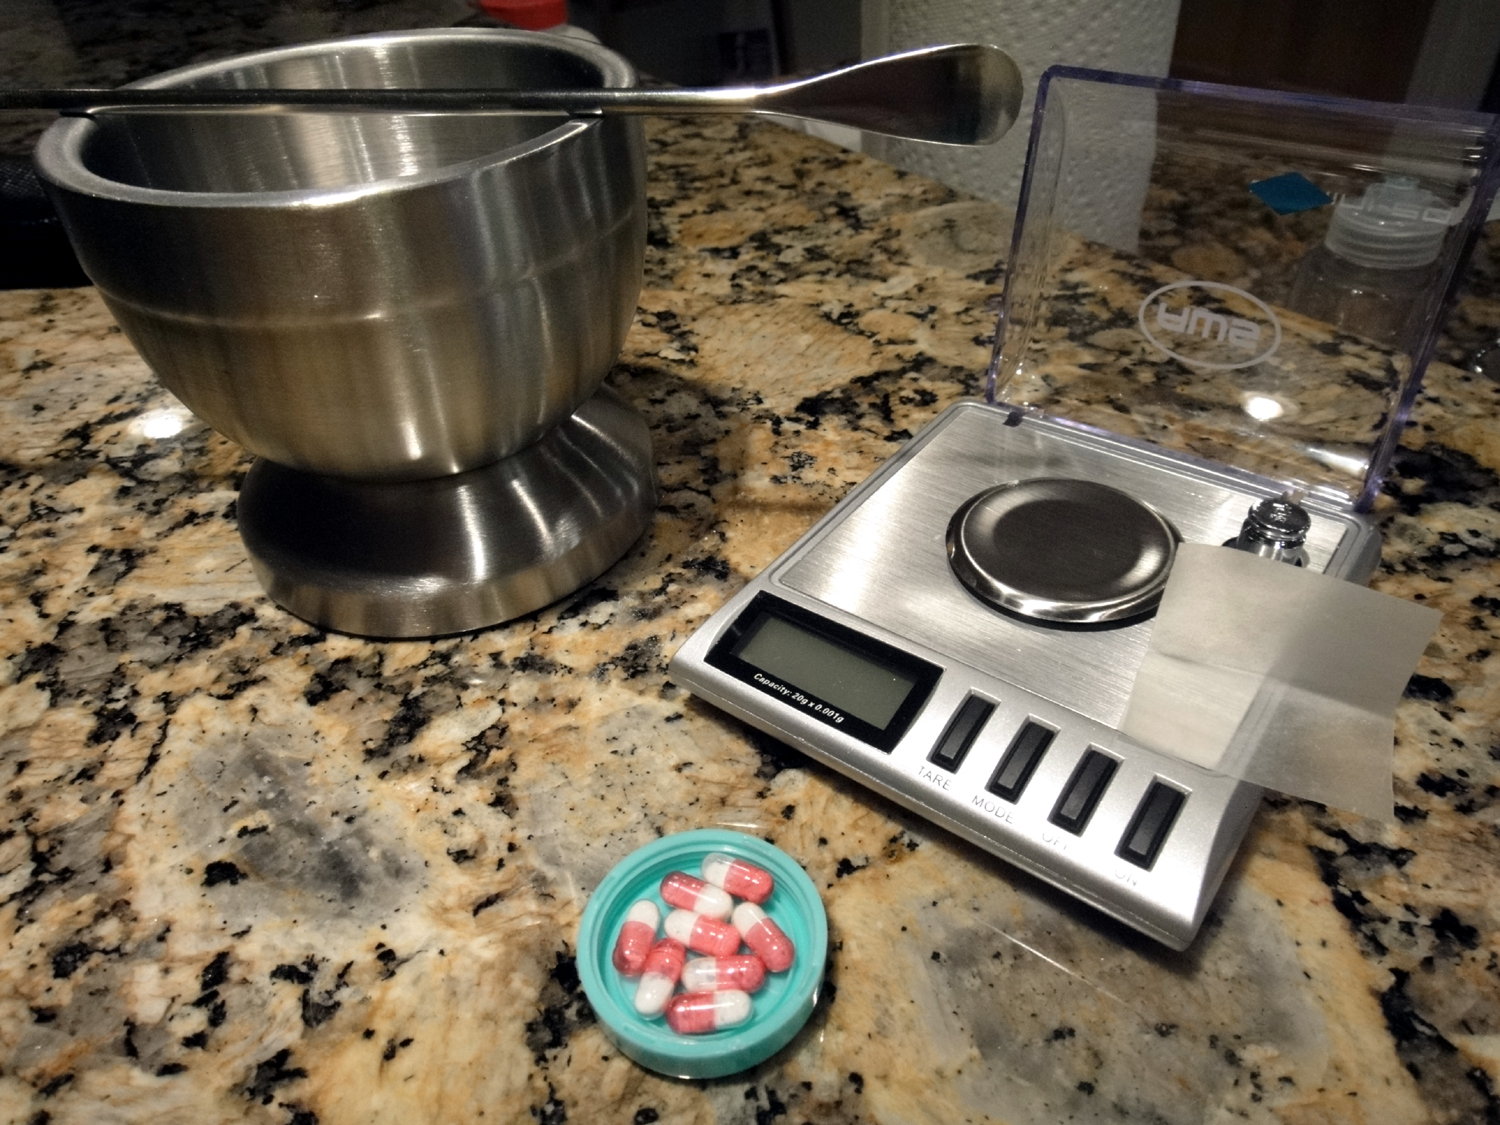
Back to Amazon… And in a couple of days I had what I needed:
* Updated April 11, 2021 – This scale has gone out of stock but the Amazon recommendation engine will happily point you toward an equivalent.
I had a few tablets on hand because I had just stocked up so I began by weighing each of them. There was a slight variation – just a couple of milligrams. I averaged the weights and divided the result by four – my quarter-tablet goal. Then I went to work.
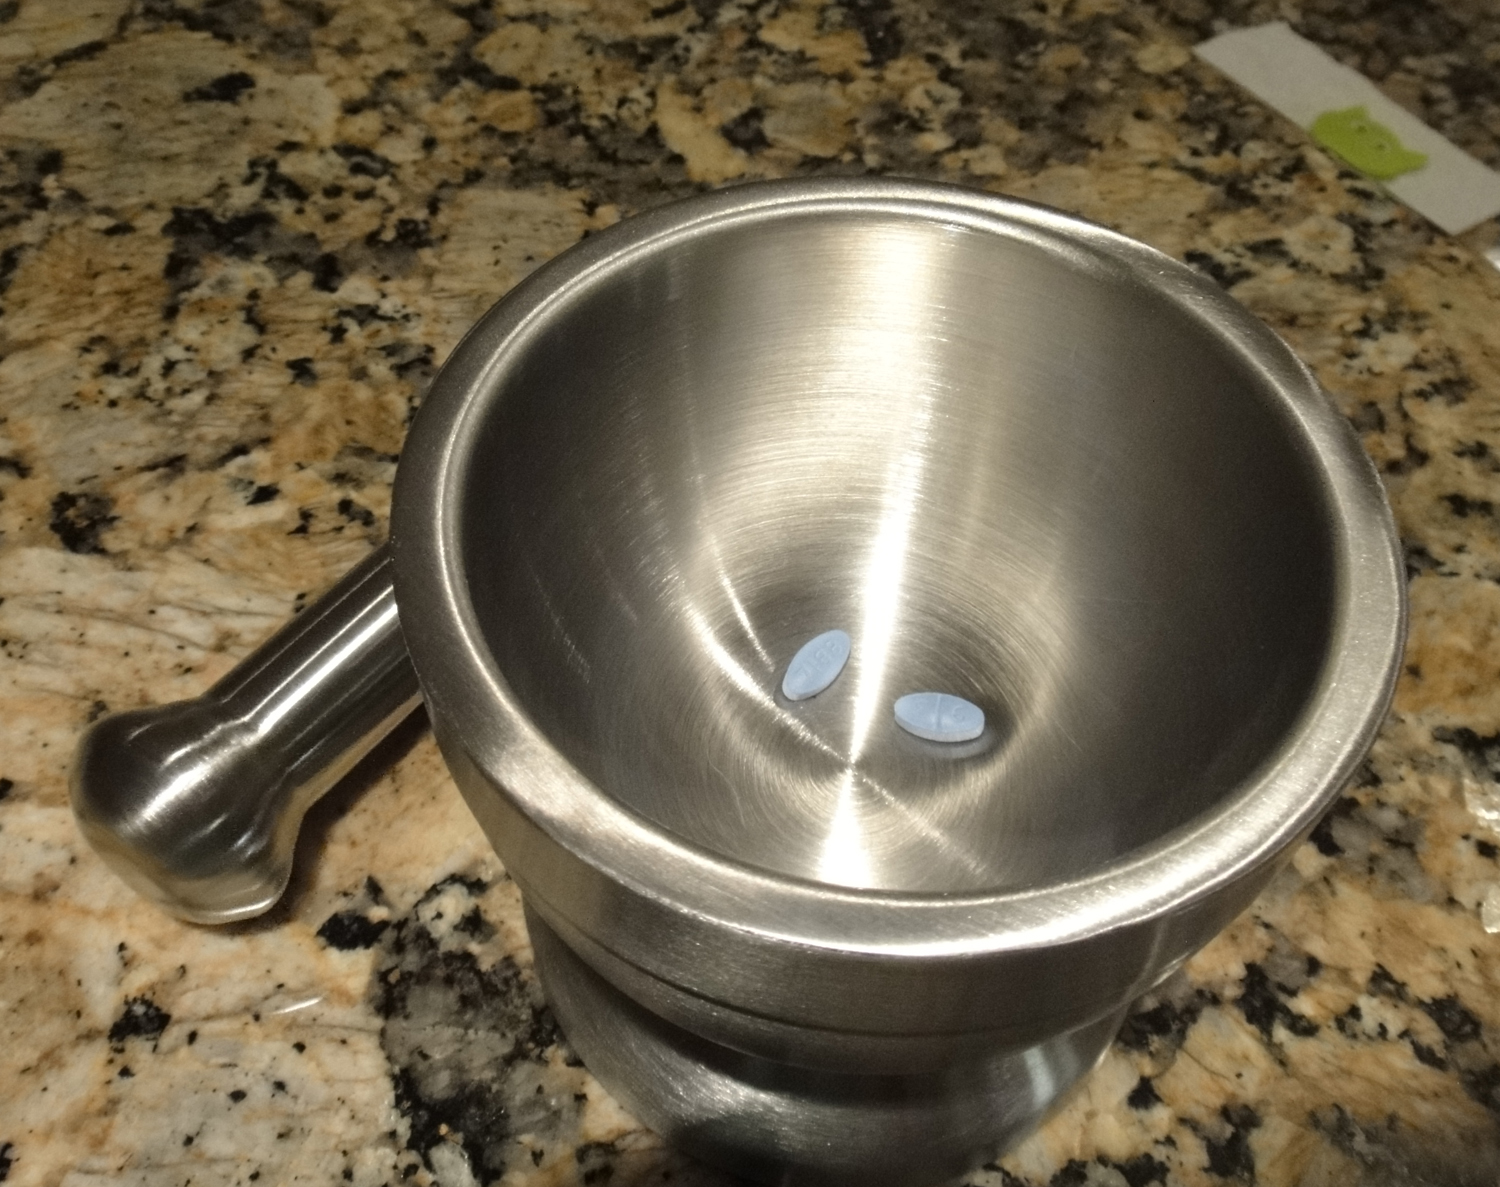
Two 10 milligram tablets are ready for crushing. 10 mg is, of course, the amount of the drug and not the weight of the tablets!
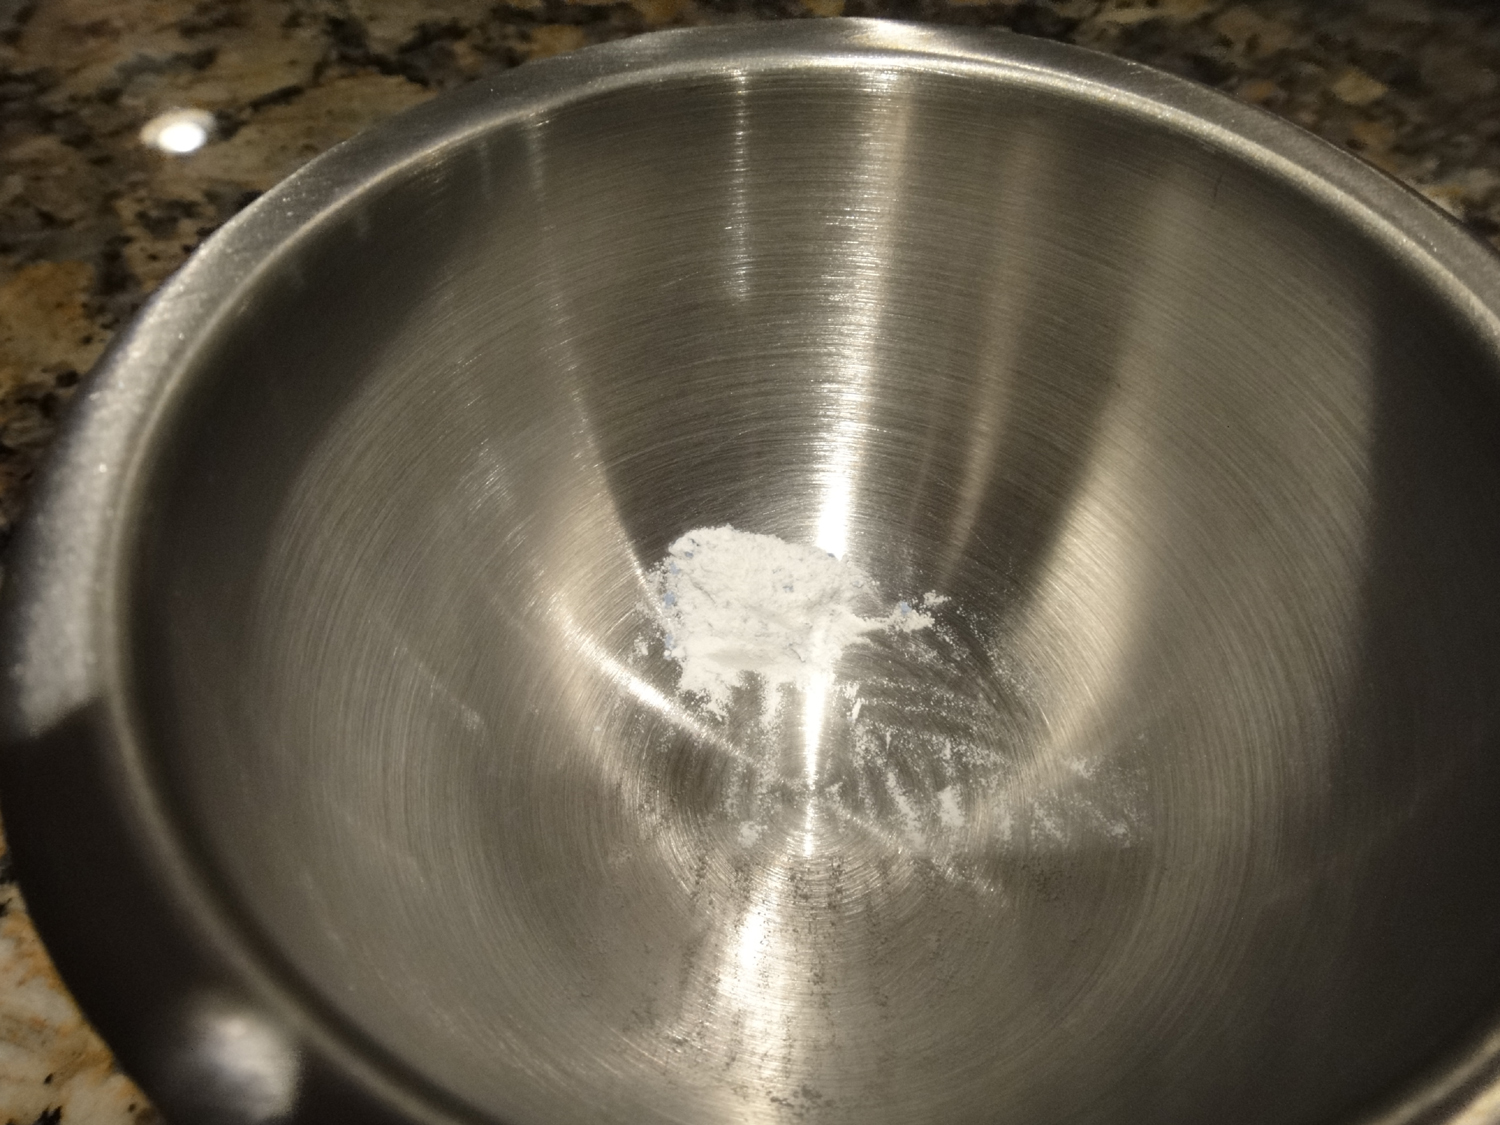
In a few seconds I’d reduced the tablets to powder. If you look closely you can still see some flecks of the tablet coating. It’s kind of like the candy coating a plain M&M, but much thinner, very hard and brittle.
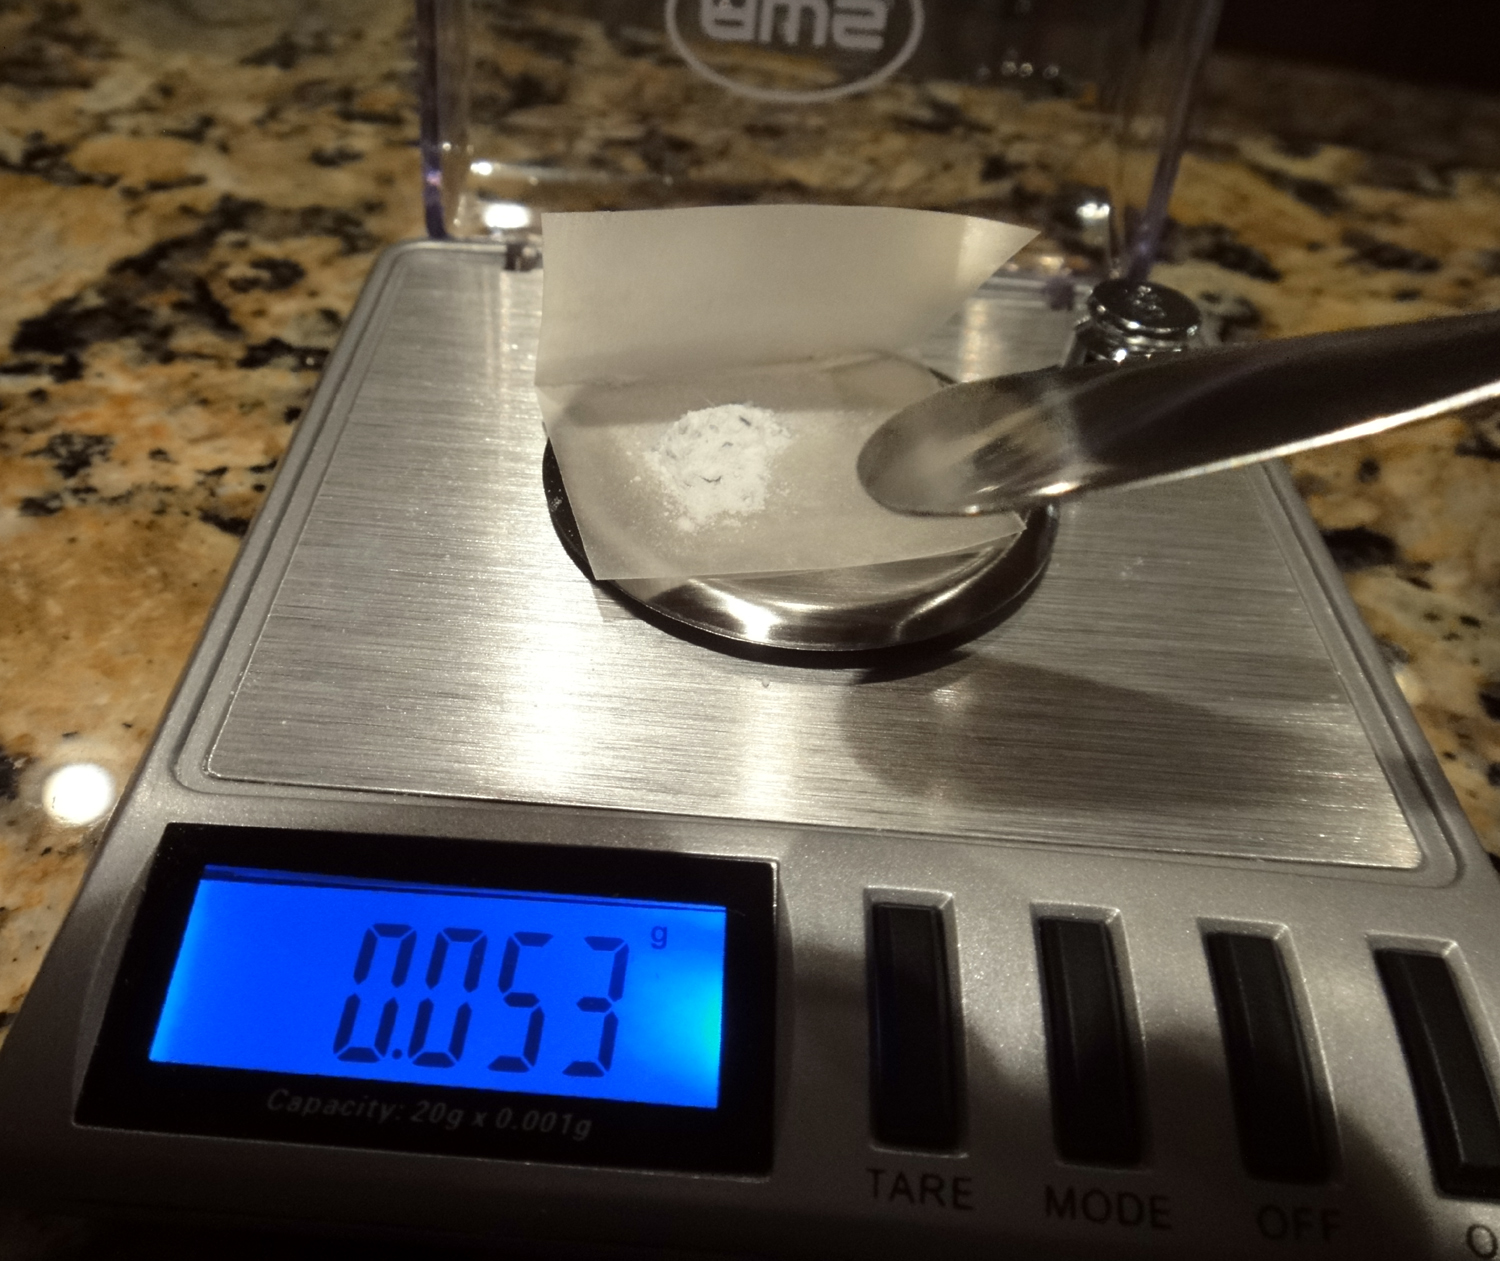
I’ve used the spatula to transfer 53 milligrams of pulverized tablet to a small square of waxed paper sitting in the weigh pan. They make anti-static squares for this purpose but I guessed that the Florida humidity would keep static under control. I guessed right. I creased the waxed paper to make filling the gel-cap easier. Needless to say, the scale is zeroed with the waxed paper in the weigh pan before adding product.
Here’s the setup and the finished work product. The hardest part is dumping the weighed powder into the size-5 gel-caps; it takes a steady hand and a good eye, but it gets easier with practice. Notice, there’s very little residue on either the waxed paper or the spatula, indicating that my static is under control.
The final result? Worth every nickel of cost and every moment of work!
That the evil, bitter taste is now gone is a clear win. And I’m convinced that consistent, accurate dosing is exactly what Wiley needs. He’s back to his old self! Our relationship is back on track, too.
The other day I learned something about Florida traffic law. The fine for “obscuring your license plate” is eleven hundred and fifty bucks!
The short story goes something like this. My barhopper’s plate holder’s pivoted. It can fold flat against the bike, out of the way. I’d been working in the battery box the day before and had the thing pivoted backward. I’ve scraped my calf a couple of times on the damned thing. Before hittin’ the street I completed the usual first-ride-of-the-day checks as the engine warmed – lighting, control operation, etc. – like I always do. But the plate’s position just didn’t register.
I guess I made it about fifteen miles or so before I got lit up.
Considering the LEO commented “I could have sworn there was no tag at all” when I explained, the stop went well. I wasn’t ticketed and I learned something. Turns out the fine is steep from folks running tolls, covering their plates to avoid the cameras.
Tension eased, I took the opportunity to ask after something mentioned to me a while back, that vertically-oriented plates were illegal here. They’re not illegal, and the other LEO (yeah, by then another patrol car had joined us) concurred. I may remount the plate for a cleaner look – and to avoid another mishap.
In a few minutes I was back on the road. As I donned my lid one smiled and said “Try to stay under a hundred, okay?” “And keep the front wheel on the ground,” the other added.
Owning a swimming pool is practically a requirement in Florida. Our pool, like many, uses a replaceable cartridge-type filter. The filtration system is simple, works well, and it’s easy to keep up. The trade-off for that convenience is the cost of the filter media.
In case you’re not familiar with these things I’ve included an image of a typical filter cartridge. It’s remarkably similar to an aquarium filter, but larger. Mine is about 2 feet tall and maybe around 10 or 11 inches in diameter. It’s basically a perforated plastic tube wrapped with a deeply pleated fiber media, with some support rings at either end. Situated vertically, water flows from the outside in, through the perforated tube, exiting through the bottom of the perforated tube. Any debris not caught by the skimmer basket and pump screen becomes trapped within the pleats.
A top-quality, name-brand filter cartridge costs around a hundred bucks.
My contractor suggested that frequent cleaning would extend the life of the media. It made sense. Cleaning is theoretically simple: direct a spray from a garden hose at the outside; work your way around the unit, letting gravity carry away any debris. In practice, the pleats make this a time-consuming task. And after a while, crouching on the ground with a spraying hose in one hand and stabilizing/positioning the cartridge with the other hand makes every minute feel like an hour.
I quickly learned that having spare cartridge on hand is a good idea. Swapping cartridges handling the rest of the maintenance to bring the filter system back online only takes several minutes, leaving one free to concentrate on the cartridge.
Filter Flosser. Quality made from aluminum, but not very effective. Click the image for an enlarged view and you’ll see why.
Over the years I’ve tried several tools and tricks. I first rigged a stand from PVC tubing to orient and support the cartridge at a comfortable height and angle. (It doubles as a towel rack poolside. Or maybe the towel rack doubles as the work stand?) Water everywhere! Cleaning was much more effective because it freed a hand to spread the pleats. But there sure are a lot of pleats and by the end of the job my fingers were raw! The media, it turns out, is kind of abrasive. I tried a tool called the Filter Flosser (inset), designed to concentrate a water blast between the pleats . That’s a pricey tool that’s not very effective. I even tried letting the media dry out, cleaning it with a jet of air from my shop compressor. That beat my fingers up even worse, took about as long as the garden hose and wasn’t as effective.
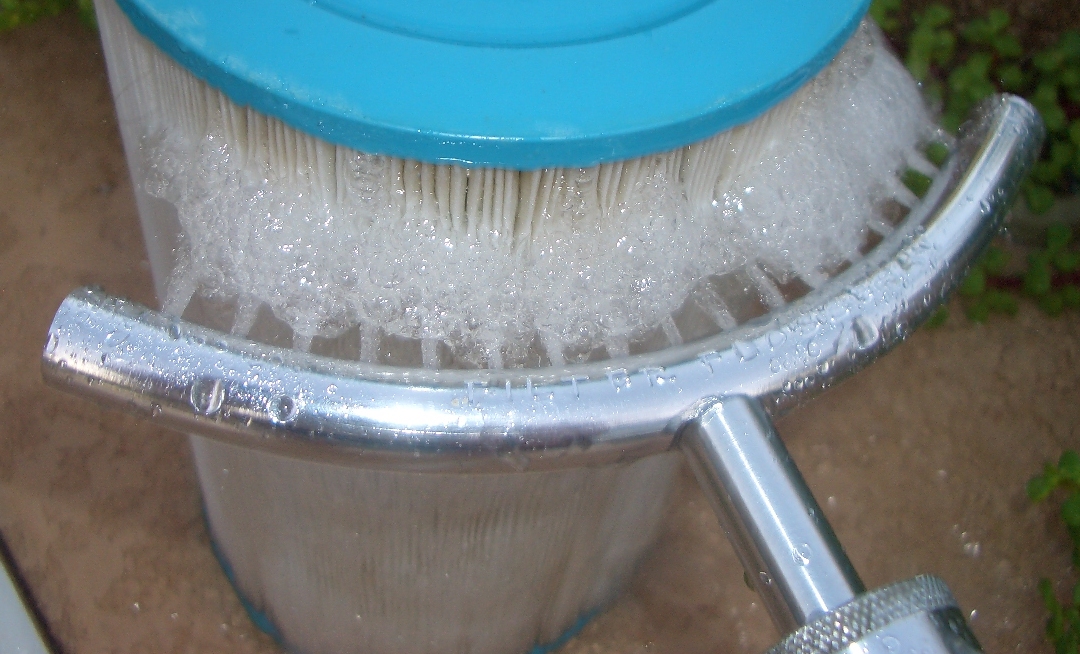
Enter the Aqua•Comb!
This awesome little unit caught my eye at the local Pinch-A-Penny, where I pick up chemicals and what have you. The guy behind the counter (who happens to own the store [at the time of writing – it’s a franchise and he sold it]) told me that he bought one for himself and it works great.
I thought the price was somewhat high for plastic. But it really does work, saves a ton of time, uses less water, and makes way less mess. Okay, the tag says “…as little as 5 minutes” so it could be more – and it is. But still, nowhere near the time it took by hand. The bottom line? Worth it!
Why? The comb teeth, for one. They get between the pleats, way down deep, and they save your fingers. The water jets are fewer and, thus, more powerful. It’s easy to direct the jets down for optimal water flow as the comb teeth provide access between the pleats. For complete coverage you do need to follow the instructions, but overall it’s so fast that what reads like repeat work really isn’t.
This tool – along with its derivative products – is going to make the inventor a well-deserved bundle of cash! What’s more, it’s an American company, making products from USA sourced material with American labor. Which is more than Harley-Davidson can say.
Here’s their website, go see for yourself. If you have a pool or spa using cartridge filters – or a horse or dog (use your imagination!) – and you do your own labor then you probably need this product.
Way back in 2008 Pam​ was outgrowing her computer, a P4-based HP laptop. Yeah, right. Remember those ‘desktop replacement’ laptops? Lots of power (well, for its day) but it must’ve weighed ten pounds. With a power brick that was about the size of a real brick. Yeah, you remember.
So I built her a desktop. Kick-ass (well, for its day) dual core Intel processor, three huge hard drives, gobs of memory, rockin’ graphics card to drive the bleedin’ edge HP monitor she saw at a Digital Life show… She named it Thor, and it was good.
Over the years Thor got his share of tweaks and minor upgrades. New drives here, more and faster memory there, but substantially the same old box. Fast-forward to today.
Thor’s been feelin’ the weight of the ages, actin’ flakey, a little unstable.
The guy in the brown truck brought some stuff yesterday afternoon. Motherboard, CPU, memory, power supply rated for the Intel Haswell chips… Almost a quarter of the cost was covered by rebates and other incentives. Free shipping. No sales tax.
Pam named it Kermit.
Kermit’s just burning in now. In a couple of weeks I’ll start messing around. Clocks, timings, and so on, tuning for performance. But for now, so far, so good.
So where’s my geek hat… Windows 10 activation/licensing was an issue, for a while. I was a little worried going in. Thor was on Windows 7, caught the free upgrade to Windows 10 back in July. No Key. What was gonna happen when the box booted? Kermit booted to a non-activated state and subsequent boots loading drivers and such remained non-activated. But after loading chipset drivers – the motherboard was WAY different – Windows 10 came up fully activated once again. Symantec activation and licensing was another hurdle. (Disclosure: We run their security product on our Windows desktops here, I recommend ’em and buy OEM licenses in bulk.) What happened was the existing license pretty much evaporated and jumped to an unused license in my pool of unused seats. I had a conversation with the folks at Symantec (online chat with ‘Ace’, actually – ‘Ace’ probably has too many consonants in his real name) and put the licensing right. No other gotchas so far.
So, what of Thor? Probably… clean him up a little, pull a chassis out of the back, stuff in some drives, install a Linux server image, and put him to work. No rest for the weary here; earn yer fuckin’ keep!
When I was in my twenties I went through one of my car-less periods, only a motorcycle for basic transport. Rain or shine, winter or summer, I rode. Jerry, a guy I knew, felt bad for me one wintry day. He gave me a car.
I don’t recall the year, but it may have looked something like this. Certainly not as clean.
It was an old Dodge Dart. I don’t recall the year. If you’re anywhere near my age you’ve probably seen thousands upon thousands of these old Dodge Darts on the road. They were bulletproof: slant-six engine; three-speed on the column; torsion-bar suspension; bench seats complete with the saggy back rest. This one was blue. The interior was all musty from sitting in Jerry’s mom’s backyard for months and months. (She may have pressured him to get it out of there, helping lead to my good fortune.)
I remember when Jerry bought the Dodge. He wasn’t much of a mechanic and he had asked for my help with its assessment. “The clutch is slipping some,  you’ll need to replace it eventually. But otherwise it’s reasonable.†I think he paid a couple hundred for it.
When I got my hands on that old Dodge the clutch was still slipping some. The engine had two operating temperatures: hotter than hell, and hotter than hotter than hell. Coolant boiled out regularly; the water jugs in the backseat were a permanent fixture. But that ol’ engine never faltered, not once. In fact, it always delivered excellent heat. And judging by the sludge in the crankcase I don’t think Jerry ever got around to changing the oil in the couple of years he had it. I know I didn’t.
I used to have fun with that slippery clutch! I knew a new friction plate would be cheap and easy to install. It became something of a game to see how much abuse the poor little clutch could take. I’d wind that little engine for all it was worth and sidestep the pedal just to catch a whiff of the burning plate.
I was using that very technique to enter the highway, pulling out of a local titty bar one afternoon, when the clutch signalled it had finally had just about enough. The sound was odd and clunky – not good at all. A bit of friction remained, though, and the car lurched ahead. I didn’t dare touch the pedal during the short ride home.
The decision had been a sound one. The very next pedal depression was its last. Oh, the pedal would move alright, but it no longer mattered. Engine on or off, pedal or not, any gear could be selected at will while the car no longer moved on its own.
So the next weekend I picked up a friction plate, release bearing, and other assorted parts and set to work. The drivetrain and transmission came out easy enough. But what remained of that poor clutch was a sight to behold. Some dust and shredded friction material along with some broken metal fell out of the housing to the asphalt. It was one of those moments that fairly begged for a digital camera. But this was WAY before that technology became ubiquitous. In short order the new clutch was again transferring engine power to the transmission!
I was working in Bridgeport, Connecticut at the time and Monday morning I set out from my New Jersey home with confidence. With a week’s worth of clothing (and several water jugs) in the backseat, all was well with the world and the ride up Route 95 went without incident. But as I reached the job site there was a mighty clunk from the front end as the left front quarter sagged nearly to the ground. A quick look confirmed my suspicion: the torsion bar had broken free, its mount in the frame rusted out.
At the end of the day, before I checked into my hotel, I found a salvage yard and limped the old Dodge to its final resting place.
The yard operator paid me just about enough to cover my clutch parts.
Introduction
Back in January I wrote an article about remedying failed certificate errors in Eudora. The article came about because I had a problem, the solution I puzzled out wasn’t terribly obvious, and I hoped to help others in a similar bind.
The article exceeded my expectations! Go read the comments and you’ll see what I mean. I’ll wait.
I’ve learned a lot, too! There are WAY more Eudora enthusiasts than I had ever imagined. There’s a rather active, reasonably high signal-to-noise ratio mailing list dedicated to Eudora for Windows (eudora-win@hades.listmoms.net) where you’ll find plenty of expertise. There I learned a few other tweaks and adjustments that have made my Eudora experiences even better, despite my many years using it.
Thank you all for your support and for passing my article around! I can’t believe some of the help desks it’s touched.
Criticism
While the solution I discovered was effective, I received criticism that it was more complicated than necessary. There’s no need to go through the steps to import or install a certificate, I was told, and in fact, the import/install steps could actually lead to other problems.
I’ve since learned that this is largely true – although I haven’t heard of any instances where trouble actually resulted from the import/install steps I outlined.
This article presents a shortened solution. It omits the unnecessary steps and borrows a bit from stuff on the mailing list. It includes images of the dialogue panels you can expect to see – because I received a ton of positive feedback on that.
Revised Steps
Once again, I’m using Eudora version 7.1.0.9. I can’t think of a single reason anyone should use an earlier version. I’m also running on Windows 10, which should lay to rest any doubt that Eudora runs just as well there as ever. I think that’ll stay true until email address internationalization becomes a standard and gains traction.
A quick word about the dialogue panel graphics shown in this article. They’re actual screen shots so the default action button appears slightly different from the other buttons. (This graphic, for example, shows the Close button as the default action.) In the instructions which follow, however, the button(s) that require clicking are not necessarily the default action.
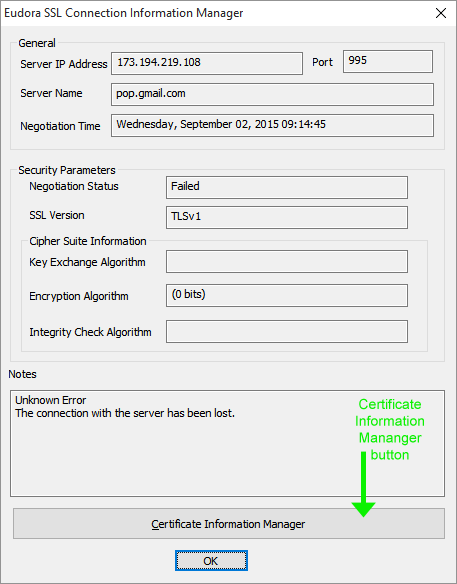
It’s most likely that you’ll encounter a certificate rejection when checking email; most of us check email more often than we send. And failures occur with increased frequency lately with Gmail; they seem to change certificates more often than other providers. So let’s assume that’s the case and Eudora has thrown this error panel at us during a check on Gmail:
Server SSL Certificate Rejected during a Gmail check.
Take note of the Eudora Persona which produced the error, if you can. A clue sometimes be seen in the status area. In our example it’s one of my Gmail accounts.
The status area at the bottom of the screen may provide a clue as to which Persona has produced the certificate error.
If you use multiple Persona in Eudora and can’t tell which one experienced the certificate rejection then you’ll need to look at each until you find the correct Persona to adjust. Working with the wrong one will just frustrate you. We’ll come back to this a little later.
For now, Click the Yesbutton in the Server SSL Certificate Rejected panel. Clicking Yes won’t actually fix the problem but it’ll let Eudora finish the tasks that are running. Allow Eudora’s activities to continue until they complete.
Without closing Eudora, access the Properties of the Persona with the rejected certificate. In our example, we know the rejection occurred during a mail check so we’ll access the Incoming Mail tab of that Persona. The Properties appear in the Account Settings panel.
The account settings panel for the Persona that rejected the certificate. We’re looking at the Incoming Mail tab because we know the certificate rejection occurred while checking for new email. Had the rejection occurred during a send we’d be looking at the Generic Properties tab instead.
Click the Last SSL Info button. The Eudora SSL Connection Information Manager panel appears.
The Last SSL Info button will only show this panel if this Persona has used SSL since Eudora was last launched. The green arrow indicates the Certificate Information Manager button mentioned below. Yes, that large grey bar is a button!
Click the Certificate Information Manager button, which I’ve indicated with a green arrow in the graphic above. DO NOT click OK if you are trying to get to the Certificate Information Manager. The Eudora Certificate Information Manager panel appears.
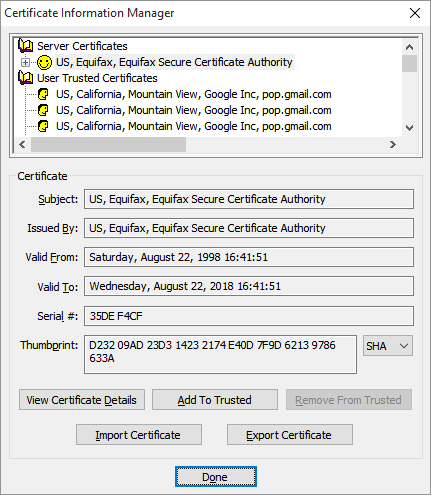
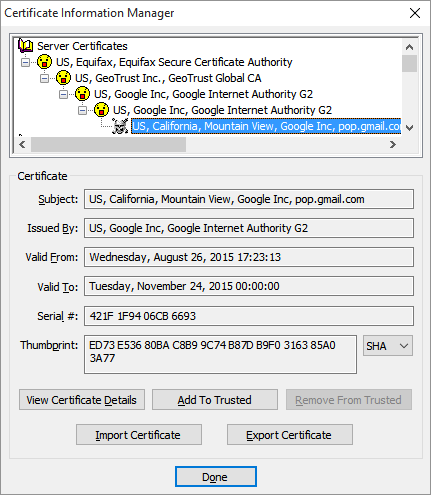
The Certificate Information Manager displays and allows you to manipulate the certificate chain.
Looking at the top-most section of the Certificate Information Manager panel, the first row under Server Certificates (that’s the topmost row with the smiley face in the image above) contains the rejected certificate. You can’t actually see the problem certificate yet because it’s actually the last (or near the last) in a chain of certificates. Like the layers of an onion, you can’t see inside until you remove a layer. (Some refer to it as a series of locked doors, where you need to unlock one before you can see the next.) In any case, the rejected certificate we seek is inside. Click the plus sign next to the top smiley row to expand the chain, which is like peeling away the first layer of the onion.
Here we’ve expanded the chain of certificates just once. Notice the smiley face icon we saw earlier changes to an open mouth. The expansion has revealed… another certificate with another smiley face – the next link in the certificate chain.
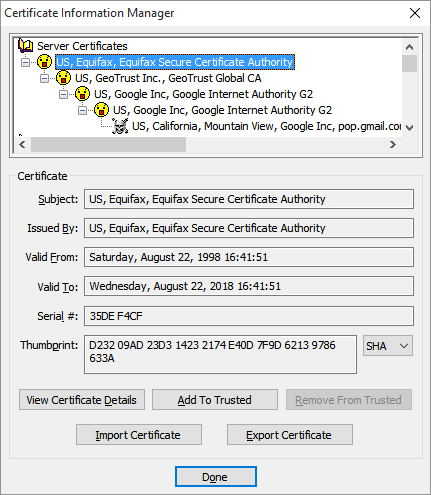
Keep expanding the certificate chain by clicking the plus sign of each certificate in turn, peeling away layer after layer of our imaginary onion. Eventually you’ll see a skull and crossbones icon instead of a smiley face.
Here we see the fully expanded certificate chain. The final certificate – the one with the skull and crossbones icon – is the one that was rejected because it was untrusted.
In this example I needed to expand the chain four times to reach the problem certificate. You may need to expand the chain more times or less times, and that’s perfectly okay.
Remember several steps back I mentioned working with the correct Eudora Persona when chasing a rejected certificate, and that I’d come back to it later? Welcome to later.
Let’s imagine for a second that we took all these steps and expanded the certificate chain all the way to the end – no more plus signs to click – yet didn’t end up with a certificate marked with a skull and crossbones. What then?
Simply, it means that we’re looking in the wrong place! If you’re not seeing the rejected certificate you can’t very well fix it, can you? So if you gotten this far with no skull and crossbones then close the Certificate Information Manager panel and close the Eudora SSL Connection Information Manager panel. Choose another Persona to work with (or the other tab of the Persona if you don’t know whether you were receiving or sending when the error appeared) and try again.
In order to get Eudora to accept the failed certificate you must first find it! And it’s indicated by a skull and crossbones icon. No skull equals no fix. This is sometimes a point of frustration.
But let’s assume that you have found the certificate with the skull and crossbones. Select it by clicking on it, so it looks like this in the Certificate Information Manager:
The rejected, untrusted certificate with the skull and crossbones icon is selected.
Now we’re ready for action!
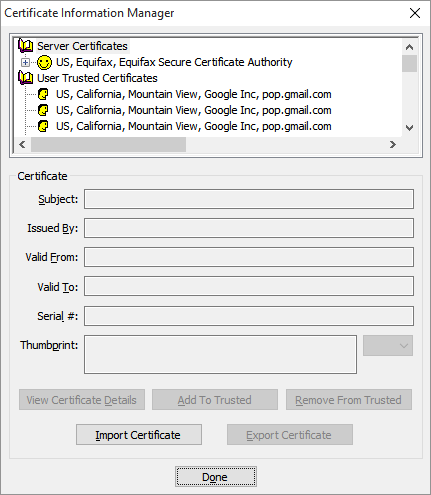
Click the Add To Trusted button. When you do that the certificate chain we took so much trouble to expand will contract. The Certificate Information Manager panel will look much the same as it did when we first opened it.
The Certificate Information Manager panel just after the Add To Trusted button is clicked.
All that’s left to do is dismiss all these panels and test.
Click the Done button in the Certificate Information Manager panel to dismiss it. Click the OK button in the The Eudora SSL Connection Information Manager panel to dismiss it. Click the OK button in the Account Settings panel to dismiss it.
Finally, try collecting (or sending) your email again.
Did it work? It did? Great, you’re done. Well, until next time Eudora rejects an untrusted certificate.
Oh, wait, it didn’t work? Don’t panic. Just go back and follow the steps again.
Think back to the certificate chain, the onion layers, the series of locked doors. You need to trust a certificate in the chain before you can see what lies beyond it. The next run though the steps you’ll find that the certificate chain expands one more time before revealing another certificate with the skull and crossbones icon. When you find it, trust it and test again.
As non-intuitive as that may sound, you may need to step through the fix two or more times before achieving success.
Conclusion
If you compare this discussion to my earlier article you’ll see that there are actually WAY fewer steps. Once you’ve gotten through it a few times (and you certainly will if you use Gmail) you’ll see that trusting new certificates only takes a handful of clicks.
Yes, this article seems/is long and ponderous, with several panel images that look nearly the same. That’s because I’m trying to do a better job describing the areas about which I’ve fielded many questions privately.
A tip o’ the hat to Jane who, after working through some frustration, circled back to tell me what she had learned. Jane helped bring clarity to a possibly confusing section of this article. Thanks!
I never had poison ivy, never in my life. I could handle the stuff, nothing. “Lucky you,” the doc said when I asked, “you’re just immune.” Until that time back in 2001…
My dad had two rows hedges he wanted removed. There was plenty of poison ivy in those hedges, which is one of the reasons he wanted ’em out. When he trimmed ’em he’d get some poison ivy for his trouble. I told him I’d handle it.
So one morning I set to work. I crawled under each bush, wrapping the bottom with my trusty tow strap. Attached the loose end to the front of my Jeep and yanked the thing out by the roots. Then on to the next. One after another, about 80+ linear feet all told. Some came out easy, some not so, requiring more wrestling to re-attach the strap and/or dig with a shovel or pickaxe. Then haul it all out to the street by the armload Sweaty, dirty work it was.
The shower felt pretty good.
By nightfall the itching and oozing had set in bigtime. I woke up looking like the Michelin man.
I figured it’d go away pretty quick. After all, I was immune. I figured wrong.
After a couple of days of agony I dropped in on the local doc. He walked into the examining room, took one look, turned and left without a word. Came back with shots and gave me a prescription for 15 days of prednisone (ultra-high dose immediately, then very high and tapering off in five-day increments). Hydroxyzine hydrochloride, too, several times a day for the duration. And finally, some kind of voodoo ointment (Diprolene AF) to help combat the external symptoms.
“But I’ve always been immune! WTF??”
“No more,” he told me, “those days are over for you. You got yourself one severe overdose.”
Over the next couple of weeks my skin slowly dried up as the itching and oozing subsided. And I put on a good fifteen pounds, too, because I ate everything in sight. I was famished-hungry 24/7. Fucking steroids.
And yes, today I’m sensitive to the damned plant. Not as bad as some, but enough that I treat it with respect.
I planned to follow-up the first article after about a week but you know how that goes sometimes…
New oddity with Windows 10. Since it has to do with wi-fi connectivity it could be vitally important for some, so here goes.
Basically, IPv6 works perfectly but IPv4 does not – at least not completely, and at least not for me. In the context of the web, it means that any site that’s IPv4-only becomes pretty much unreachable. That’s a lot of the web!
Here’s how I discovered it. I’ve had wire line phone trouble over the past few days. Interestingly (and thankfully!) my ADSL (1 pair of 2 coming into my home) remained fine while my dial tone went away. The voice pair indicated itself as permanently in-use and the pair at the demarc, when I tested, indicated reverse polarity. Today a tech came out, verified that the problem was on their end, and went to work.
He disconnected me out at the pedestal while he worked so I figured I’d simply use my smartphone’s hotspot. I use the feature often enough because it speeds my Internet connection by a factor of 35 or so over my wired ADSL connection. But this was the first time I needed to use it since Porky’s Windows 10 upgrade.
The hotspot connected straight away. I pointed my browser at the host I was working on and it reported ‘no connection’. I gave Google a quick ping and it answered – with its IPv6 address. I gave my target host a ping and it didn’t answer at all. I forced an IPv4 ping to Google (using ping’s -4 flag) and it, too, refused to answer.
I probed Porky’s network configuration for a while but haven’t come up with anything definitive yet. Until I do, the Windows 10 upgrade for the TwoFace2, our Surface Pro, is off the table. We use that little box often when we’re out and about at client sites and stuff, getting Internet through our smartphones when we do. Having that not work, or work only with IPv6 hosts, is not an option.
Oh, and if you’re wondering, the tech located two separate problems (!) with my voice pair between here and the CO, some 12,000+ feet away. (“Probably all this rain,” he said, “or maybe squirrels. Kill ’em if you see ’em, okay?”) He said he reassigned me a clean pair which restored my dial tone. I resisted the temptation to bitch about their antique DSLAM and just thanked him instead.
Shortly afterward the skies opened up. It’s the rainy season, after all.
Like millions of others, I’ve been running Windows 10 in a non-production environment for months and months. Mostly on virtual machines, the experience has been… pretty good!
But all the playing in the world is no substitute for a live update to a production OS running a production application load. Here are my experiences with Porky, my work-a-day desktop. Porky’s no slouch in the performance department. As we like to say sometimes, your mileage may vary.
Getting Ready For those wanting to jump right in Microsoft has provided a Media Creation Tool. The tool handles the download for your chosen Windows 10 version and produces either an ISO file or a bootable USB thumb drive. I initially chose both 32-bit and 64-bit Windows 10 Pro versions and elected to produce an ISO file. To my dismay, the result was a file that’s too big to burn to DVD. Bummer, intermediate files are cleared when you finish with the tool so I couldn’t simply make the bootable USB stick without another lengthy download. The moral is that unless you enjoy a blazing, unmetered Internet connection, choose carefully when running the tool.
Use the resulting ISO or USB stick to either upgrade OR do a clean install. This is important: to upgrade your license key and activate Windows 10 you must UPGRADE your already installed, qualified Windows version FIRST. Do that by running Setup from the media. After you’ve upgraded and activated, if you wish, you can use the same media to do a clean install by booting it. Activate your clean install using your upgraded license key.
The remain preparation was simple. Over the past week or so I’ve reviewed applications, drivers, and so on, and upgrading/updating where necessary. And just before I imaged the boot drive. I verified and tested the image. Then I backed up Porky’s data drive array to an external drive. If Windows 10 left a smoking hole in my floor my data would still be safe.
Upgrade Duration
The upgrade took a while, which was a surprise. Not counting the download over my coffee-stirrer of an Internet pipe, upgrading my test environments – and the releases came hot-and-heavy toward the end – took only tens of minutes. Porky, by contrast, took well over an hour to complete. What’s more, there were a few periods of inactivity where progress appeared to stop altogether. If I had less patience I might have bailed. Instead I rode it out. Eventually a desktop appeared, sorta.
What’s this? VGA?
Porky settled into its first Windows 10 desktop in VGA mode, using only one monitor! The screaming fan of the mid-range Nvidia card was the clue and Device Manager confirmed that Microsoft had inserted their own generic display driver. A 280+ MB download from Nvidia plus a bit of fiddling fixed that.
Sleep
It was getting pretty late; the sun would be up soon. Even though Porky’s cold starts are lightning fast I use S3 sleep for a week or so at a time, which makes starts near instantaneous. Bump the mouse and it’s ready to work by the time my ass hits the chair. So that’s what I did in Windows 10.
When I returned to the office, coffee in hand, Porky was awake. Fans were screaming (not a good sign), the keyboard backlight was dark, and both keyboard and mouse were unresponsive. I leaned on the power button and Porky went down hard. I counted ten and powered up.
What the??? It was almost as though S3 sleep had worked after all!
Something’s flakey with recovering from the S3 low-power state. I’m not sure what. But I’ll be cold starting Porky until I get it sorted.
Start
I’m already used to the new Start menu, but that didn’t prepare me for the devastation the upgrade would bring. I’ve used the non-desktop, tiled interface in windows 8.1 as nothing more than an application launcher. I grouped my typical application loads together and my scroll finger had learned to horizontally move to the correct group. Finding things was easy!
The new Start menu seemed to have been filled by madmen on drugs. Finding stuff will be a pain in the ass until I could get organized. And sometimes, stuff just seemed to be missing altogether…
Missing Applications?
SmartFTP was the first of the missing. After confirming that it was still installed I ran a Repair sequence with its installer to bring it back. The installer complained, leaving a blank desktop in its wake. Via Task Manager I ran explorer.exe to get it back. The SmartFTP client runs, but it’s got some visual artifacts and the interface has some glitches. I guess the vendor will be updating that sucker pretty soon.
Have other applications fallen off the Start menu? Dunno, time will tell.
email
It’s no secret that I’m a heavy user of the venerable Eudora email client. It worked great in my test environments so IÂ expected no problems. One click and the mail flowed.
Eudora hasn’t been maintained in nearly a decade. Kudos to its development team. The old girl lives on!
The first email check of the day usually brings me a bunch of stuff to do so I busied myself with that.
Performance
Microsoft has managed to do it again. I said before: Porky’s no slouch. Yet every (modern) Windows upgrade - 7 to 7SP1 to 8 to 8.1 to 8.1 Upgrade 1 to (now) 10 – has brought a noticeable performance boost. I’ll take it.
Other Weirdnesses I’m only mentioning  odd stuff I notice. If I don’t mention it here then either I don’t use it or it seems okay.
SmartFTPÂ I covered earlier.
Microsoft Word put itself through a series of gyrations with dialogues popping up and going away faster than they could be read. But that was just once. Thereafter it launched just fine. This was version 2010, by the way. I’ve seen no compelling reason to upgrade Office.
Adobe Acrobat 9 Pro Extended requested a Repair process when first launched. It took a while and asked for a reboot afterward. This is version 9, by the way. Acrobat’s expensive and this one works for me. The Repair sequence, available from the Help menu, took care of it. I can remember needing to do this before but can’t remember when or why, and I’m too lazy to search the system notebooks.
Cold starts will sometimes fail to load the driver for the Ethernet hardware on my motherboard. Porky’s cabled directly to my router through 1 of 2 available Ethernet ports on my motherboard. The port in use identifies itself as an Intel I210. The driver identifies itself as an Intel driver version 12.12.50.6. Near as I can tell, this is the latest and greatest, the Intel site shows nothing newer for Windows 10. The problem shows as a ‘no network’ condition, in Network Connections the adapter shows as Disabled and won’t Enable. In Device Manager, Update Driver Software finds a local driver, loads it, and the connection sets itself up straight away.
Conclusion
So far, this is less than a half day of experience following my Windows 10 upgrade. A few inconveniences, no showstoppers. I have yet to exercise the new stuff. This article is basically in the name of remaining productive, to help you decide whether to go ahead with your upgrade or wait it out a little.
Typos, bad grammar, and all that crap are my own. In the interest of speed, hey, you get what you pay for.

 Gallery3 platform but that hasn’t been supported for several years now.
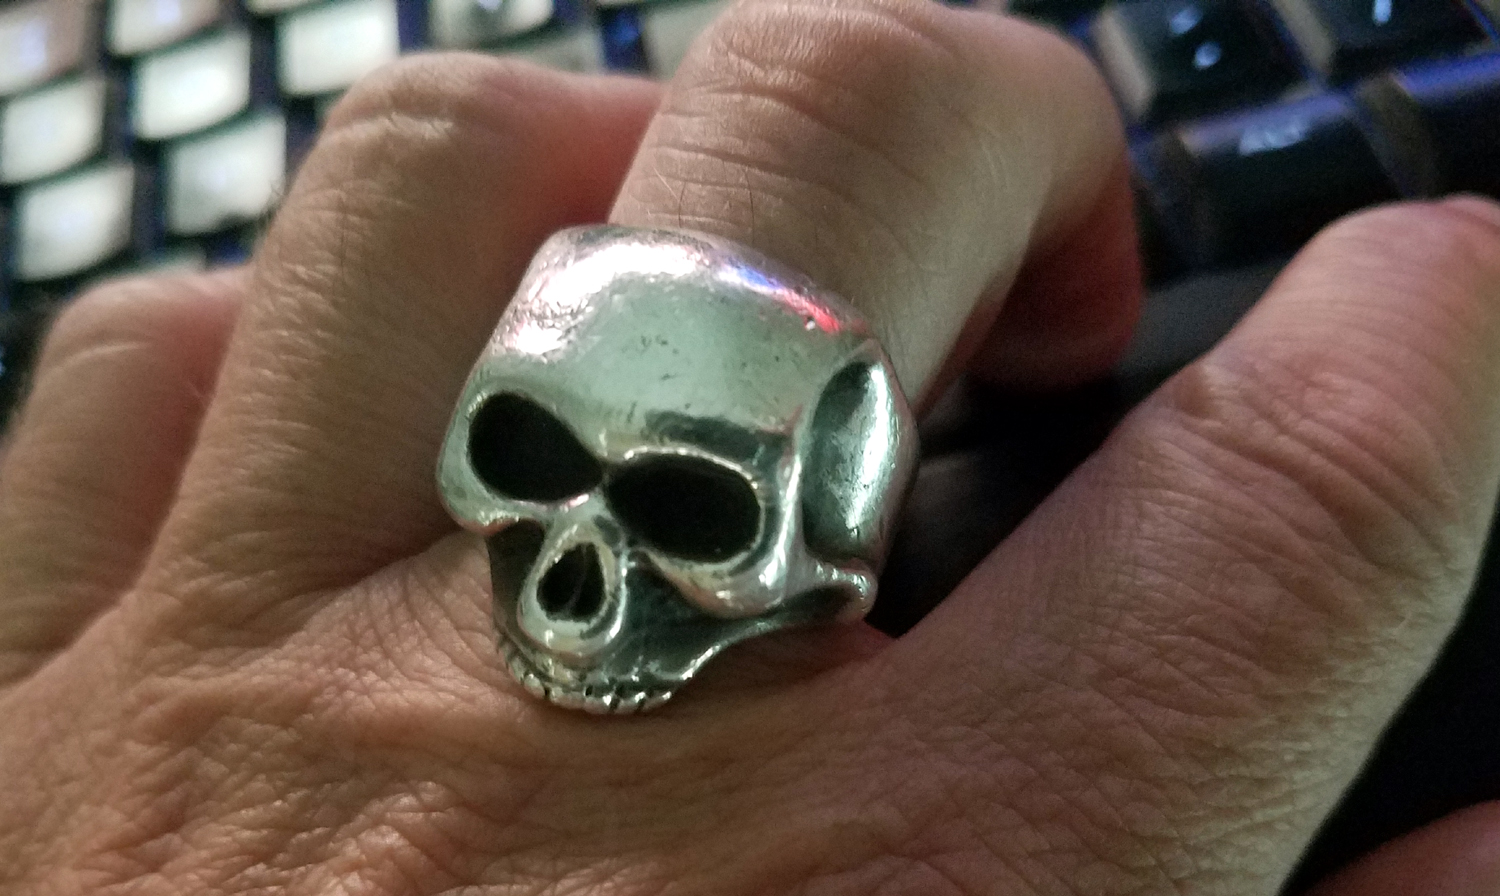


 been working in the battery box the day before and had the thing pivoted backward. I’ve scraped my calf a couple of times on the damned thing. Before hittin’ the street I completed the usual first-ride-of-the-day checks as the engine warmed – lighting, control operation, etc. – like I always do. But the plate’s position just didn’t register.
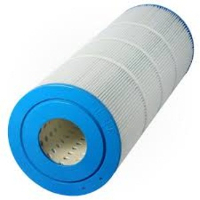

 Thor’s been feelin’ the weight of the ages, actin’ flakey, a little unstable.
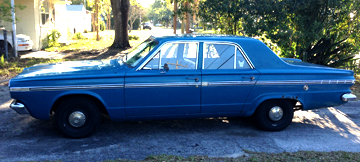
 Introduction


 My dad had two rows hedges he wanted removed. There was plenty of poison ivy in those hedges, which is one of the reasons he wanted ’em out. When he trimmed ’em he’d get some poison ivy for his trouble. I told him I’d handle it.